Cart

  Discount
  Subtotal

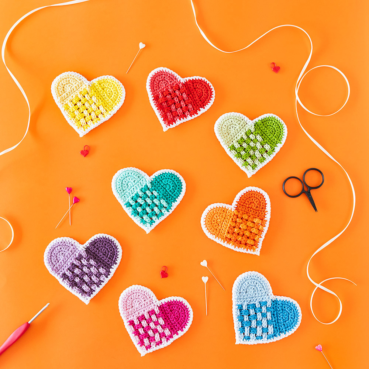
Crochet coasters: Roller Coasters

09.Nov.22 / Kirsten Ballering

Round and round and round these Roller coasters go, where they'll stop, that's up to you! You can create a set in an evening, making them a perfect quick and easy DIY crochet coaster gift!

Materials and preparation

You can create 3-4 base coasters from one 25g ball, and you only need small amounts of yarn for the contrast colour(s).

Yarn

Grey and bright blue coasters

Scheepjes Catona (100% mercerised cotton, 25g/62.5m)
  • Colour A: 242 Metal Grey x 1 ball
  • Colour B: 146 Vivid Blue x 1 ball

Grey and Green-to-deep-blue coasters

Scheepjes Catona (100% mercerised cotton, 25g/62.5m)
  • Colour A: 242 Metal Grey x 1 ball
  • Colour B: 515 Emerald x 1 scrap
  • Colour C: 146 Vivid Blue x 1 scrap
  • Colour D: 261 Capri Blue x 1 scrap
  • Colour E: 400 Petrol Blue x 1 scrap

Grey and purple-to-blue coasters

Scheepjes Catona (100% mercerised cotton, 25g/62.5m)
  • Colour A: 242 Metal Grey x 1 ball
  • Colour B: 400 Petrol Blue x 1 scrap
  • Colour C: 201 Electric Blue x 1 scrap
  • Colour D: 282 Ultra Violet x 1 scrap
  • Colour E: 251 Garden Rose x 1 scrap

Grey and yellow-to-red coasters

Scheepjes Catona (100% mercerised cotton, 25g/62.5m)
  • Colour A: 242 Metal Grey x 1 ball
  • Colour B: 115 Hot Red x 1 scrap
  • Colour C: 189 Royal Orange x 1 scrap
  • Colour D: 208 Yellow Gold x 1 scrap
  • Colour E: 522 Primrose x 1 scrap

Grey and Green-to-yellow coasters

Scheepjes Catona (100% mercerised cotton, 25g/62.5m)
  • Colour A: 242 Metal Grey x 1 ball
  • Colour B: 522 Primrose x 1 scrap
  • Colour C: 245 Green Yellow x 1 scrap
  • Colour D: 513 Apple Granny x 1 scrap
  • Colour E: 515 Emerald x 1 scrap

Shop the yarn

You can buy Scheepjes Catona via Scheepjes retailers, such as:

Crochet hook

4.5 mm hook (US size 7).

Measurements

A finished coaster measures 10cm (4in) in diameter.

Gauge/tension

Gauge is not critical for these crochet coasters.

Abbreviations (US Terms)

  • ch: chain
  • dc: double crochet
  • ss: slip stitch
  • st(s): stitch(es)

Repeat formats

  • (…) once/twice/3x Crochet the instructions between brackets the total number of times indicated.
  • […] Indicates the amount of stitches at the end of a row or round.
 

stay in the loop

Join the Haak Maar Raak community mailing list and receive the complete PDF guide to blocking for free!

You’ve successfully signed up! Check your email for details.

Crochet pattern

Crochet Coasters

With your main colour, crochet a magic ring. Alternatively, you can ch3 and join the third chain with a ss to the first ch, thus creating a circle. However, the advantage of a magic loop is that you can pull it tight, leaving no gap in the middle of your work.

Round 1 Ch3 (counts as first dc throughout pattern), 13dc in magic ring, join last dc with ss to third ch of beginning-ch. [14 dc]

Round 2 Ch3, (2dc in 1 st) 13 times, 1dc in the same stitch as where you started the ch3 (near the arrow in the picture below), join with ss in third ch of beginning-ch. [28 dc]

Round 3 Ch3, (2dc in 1 st, 1dc in next st) 13 times, 2dc in 1 st, join with ss to third ch of beginning chain. [42 dc]

Round 4 Ch3, 1dc, (2dc in 1 st, 1dc in each of next 2 sts) 13 times, 2dc in 1 st, join with ss to third ch of beginning chain. Cut yarn, leaving a 10cm tail. [56 dc]


Invisible fastening

Now we’re going to weave in your end tail with a magic fastening, making it near impossible to see.

Take your needle, and insert it in the third ch of the starting dc, under the ‘V’ on top of that stitch. Pull it through the stitch and then back in the last dc through the top of the ‘V’. This way, you have made a slip stitch that looks pretty much like a regular stitch. Don’t worry if your circle isn’t completely flat or a bit wonky, the surface crochet will take care of that.

Surface crochet

Switch to your contrast colour(s). You clearly see the 4 rounds you’ve crocheted in your pattern. You are going to crochet over the top of the stitches in each round, starting with Round 1.

Insert your hook in any stitch of the first round and pull up a loop of your contrast colour. Insert your hook in the next stitch and pull up a loop, and then pull this loop through the first loop on hook (ss made). Repeat these steps for all stitches in the round until you’ve reached your first stitch. Cut your yarn leaving a 10cm tail and use the magic fastening just like you did with the tail of Round 4.

Repeat the surface crochet for the next 3 rounds, slip stitching your way around the circle.


Don’t worry if your piece is a little bit concave (like mine), this will be fixed once you block your finished piece.

Extra tip: Spray some starching spray on your coasters to make them extra stiff (most drug stores carry one brand or another). It just feels a little bit sturdier which I like for the coasters. The instructions on my can say to spray and then iron the piece, but check what yours says.

You can also play around with other colours. Put your imagination to work!

Comments

María Elisa
Muchas gracias!!! Muy claro el patrón . Cariños desde Chile November 10, 2013 05:09 - Reply
Kirsten
You're very welcome! November 10, 2013 06:06 - Reply
Sasha
Lovely! Thanks for the pattern. =) November 10, 2013 17:16 - Reply
Kirsten
You're welcome! November 12, 2013 06:01 - Reply
Bethintx1
Cute pattern! I have perfected the finishing technique. The beginning chain disappears and you have the full loop at the top of the stitch. starting at 1:42 on this video: http://www.youtube.com/watch?v=pz2UC_RvNs0 November 11, 2013 19:49 - Reply
Kirsten
Great! I knew there was a method somewhere but I hadn't looked at it properly. Thank you for the link! November 11, 2013 20:22 - Reply
Ana Paula Waaijenberg
Perfect pictures! I only get mixed up with the magical loop. But there are plenty online tutorials for that technique November 11, 2013 23:36 - Reply
Kirsten
Thanks! Yes, the magic loop is tricky at first but I figured that if there are great tuts out there, why should I do the same all over again! November 12, 2013 06:00 - Reply
Anne Hendricks
Thank you so much. Have been looking for a pattern for these for a long time. Appreiate your pictures and help. November 12, 2013 00:25 - Reply
Kirsten
You're welcome! Let me know if you have any questions. November 12, 2013 06:01 - Reply
La Valé du cARTon
Merci pour ce "pattern", c'est très joli :) November 12, 2013 06:29 - Reply
LAURA
La flor esta hermosa y la explicacion, muy buena. felicidades y muchas gracias por enseñarlo. November 12, 2013 13:20 - Reply
LILIANA
Gracias!!!!
Muy lindos y faciles de hacer..
Excelente explicacion.! November 12, 2013 16:22 - Reply
Durinda
I love this, I can use it so many other ways as well.

Thanks November 14, 2013 03:43 - Reply
Nancy
Nice! Thanks! November 18, 2013 18:44 - Reply
Charlie
I love these. Can you do a placemat pattern?Im not sure how to add to it. November 24, 2013 20:08 - Reply
Kirsten
Hi Charlie,
I wasn't planning on making a big version of these any time soon. But in the meanwhile, I think you can take a look at this explaination of an oval shape (assuming you want an oval placemat, but I can imagine a round one would be an odd shape for a placemat). Just work it in rounds and increase it untill it is the right size. The surface crochet is exactly the same as in the coaster pattern :) Good luck! November 24, 2013 20:13 - Reply
Tamara - Moogly
I love the look of these! I featured a link to your pattern this morning on Moogly: http://www.mooglyblog.com/fast-gifts-free-crochet-patterns/ :) December 17, 2013 16:57 - Reply
Katie Wells
THese are very nice could make it larger for tree shirt or placemats or do in thread for a doily December 19, 2013 19:16 - Reply
Ana Maria Aguiar
muito boa as explicações. obrigada, vou tentar realizar este trabalho. December 20, 2013 00:24 - Reply
flo09
Bonjour,
Très très jolie idée, moi qui adore jouer avec les couleurs...
merci beaucoup pour ce tuto.
amicalement
Florence December 20, 2013 15:36 - Reply
sheri
This is a great tutorial And pattern. My only confusion is to what yarn to use. Is this like red heart yarn? I know this is a dumb question but I have to ask. Thanks. April 17, 2014 07:19 - Reply
kirsten
Hi Sheri, It can be like red heart yarn. I'm not familiar with most of their lines, but as long as you have a cotton yarn (which can be any brand), you'll be fine. You can make them out of acrylic or wool yarn too, although these fibers are less heat-resistant. But for beverage coasters that's not going to be a problem, I think. July 15, 2014 20:06 - Reply
elisabetta
very clear explanations......... April 22, 2014 06:29 - Reply
Paul
Awesome, thanks. April 24, 2014 01:36 - Reply
Lee Ann
What cute coasters! Thank you! :). :) September 12, 2014 22:54 - Reply
Janni
Hi Kirsten. These are awesome. I'm making a bunch right now I'm bigger sizes for my sister. She will be using them for flower pots, not glasses October 09, 2014 19:15 - Reply
Kája
Dobrý den,
je to velmi hezké. Myslím si, že takto by šly uháčkovat sedáky na židle, nebo koberečky do koupelny.
Zdraví Vás Kája October 09, 2014 19:47 - Reply
Donna B.
I love the light grey cotton yarn you used for the main body of the coasters, but I haven' t been able to find it anywhere in the craft and yarn stores in my area of the Eastern U.S. I love working in cotton yarn! I have a huge stash of cotton yarns, mostly "Peaches & Creme" brand. The grey works well for frequently used items that might get dirty and grimy from constant use.
The addition of bright and vibrant colors just make it all the more appealing!
Can you recommend where I might find this grey cotton yarn in my area?
Thanks so much for the free patterns! I might have to try this with black in lieu of the grey if I can't find grey cotton yarn for the project. February 02, 2015 22:14 - Reply
kirsten
Well I know Deramores sells to the US as far as I know, so I think you could order the Phildar there! I'm not familiar with American cotton brands so I'm afraid I can't help you much there! February 03, 2015 09:33 - Reply
Karla
Thank you for posting the free coaster pattern! It is fabulous:) I have included it on my blog Karla's Making It (linking to your pattern, of course)! You can view it here http://www.karlasmakingit.com/free-crochet-patterns/free-crochet-coaster-patterns/ April 10, 2015 20:58 - Reply
DéboraChagas
Muito lindo, parabéns!!! Super fácil de fazer! April 30, 2015 15:44 - Reply
Barbara Conje
Thank you for this excellent, detailed pattern. May 20, 2015 03:22 - Reply
maria matias
É BELO...É PERFEITO!!! July 11, 2015 07:40 - Reply
Edith Bell
Would love to make a hoooooge circle, then turn it into a SQUARE for my table. Any instructions on how to do that??????
I can just see fingers going round and round in circles while having coffee.
Hoping for some info,
Edith Bell July 02, 2015 02:48 - Reply
maria matias
É BELO...ADOREI !!! July 11, 2015 07:42 - Reply
luz marina
me gustaria verlo en español August 19, 2015 19:17 - Reply
Jennifer
What is the best way to weave the ends (contrasting color) of the surface stitch so it looks neat and tidy against the grey base? October 16, 2019 15:00 - Reply
Mel Redcap
I made a set of these as a present for my mother and she loved them 8D Thank you! August 20, 2015 14:56 - Reply
madeleine
love it!!!! September 18, 2015 06:27 - Reply
Mary
I've really enjoyed learning this pattern and making several coasters in different colors. When I made the first on with a DC stitch as the pattern calls for, my coaster was more the size of a "hot pad." I switched to a HDC stitch and they are still bigger than a normal coaster size. The last one I made was HDC and I finished it off after Round 3. Is it just me, the yarn I'm using or is the finished size just bigger than I'm used to? I'm using a 4 ply, worsted cotton yarn (Lily, Sugar n' Cream). September 20, 2015 22:39 - Reply
kirsten
Hi Mary,

I've checked the Lily yarn and it has a bigger gauge compared to the yarn I've used (Phildar Phil crochet coton 3). That might be the issue! My coasters measure approx. 10 cm after four rounds.

Hope this helps! September 21, 2015 09:57 - Reply
Karuna Arora
Really good, I really enjoyed learning it the way you showed the steps in a very simple manner. Thanks for sharing October 07, 2015 08:48 - Reply
Elise Long
Hi Kirsten,

Thanks for sharing the beautiful roller coaster pattern. I have just one small concern. I cannot finish the surface crochet cleanly once I've completed a round. It knots up a lot. It's not really clear (to me at least) from your photo how to get that clean look like you. Any recommendations?

Thanks

Elise May 27, 2016 14:26 - Reply
Liezel
How do you secure the ends of the surface crochet? I've tied a knot, i've weaved them in but it just doesn't seem secure enough October 06, 2016 14:56 - Reply
Kirsten
Hi Liezel,
I always weave them in a couple of cm, and then weave the ends in in the opposite direction for a couple of cm as well. Mine never came loose! October 08, 2016 16:19 - Reply
Anette Eckman
These make me want to learn to crochet! May 08, 2017 18:29 - Reply
Joanna
Thank you for sharing the instructions how to make those coaster - I totally adore them!
They are simple yet beautiful. I made 16 over Memorial Weekend enjoying playing with colors and utilizing all the leftovers.
THANK YOU, THANK YOU, THANK YOU! June 01, 2018 18:43 - Reply
melissa sparacino
Thank you so much for this pattern and pictures! I was struggling with making circles and your step by step instructions with pictures and arrow helped me see what I was doing wrong. I will need to keep this pattern for future reference! March 31, 2019 03:19 - Reply
Mary
Love the pattern! I finished with 3 rounds and joined two coasters together with a slip stitch around the edge for a little more thickness. September 21, 2019 18:35 - Reply
Louisa
Hi Kirsten, I would like to make the coasters, but i have a slightly thinner yarn. How do I continue the augmentations in order to reach the diameter I need? Thanks! March 08, 2022 17:00 - Reply
Kirsten
Hi Louisa, thank you for your comment! The coasters are based on the 'standard' circle increase. So that means: double every stitch in the second round (2dc in next st), double every second stitch in the third round (2dc in next st, 1dc in next st), double every third stitch in the fourth round (2dc in next st, 1dc in each of next 2 sts) and so on. You can keep on increasing like this until the coasters measure the right size! March 18, 2022 17:44 - Reply
Louisan
Thanks Kerstin! Great answer! Too often I didn't get any in other sites... thanks again March 21, 2022 10:20 - Reply
Alice
Hi Kirsten, I love this design and I tried to make it myself, but I am having trouble with the surface crochet around the fourth round. It just doesn't fit like the other surface stitches and looks uneven in comparison. Did you do a fifth round of single crochets around the edge to allow for this surface stitching to fit? Thanks! June 25, 2022 22:30 - Reply
Kirsten
Hi Alice,

thank you!
I didn't, but I think it would be perfectly fine if you did if that would sort the issue. June 28, 2022 07:01 - Reply
Bill
How many stitches in the first magic circle? September 12, 2022 00:11 - Reply
Kirsten
Hi Bill, there's a total of 14 dc in the magic circle :) September 23, 2022 14:12 - Reply
New reply
:Amount:x :Name: :Price: