Spicy Diamond Blanket
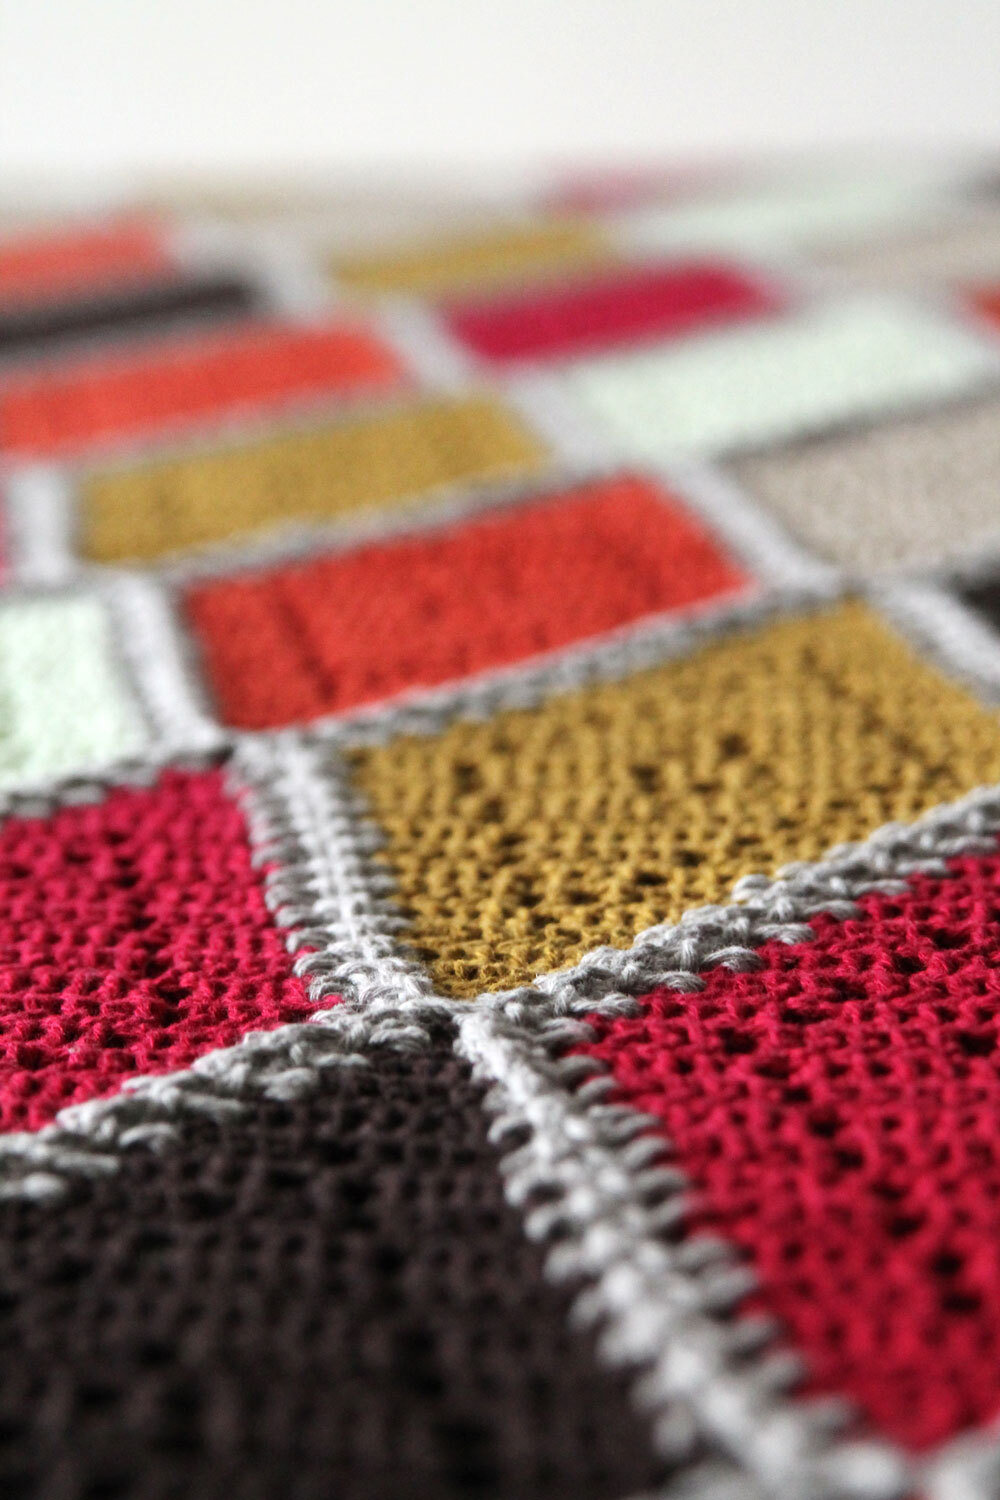
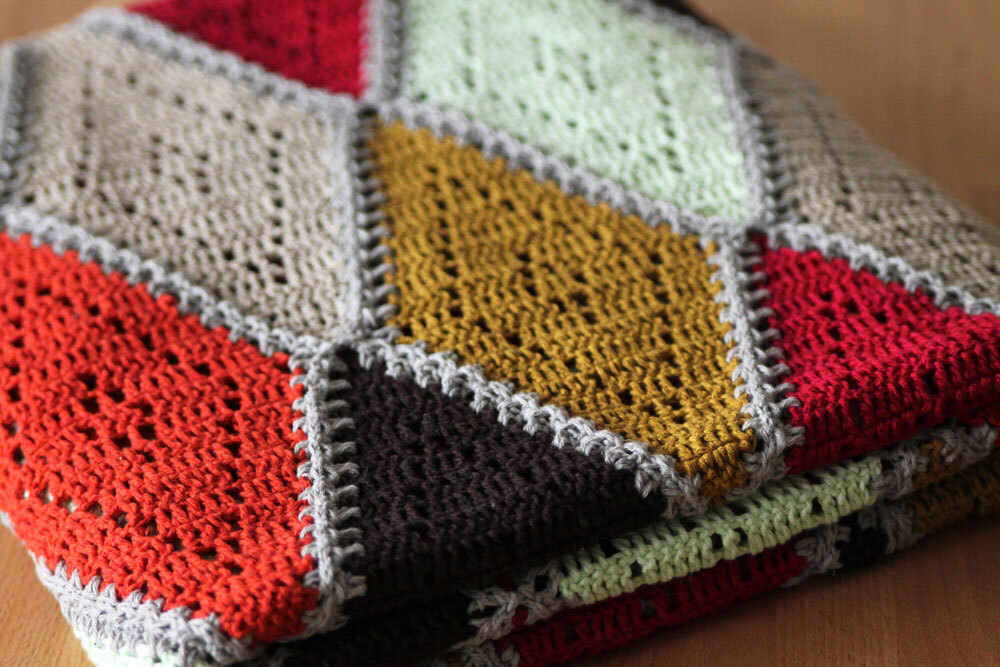
28.Oct.15 / Kirsten BalleringThe Spicy Diamond blanket is a harlequin blanket with a twist! The Diamond pattern inside the motifs creates an airy feel and keeps the motifs interesting. The blanket is sized at 1.20 x 1.80m (41 by 70in). The spicy diamond is a great choice for an autumn blanket, but can be used in any season!
Materials and preparation
Yarn
- Colour A: 601 Dark Brown x 4 balls
- Colour B: 604 Red x 4 balls
- Colour C: 609 Orange x 4 balls
- Colour D: 610 Mustard Yellow x 4 balls
- Colour E: 620 Beige x 4 balls
- Colour F: 622 Pistache Green x 4 balls
- Colour G: 619 Grey x 8 balls

Shop the yarn
You can get Scheepjes Linen Soft via Scheepjes retailers, such as:
Crochet hook
3.5 mm (US Size E/4).
Measurements
1.20 x 1.80m (41in by 70in).
Gauge/tension
A diamond measures 32.5cm in length and 13cm in centre width (12.75 x 5in), unblocked.
Notes
- The ch3 at the beginning of a row count as dc.
- The diamonds have a top and bottom side, as all crochet pieces have. Make sure you have the diamonds all facing in the same direction while joining.
- The diamonds do not have a front and a backside because you’re working in rows.
- The half diamonds for the sides can be used on both sides (as they are reversible) but make sure to keep the right side up.
- I’ve blocked my diamonds before joining (and after assembly again).
Abbreviations (US terms)
- st(s): stitch(es)
- ch: chain
- ch-sp: chain-space
- hdc: half double crochet
- dc: double crochet
- dc2tog: double crochet 2 together
- dc3tog: double crochet 3 together
Colour layout
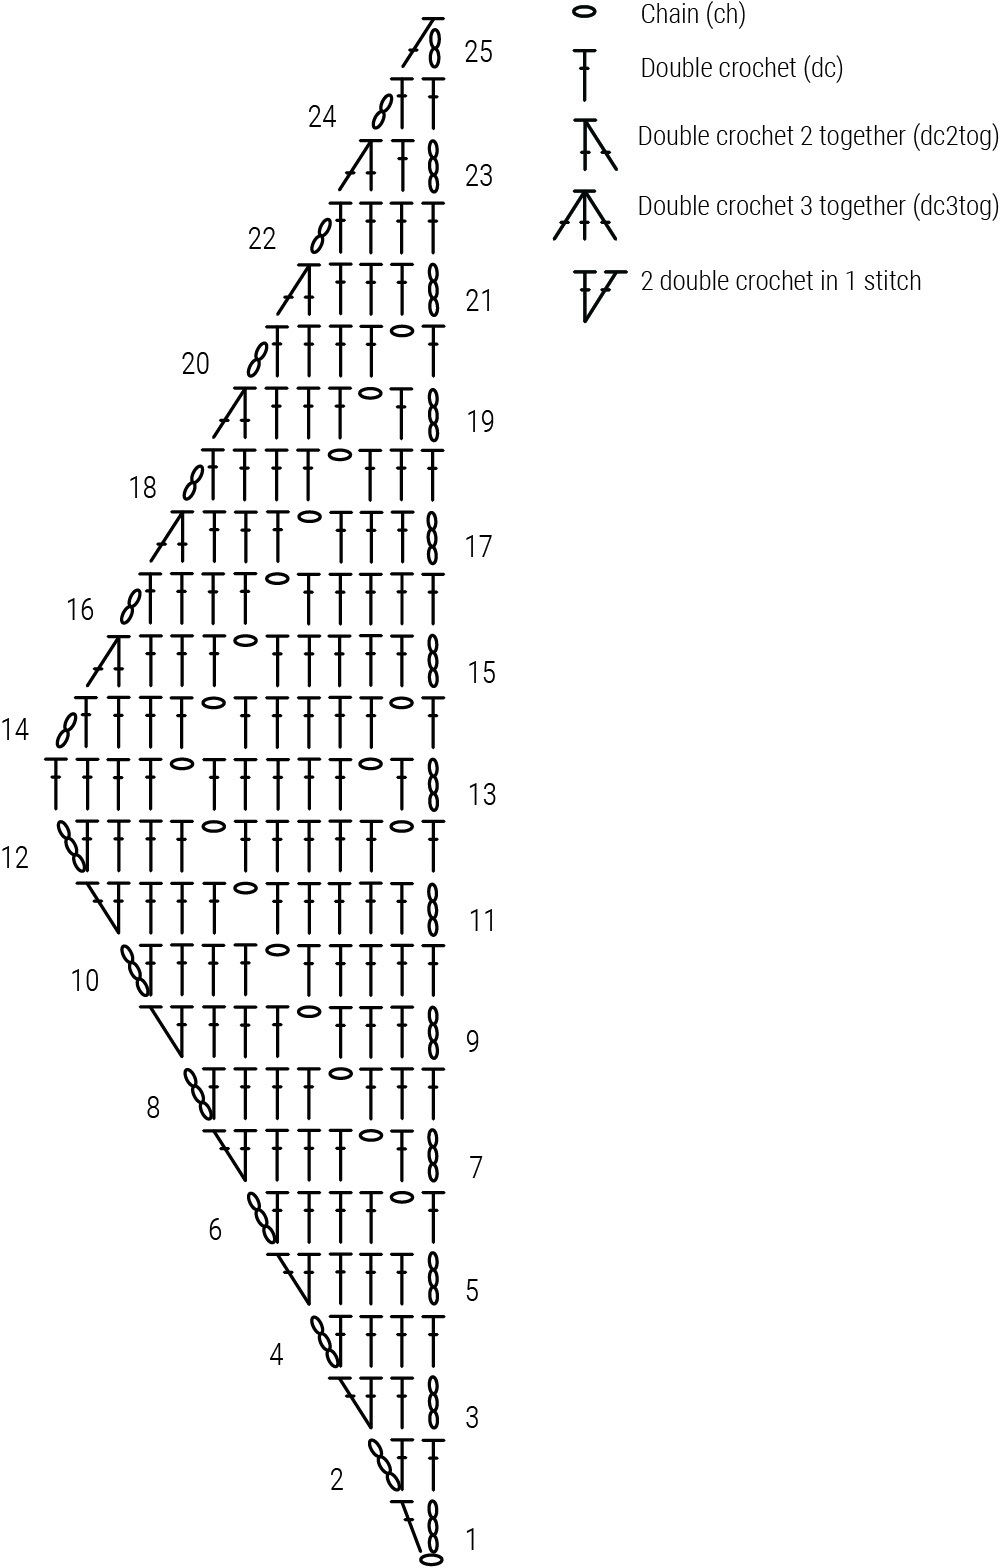
The pattern consists of A. patterns for the diamonds, B. a pattern for the joining, C. a pattern for the edging, D. Instructions for blocking and E. troubleshooting. I’ve made charts of the diamond patterns.
To recreate the exact blanket, you need:
- 65 whole diamonds
- 9 brown
- 11 beige
- 12 red
- 12 orange
- 11 green
- 10 yellow
- 10 half diamonds lengthwise
- 3 brown
- 1 beige
- 2 red
- 1 orange
- 1 green
- 2 yellow
- 6 half diamonds widthwise (for top side)
- 1 beige
- 2 green
- 3 yellow
- 7 half diamonds widthwise (for bottom side)
- 1 brown
- 2 beige
- 1 red
- 1 orange
- 2 yellow
- 2 quarter-sized diamonds (for 2 top corners)
- 2 red
Below is the colour layout I’ve used. I’ve also got an empty layout for if you want to determine your own colours! Just fill it up with your colours in photoshop, paint or old-school sharpies.
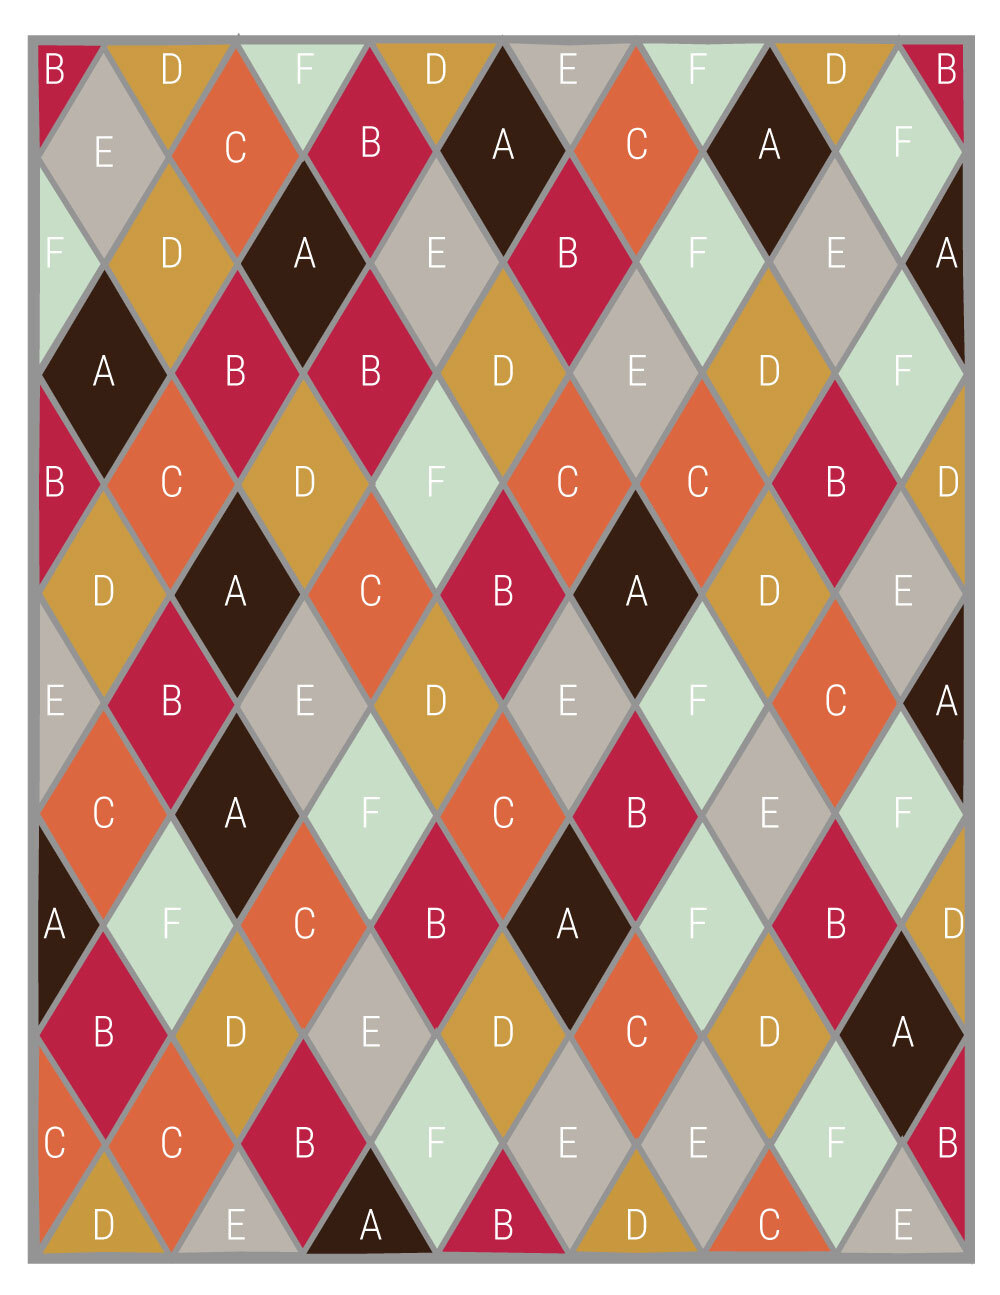
Crochet pattern
Diamond patterns
Diamond motif
Row 1 Ch1, ch3, 2dc in first ch, turn. [3 dc]
Row 2 Ch3 (counts as st here and throughout pattern), dc in same st, dc, 2dc in next st, turn. [5 dc]
Row 3 Ch3, dc in same st, 3dc, 2dc in next st, turn. [7 dc]
Row 4 Ch3, dc in same st, 5dc, 2dc in next st, turn. [9 dc]
Row 5 Ch3, dc in same st, 3dc, ch1, skip 1 st, 3dc, 2dc in next st, turn. [10 dc, 1 gap]
Row 6 Ch3, dc in same st, 3dc, ch1, skip 1 st, 1dc in ch1, ch1, skip 1 st, 3dc, 2dc in next st, turn. [11 dc, 2 gaps]
Row 7 Ch3, dc in same st, 3dc, ch1, skip 1 st, 1dc in ch1, 1dc, dc in ch1, ch1, skip 1 st, 3dc, 2dc in next st, turn. [13 dc, 2 gaps]
Row 8 Ch3, dc in same st, 3dc, ch1, skip 1 st, 1dc in ch1, 3dc, dc in ch1, ch1, skip 1 st, 3dc, 2dc in next st, turn. [15 dc, 2 gaps]
Row 9 Ch3, dc in same st, 3dc, ch1, skip 1 st, 1dc in ch1, 5dc, 1dc in ch1, ch1, skip 1 st, 3dc, 2dc in next st, turn. [17 dc, 2 gaps]
Row 10 Ch3, dc in same st, 3dc, ch1, skip 1 st, 1dc in ch1, 7dc, 1dc in ch1, ch1, skip 1 st, 3dc, 2dc in next st, turn. [19 dc, 2 gaps)
Row 11 Ch3, dc in same st, 3dc, ch1, skip 1 st, 1dc in ch1, 4dc, ch1, skip 1 st, 4dc, 1dc in ch1, ch1, skip 1 st, 3dc, 2dc in next st, turn. [20 dc, 3 gaps]
Row 12 Ch3, dc in same st, 3dc, ch1, skip 1 st, 1dc in ch1, 4dc, ch1, skip 1 st, 1dc in ch1, ch1, skip 1 st, 4dc, 1dc in ch1, ch1, skip 1 st, 3dc, 2dc in next st, turn. [21 dc, 4 gaps]
Row 13 Ch3, 3dc, ch1, skip 1 st, 1dc in ch1, 4dc, ch1, skip 1 st, 1dc in ch1, 1dc, 1dc in ch1, ch1, skip 1 st, 4dc, 1dc in ch1, ch1, skip 1 st, 4dc, turn. [21 dc, 4 gaps]
Row 14 Dc2tog, 2dc, dc in ch1, ch1, skip 1 st, 4dc, 1dc in ch1, ch1, skip 1 st, 1dc, ch1, skip 1 st, 1dc in ch1, 4dc, ch1, skip 1 st, 1dc in ch1, 2dc, dc2tog, turn. [19 dc, 4 gaps]
Row 15 Dc2tog, 2dc, 1dc in ch1, ch1, skip 1 st, 4dc, 1dc in ch1, ch1, skip 1 st, 1dc in ch1, 4dc, ch1, skip 1 st, 1dc in ch1, 2dc, dc2tog, turn. [18 dc, 3 gaps]
Row 16 Dc2tog, 2dc, 1dc in ch1, ch1, skip 1 st, 4dc, 1dc in ch1, 4dc, ch1, skip 1 st, 1dc in ch1, 2dc, dc2tog, turn. [17 dc, 2 gaps]
Row 17 Dc2tog, 2dc, 1dc in ch1, ch1, skip 1 st, 7dc, ch1, skip 1 st, 1dc in ch1, 2dc, dc2tog, turn. [15 dc, 2 gaps]
Row 18 Dc2tog, 2dc, 1dc in ch1, ch1, skip 1 st, 5dc, ch1, skip 1 st, 1dc in ch1, 2dc, dc2tog, turn. [13 dc, 2 gaps]
Row 19 Dc2tog, 2dc, 1dc in ch1, ch1, skip 1 st, 3dc, ch1, skip 1 st, 1dc in ch1, 2dc, dc2tog, turn. [11 dc, 2 gaps]
Row 20 Dc2tog, 2dc, 1dc in ch1, ch1, skip 1 st, 1dc, ch1, skip 1 st, 1dc in ch1, 2dc, dc2tog, turn. [9 dc, 2 gaps]
Row 21 Dc2tog, 2dc, 1dc in ch1, ch1, skip 1 st, 1dc in ch1, 2dc, dc2tog, turn. [8 dc,1 gap]
Row 22 Dc2tog, 2dc, 1dc in ch1, 2dc, dc2tog, turn. [7 dc]
Row 23 Dc2tog, 3dc, dc2tog, turn. [5 dc]
Row 24 Dc2tog, 1dc, dc2tog, turn. [3 dc]
Row 25 Dc3tog. [1 dc]
Cut yarn and weave in ends.
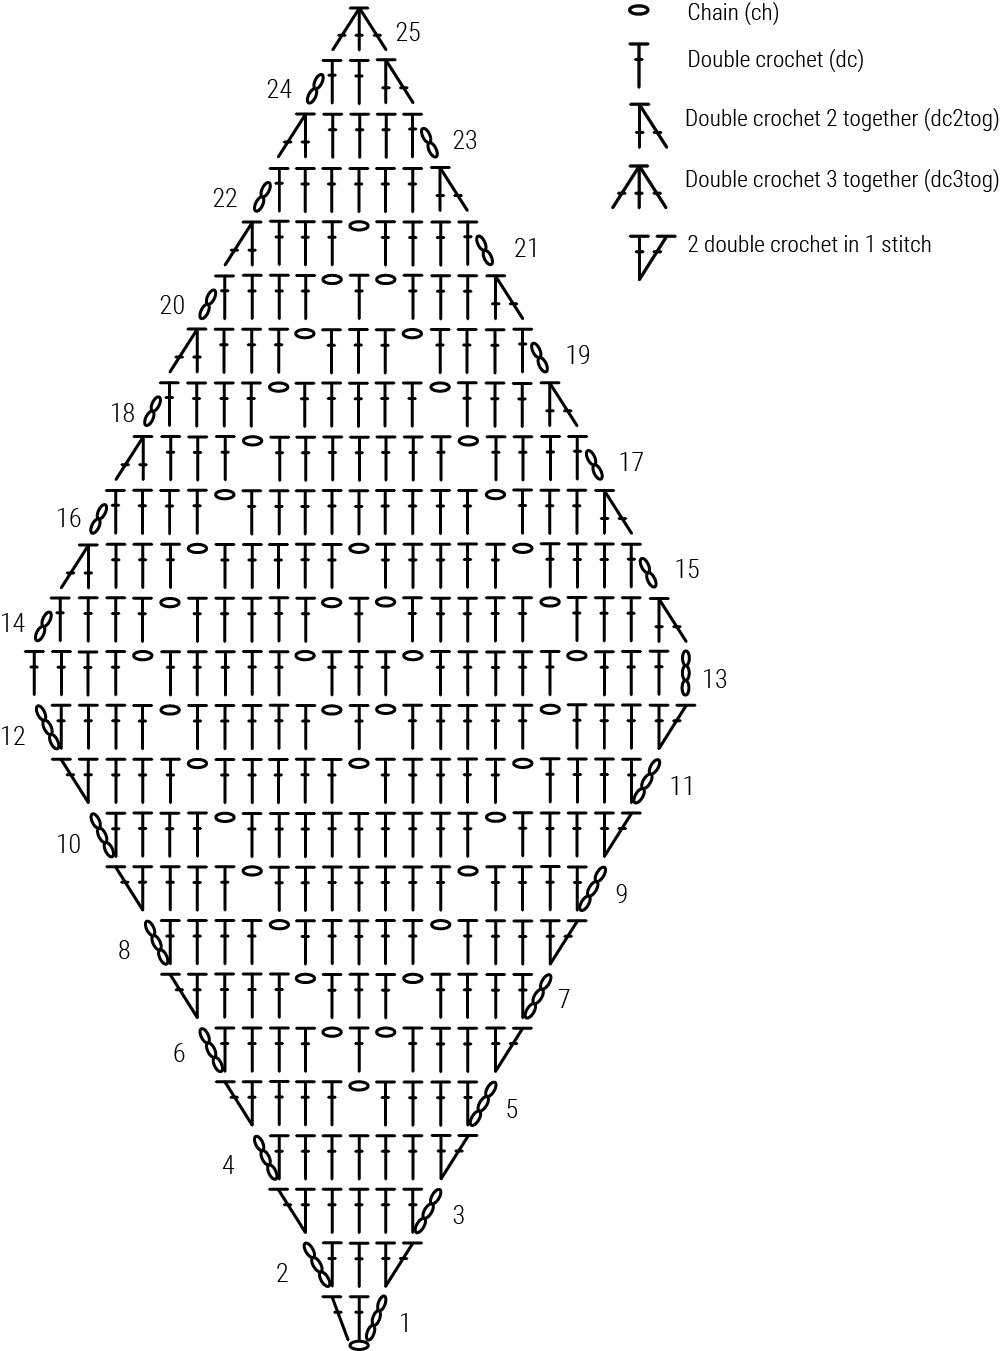
Half diamond lengthwise (for left and right side)
Row 1 Ch1, ch3, dc in first ch, turn. [2 dc]
Row 2 Ch3, 1dc in same st, 1dc in next st, turn. [3 dc]
Row 3 Ch3, 1dc, 2dc in next st, turn. [4 dc]
Row 4 Ch3, 1dc in same st, 3dc, turn. [5 dc]
Row 5 Ch3, 3dc, 2dc in next st,turn. [6 dc]
Row 6 Ch3, 1dc in same st, 3dc, ch1, skip 1 st, 1dc, turn. [6 dc, 1 gap]
Row 7 Ch3, 1dc in ch1, ch1, skip 1 st, 3dc, 2dc in next st, turn. [7 dc, 1 gap]
Row 8 Ch3, 1dc in same st, 3dc, ch1, skip 1 st, 1dc in ch1, 2dc, turn. [8 dc, 1 gap]
Row 9 Ch3, 2dc, dc in ch1, ch1, skip 1 st, 3dc, 2dc in same st, turn. [9 dc, 1 gap]
Row 10 Ch3, 1dc in same st, 3dc, ch1, skip 1 st, 1dc in ch1, 4dc, turn. [10 dc, 1 gap]
Row 11 Ch3, 4dc, 1dc in ch1, ch1, skip 1 st, 3dc, 2dc in next st, turn. [11 dc, 1 gap]
Row 12 Ch3, 1dc in same st, 3dc, ch1, skip 1 st, 1dc in ch1, 4dc, ch1, skip 1 st, 1dc, turn. [11 dc, 2 gaps]
Row 13 Ch3, 1dc in ch1, ch1, skip 1 st, 4dc, 1dc in ch1, ch1, skip 1 st, 4dc, turn. [11 dc, 2 gaps]
Row 14 Dc2tog, 2dc, dc in ch1, ch1, skip 1 st, 4dc, dc in ch1, ch1, skip 1 st, 1dc, turn. [10 dc, 2 gaps]
Row 15 Ch3, 1dc in ch1, 4dc, ch1, skip 1 st, 1dc in ch1, 2dc, dc2tog, turn. [10 dc, 1 gap]
Row 16 Dc2tog, 2dc, 1dc in ch1, ch1, skip 1 st, 5dc, turn. [9 dc, 1 gap]
Row 17 Ch3, 3dc, ch1, skip 1 st, 1dc in ch1, 2dc, dc2tog, turn. [8 dc, 1 gap]
Row 18 Dc2tog, 2dc, 1dc in ch1, ch1, skip 1 st, 3dc, turn. [7 dc, 1 gap]
Row 19 Ch3, 1dc, ch1, skip 1 st, 1dc in ch1, 2dc, dc2tog, turn. [6 dc, 1 gap]
Row 20 Dc2tog, 2dc, 1dc in ch1, ch1, skip 1 st, 1dc, turn. [5 dc, 1 gap]
Row 21 Ch3, 1dc in ch1, 2dc, dc2tog, turn. [5 dc]
Row 22 Dc2tog, 3dc, turn. [4 dc]
Row 23 Ch3, 1dc, dc2tog, turn. [3 dc]
Row 24 Dc2tog, 1dc, turn. [2 dc]
Row 25 Dc2tog. [1 dc]
Cut yarn and weave in ends.
Half sized diamond widthwise (for bottom side)
Ch25.
Row 1 Ch3, starting in fifth ch from hook, 3dc, ch1, skip 1 st, 5dc, ch1, skip 1 st, 3dc, ch1, skip 1 st, 5dc, ch1, skip 1 st, 4dc, turn. (21 dc, 4 gaps)
Repeat Rows 14-25 until end of whole diamond pattern.
Half sized diamond widthwise (for top side)
Follow Rows 1-13 for the diamond pattern.
Quart sized motif
Follow Rows 1-13 from half sized diamond lengthwise pattern.
Joining
Notes on joining
- You will be crocheting around the posts of the first/last dc’s of a row.
- It’s easiest to first join all whole diamonds. After that, start making your blanket square by adding the half- and quarter-sized diamonds.
- Joining the corners is a bit tricky to explain, keep in mind that you never join Row 13’s from diamonds to each other, there is always a top or bottom of another diamond in between where you join your Row 13 in.
Bordering the first diamonds
Take your first whole diamond in the upper corner and join Colour G on on the top left side of Row 25 with a ss. Ch2 (counts as hdc), 1hdc in the left side of hdc3tog, ch1, *2hdc in the side of next row, ch1; repeat from * another 10 times, (1hdc, ch2, 1hdc) in left side of Row 13, ch1, *2hdc in side of next row, ch1; repeat from * another 10 times, you now have reached the bottom row of the diamond. 2hdc in the left side of Row 1, ch2, 2hdc in right side of Row 1, ch1, *2hdc in side of next row, ch1; repeat from * another 10 times, (1hdc, ch2, 1hdc) in right side of Row 13, ch1, *2hdc in side of next row, ch1; repeat from * another 10 times, 2hdc in right side of dc3tog of Row 25, ch2, join with ss to first hdc of round. [44 groups of 2 hdc, 48 chs, 2 (1hdc, ch2, 1hdc) corners on sides and 2 (2hdc, ch2, 2hdc) corners on top and bottom]
Joining adjacent diamonds
When you join your next diamond, replace the ch1 between 2hdc along the sides with ss in the ch-1 space of the adjacent diamond. When you reach a top or bottom corner, make your final hdc, ss in the ch-space of the adjacent diamond(s), ch1, and resume bordering your diamond with the repeats of ‘2hdc in side of next row, ch1’. For side corners, replace the ch2 with 2 ss in either diamond.
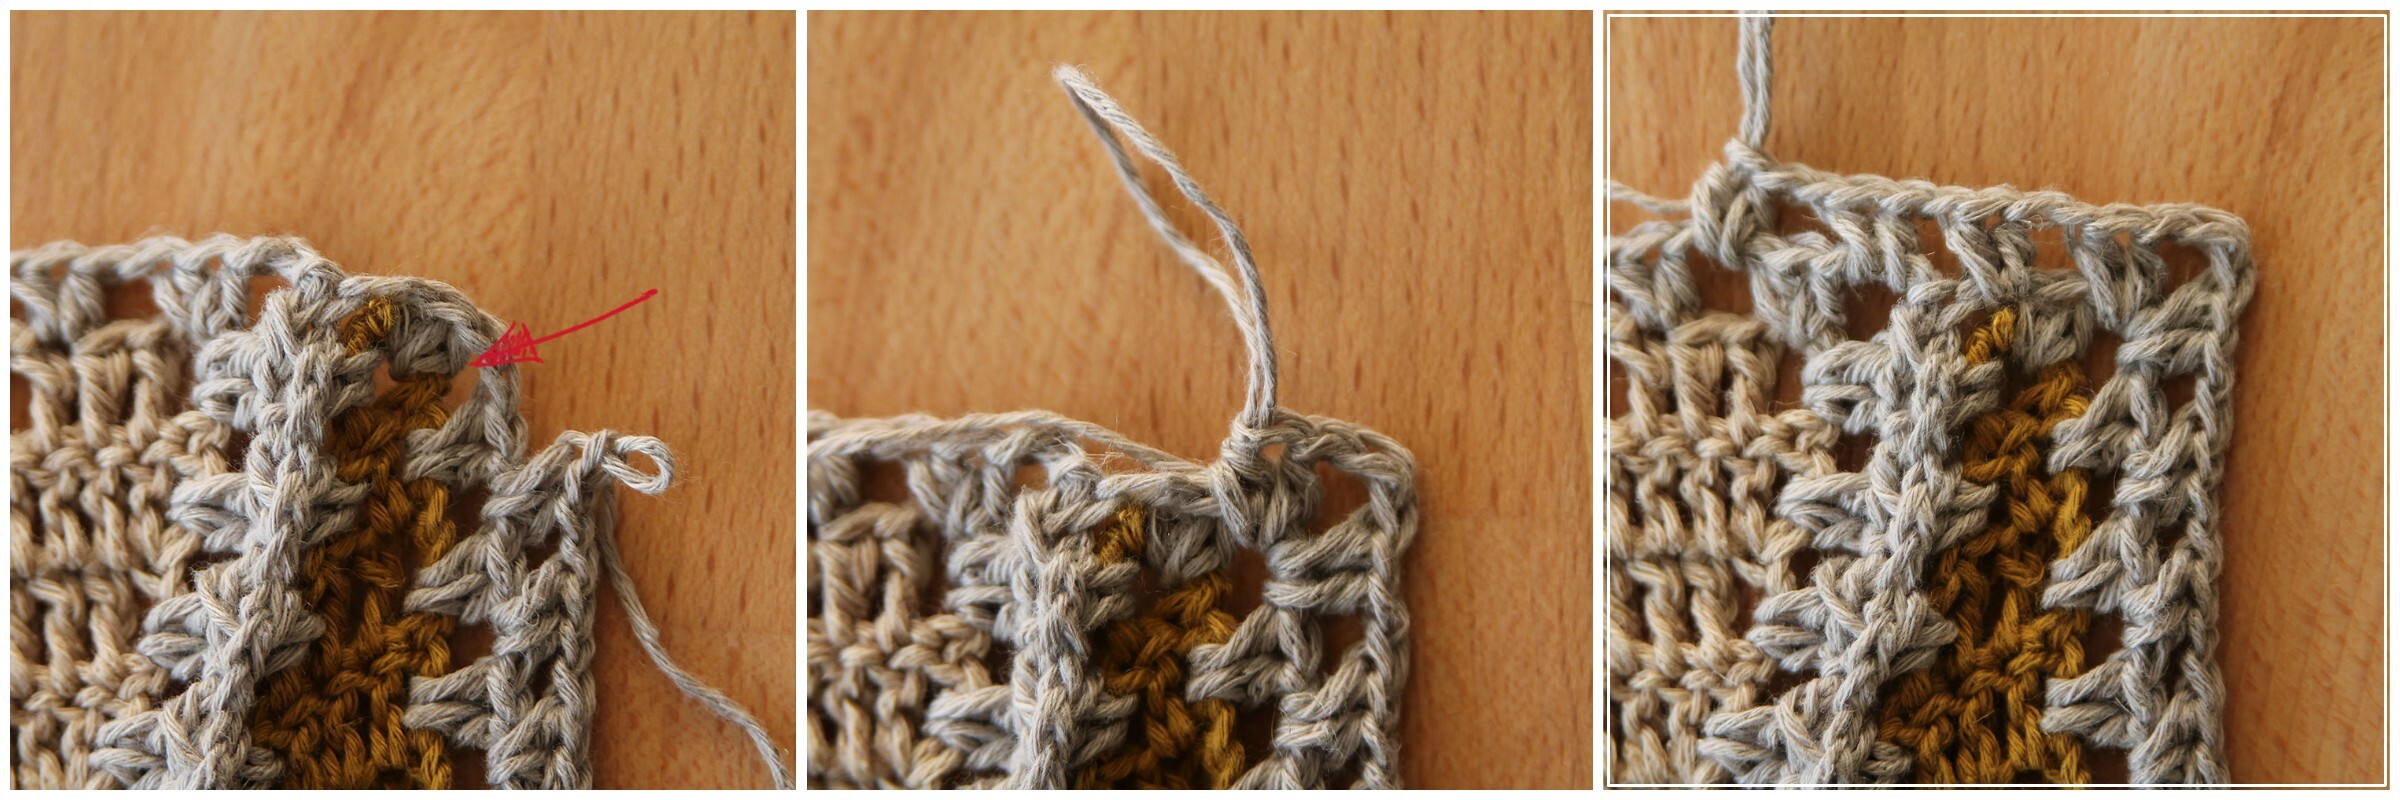
For clarification, see the collages below, where red arrows indicate where you will make your ss. Please note: you never join sides of diamonds to other sides. You will always have a top and bottom of another diamond in between.
Joining one diamond to a side
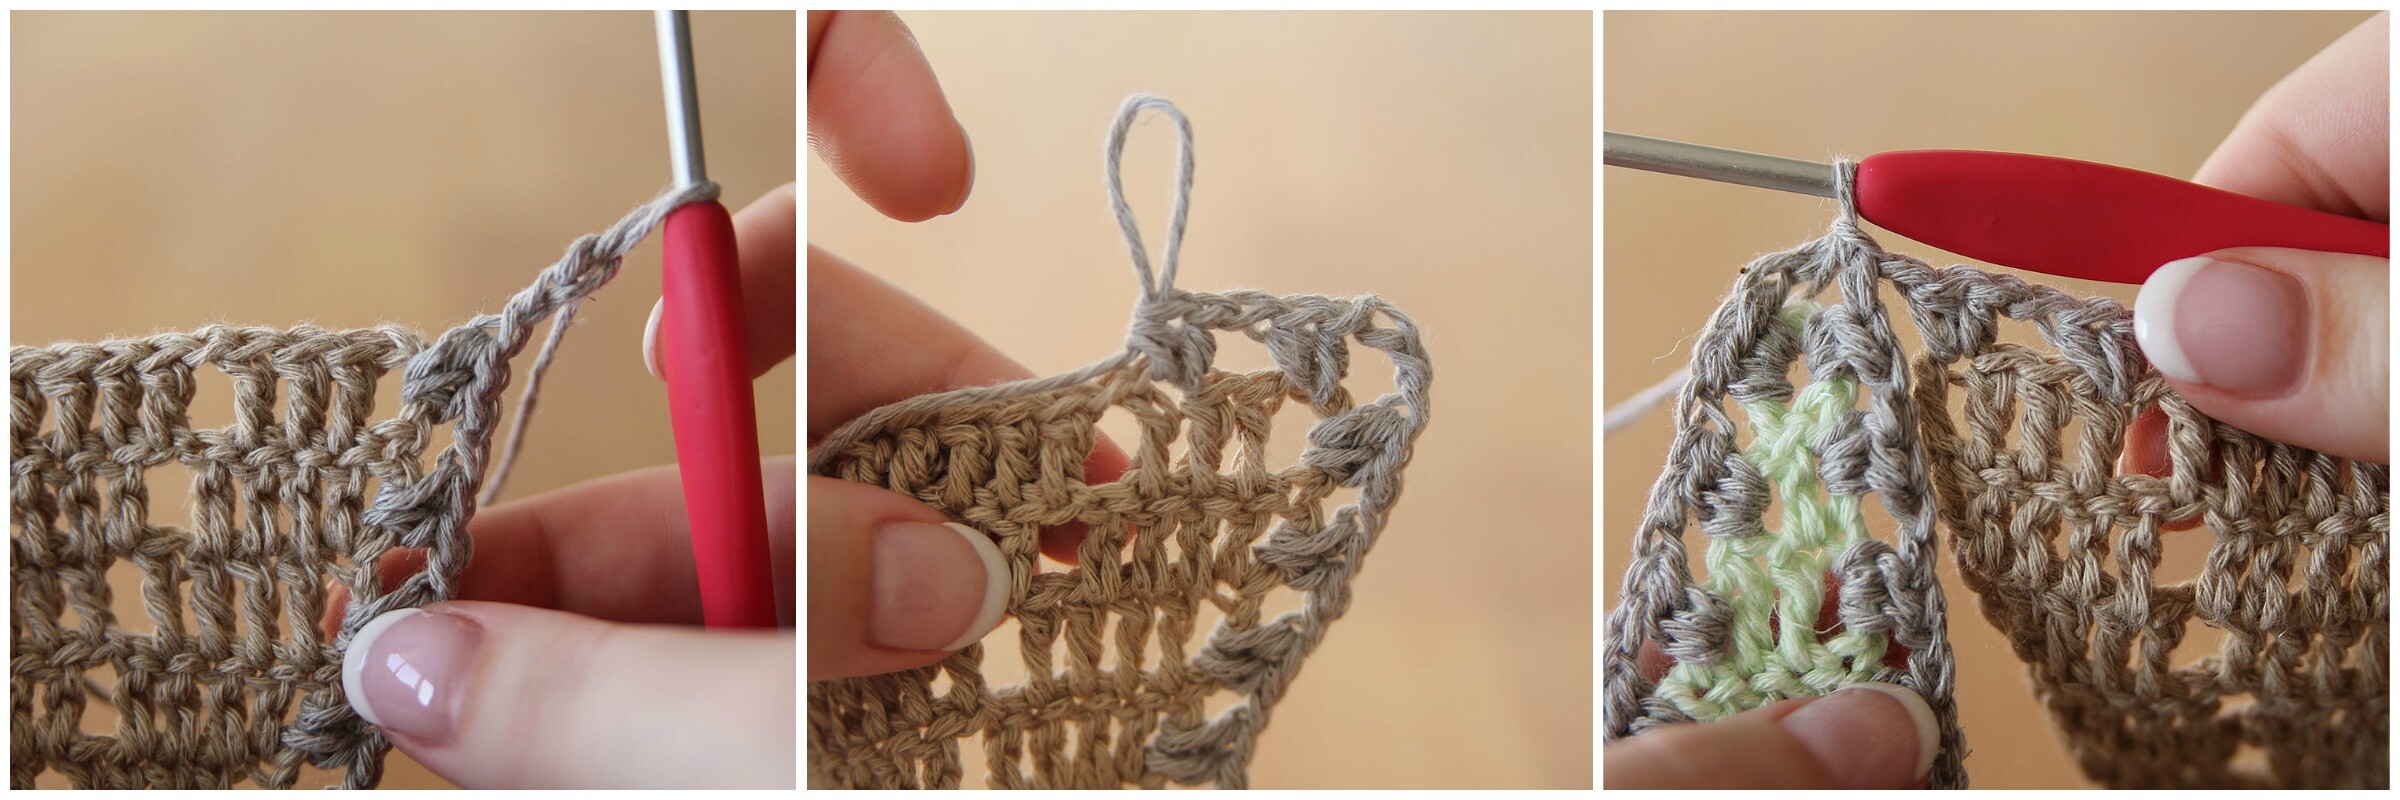
When you’re approaching the bottom of the diamond (photo 1), work your last 2 hdc in the side of Row 1 of your current diamond, then make a ss in the chain-space of the adjacent diamond (photo 2, red arrow), then one more chain and finally 2 hdc in the other side of Row 1 (photo 3). Continue as set in pattern (photo 4). The same principle goes for joining the top of diamonds.

Joining diamonds to top/bottom
When joining diamonds to the top or bottom of other diamonds, work your final 2 hdc on your current diamond in the side of your last row, then work a ss in both the ch-2 space of the diamond directly above/below, and a ss in the ch-2 space of the diamond to the left/right (photo 1, red arrows, photo 2), and ch1. Continue as set in pattern (photo 3).

Joining one diamond to two others on side
When joining diamonds to the sides of other diamonds, replace the ch2 in the corner space with a ss in either diamond (photo 1, red arrows, photo 2). Then continue pattern as set (photo 3).

Joining top and bottom half or quarter diamonds
When you’re joining half or quarter diamonds on the bottom and top of your blanket, you have to crochet in the beginning chains and dc’s of those motifs. When you have crocheted in the side of the last row, work 2 chains (or join to other diamond if applicable) (photo 1), and then starting in first stitch: *2hdc in same st, ch1, skip 2 sts (photo 2); repeat from * another 7 times, ch1, join to another diamond if applicable (photo 3), and resume crocheting in the sides of the diamond by working a ss in every ch-space of the adjacent diamond.
Border
Round 1 (RS) Join Colour G to the top side of your blanket with a ss. *2hdc in ch-sp, ch1; repeat from * until you reach the top left corner ch2-space, (2hdc, ch2, 2hdc) in same st, ch1, *2hdc in ch-sp, ch1; repeat from * until you reach the next corner space (indicated in photo 1 with a red arrow in the collage below), (2hdc, ch2, 2hdc) in same st, ch1, *2hdc in ch-sp, ch1; repeat from * until you reach the bottom right corner space, (2hdc, ch2, 2hdc) in same st, ch1, *2hdc in ch-sp, ch1; repeat from * until you reach the top right corner ch2-space, (2hdc, ch2, 2hdc) in same st, ch1, *2hdc in ch-sp, ch1; repeat from * until end of round, join with ss to first hdc.
Round 2 *2hdc in ch1-sp, ch1; repeat from * along the sides. (2hdc, ch2, 2hdc) in corner-stitches. Cut yarn, weave in all ends.
Blocking
Blocking really makes a difference for the blanket. Linen responds very well to blocking and holds the shape well, so your diamonds will pop out even more! I wet-block my items rather than steam-block them. Start by pinning them on a blocking board ( I use foam mats similar to these and T-pins as they are stronger compared to regular pins).
Make sure you pin your blanket straight, it will yield the best effect. I use a measuring tape to make sure the edges are all straight and equally long. Next, fill a spritz bottle with water (and if you have it, Eucalan or a similar treatment product for a nice smell and softer result). Spray the blanket until it’s moderately wet. it doesn’t have to be dripping. Now let it dry overnight. I assure you, you will love how soft and even your blanket will be!
Troubleshooting
I made my fair share of mistakes while making the diamonds and joining them, which in some cases caused me to frog out quite a bit. This section is here to help you prevent that!
- The Row 1/Row 25/Row 13’s don’t match up: You probably missed a ch-sp somewhere. Please remember that while joining the top of a diamond to a bottom and a side, the next chain-space after the corner join is the one between Row 13 and Row 14 or Row 12, not the one between Row 14 and Row 15 or Row 11. Good chance that if you frog your side, your next attempt will line up fine!
- The corner joins look cramped/not as displayed: You probably joined Row 13’s of a diamond to another Row 13. Two sides of a diamond are never joined. Instead, there’s always a top/bottom of another diamond in between. If that’s not the case, try blocking. It will work miracles!
- The diamond-filet pattern looks wonky: You probably missed a stitch somewhere. Remember that the top of the ch3’s made in each row also counts as a stitch!


Comments
A full diamond measures 32.5cm in length and 12cm in width (in the centre). That's 12.75 x 4.75in! October 21, 2021 10:11 - Reply
A full diamond measures 32.5cm in length and 12cm in width (in the centre). That's 12.75 x 4.75in! October 21, 2021 10:11 - Reply
A full diamond measures 32.5cm in length and 12cm in width (in the centre). That's 12.75 x 4.75in! October 21, 2021 10:12 - Reply
A full diamond measures 32.5cm in length and 12cm in width (in the centre). That's 12.75 x 4.75in! October 21, 2021 10:12 - Reply
A full diamond measures 32.5cm in length and 12cm in width (in the centre). That's 12.75 x 4.75in! October 21, 2021 10:12 - Reply
there is no youtube tutorial but perhaps the photo tutorial combined with the written pattern and charts can help you! December 03, 2021 07:48 - Reply
Probably a charting error (I made these eons ago!), as you'll have to chain one of the stitches. I'll adjust it, thanks! February 07, 2024 08:21 - Reply
Yes, it's ch4. It's written like that because the ch1 is the 'one' chain where you make all the row 1 stitches in. If you have a look at the chart you might see what I mean. I could also have written 'Ch4, 2dc in first ch'. That would amount to the same :) May 13, 2024 09:05 - Reply