The Jacob's Ladder is a unique stitch with lots of texture. In this stitch pattern, you make loops of chains, which you 'knit' up. This creates a textured, woven-like chain on top of your work. It's a fun stitch that can be made vertically, but also diagonally. There are so many possibilities!
Jacob's Ladder stitch multiple
The multiple in this tutorial is 12 stitches. However, you can easily adapt the stitch multiple of this stitch by adjusting the number of stitches in between the ladders. There's no right or wrong - it's all up to preference.
Jacob's Ladder stitch tutorial
You will be making chain loops every other row. So one row with loops on the front of your piece, and then one row of plain hdc on the backside of your piece. You can continue with the loops as long as you like. Once the piece is long enough, you can 'knit up' the ladders and fasten them in your final row.
First row
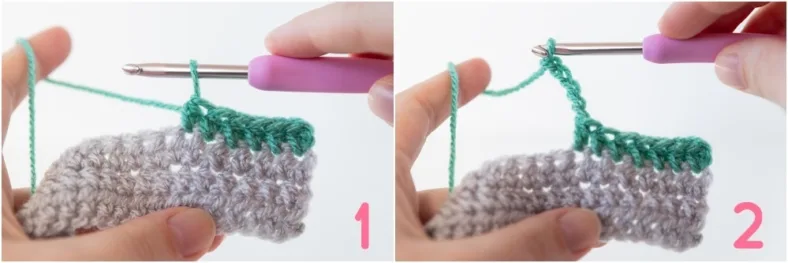
Join your new colour with a ss in the first st. Make a ch and hdc in the first st, then five more hdc, bringing the hdc total to six (photo 1). Now, make five chains to form your first loop (photo 2).
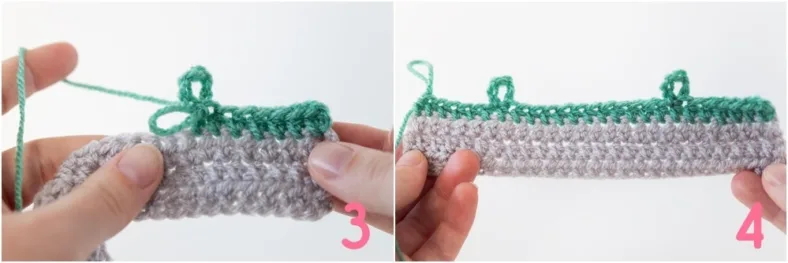
We will anchor these chains on the hdc so they form a loop, so make a ss in the top of your last hdc to close the loop (photo 3). Make twelve hdc, then five chains and close the chain loop with a ss in the last hdc.
Continue the pattern instructions until your row is finished (photo 4). Chain one and turn your blanket.
Second row
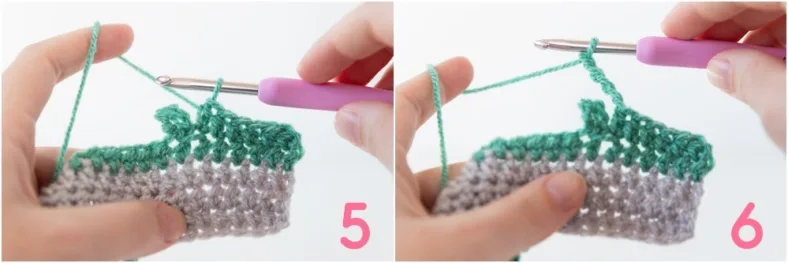
Make six hdc, of which the last one will be right before the ch5-hdc. Chain five (photos 5-6), and instead of closing the loop on itself leave it as is and make a hdc in the next st, on the other side of the ch5-hdc (photo 7). Crochet eleven more hdc (the last one will be in the next ch5-hdc, giving you twelve hdc in between loops).
Continue making five chains and twelve hdc’s according to the pattern instructions and finish your row. Cut yarn and turn your blanket.

Third row and further
The next couple of rows will look very much like the previous one. Join your new colour with a ss in the first st, make a ch and hdc in the first stitch. Make six more hdc, of which the last one will look like it is in the chain-space (this really is the loop of the first hdc after the ch5 in the previous row!). Make five chains, and then twelve hdc.
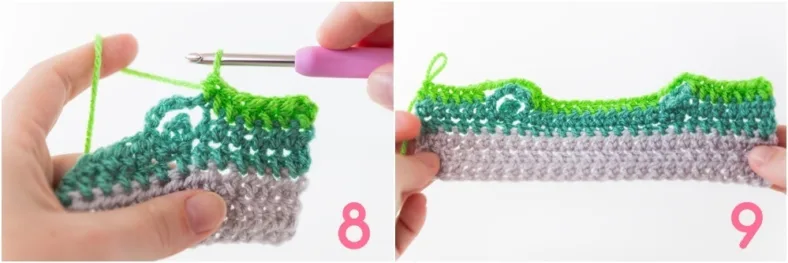
Continue as per the pattern instructions and finish the row. (photo 8-9) Repeat this for as many rows as the pattern instructs.
Making the ladders
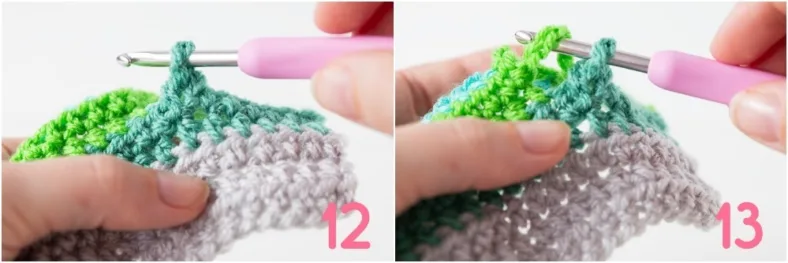
Once you’re ready to ladder up your loops, remove your hook from your yarn alltogether. Insert your hook in the first ch-5 loop (photo 10). Pick up the next ch-5 chain, and pull through the loop on your hook (photos 11-12).
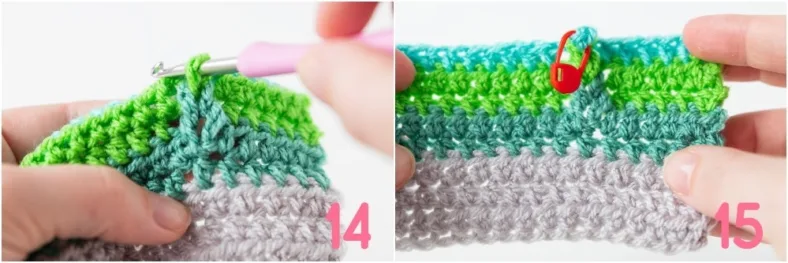
Continue doing so to get up to the last loop, and fasten the last hoop with a stitch marker if you feel it’s getting undone (photos 13-15). The backside will look like photo 16. Continue with the next row of the pattern.


Final row
Pick up your yarn loop again, ch1, and crochet six hdc (photo 17). Make a ss in the top of the ch-5 ladder to secure the ladder (photo 18), and skip the next hdc right after the ladder. Make eleven hdc, make a ss in the top of the next ladder and skip the next stitch right after the ladder.
If you feel this gap is too big, then make a hdc2tog in the skipped stitch and the next to fill up that space. When you do this, this hdc2tog is one of the eleven hdc’s you’re making.
Continue like this and finish the row according to the pattern instructions. The front will look like photo 19. That’s how you make Jacob’s Ladders!




Comments
Be the first to comment to this post!