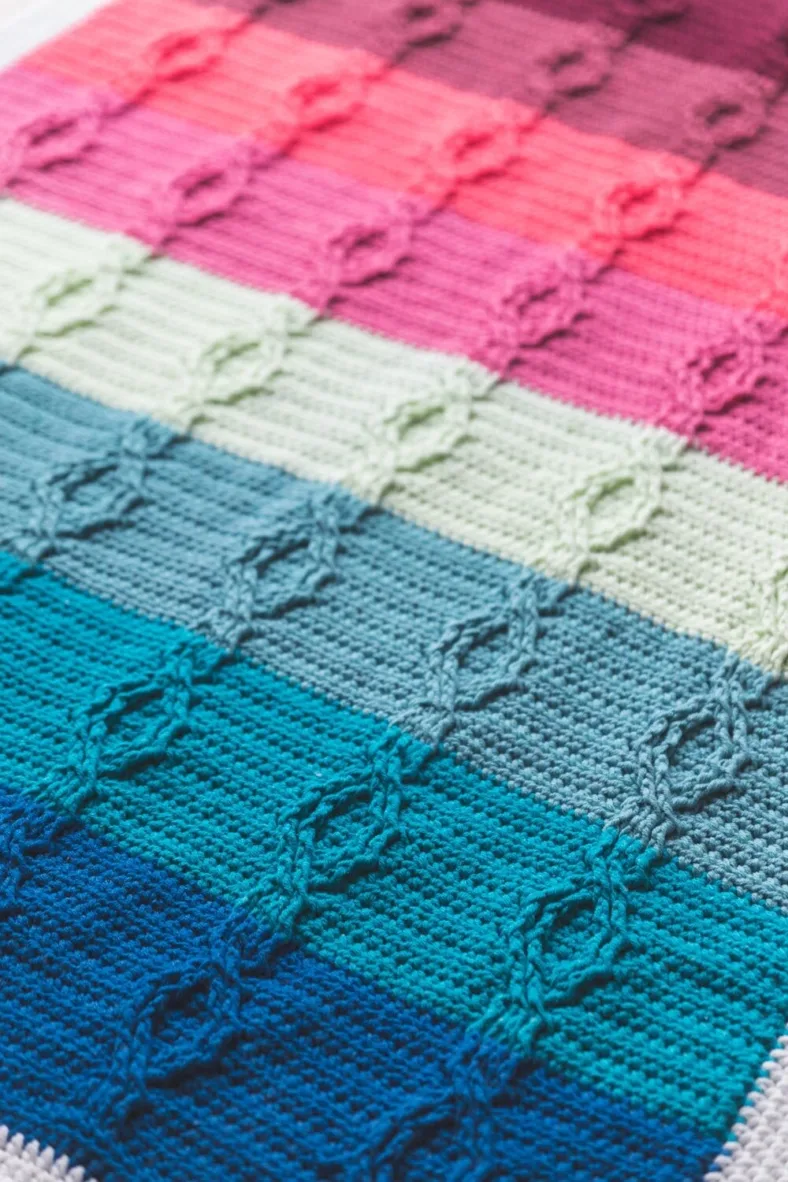
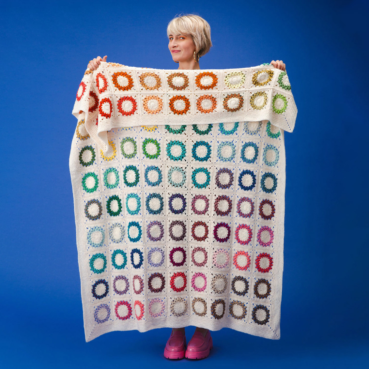
Winding Cables blanket
15.Mar.26 / Kirsten BalleringLearning how to crochet cables while creating a big, beautiful blanket at the same time? Sign me up!
The Winding Cables Blanket will learn you how to create small and big cables without any gaps behind them. By using a chunky yarn you get a big blanket - a great way to show off those cables!
Materials and preparation
Yarn
Truly Scrumptious
Scheepjes Truly Scrumptious (100% Acrylic, 100g/108m)- A: 342 Coconut Spirulina Cheesecake x 2 balls
- B: 355 Bubblegum Icecream x 2 balls
- C: 314 Blue Glazed Donut x 2 balls
- D: 317 Honeydew Melon Sorbet x 2 balls
- E: 331 Turkish Delight x 2 balls
- F: 321 Rose Barfi x 2 balls
- G: 365 Summer Pudding x 2 balls
- H: 302 Buttercream Icing x 3 balls

Shop the yarn!
Do you want to get your hands on some Truly Scrumptious? You can find it at several retailers, including the ones listed below. If you can't find Truly Scrumptious, you can replace it with other chunky yarns such as Scheepjes Chunky Monkey.
Crochet hook
6.5mm
US size K/10.5
Measurements
150 x 115cm after blocking
59 x 45¼in
Gauge/tension
10 rows and 10 hdc measure 10 x 10cm
4 x 4in
Abbreviations (US terms)
- cc: colour change: to change colour, finish stitch before indicated colour change until the last yarnover. Instead, take a strand of the new colour on your hook and yarn over in that colour. You now have a finished stitch in the old colour, and a loop on your hook in the new colour.
- ch: chain
- FPtr: front post treble crochet
- hdc: half double crochet
- RS: right side
- sp(s): space(s)
- st(s): stitch(es)
- WS: wrong side
Repeat formats
- *….; rep from * once/twice/3x Crochet the instructions after * and then repeat that section a further number of times as indicated.
- […] Indicates the amount of stitches at the end of a row or round.
- (…) in same st/sp Indicates that all instructions between brackets are worked in the same stitch or space.
Techniques
Cables
Cables are created by making a raised section of stitches. And unlike knitting, you do not need a separate cable needle. Instead, we're using Front Post Trebles (FPtr) to create a stitch that lies on top of the blanket. FPtrs are created around the post of the previous FPtr, instead of at the top of the stitch. This forms the bump you need for the cables to stand out.
We're not always going to work in the FPtr that's straight below the one we're making. To allow cables to cross and twist around each other, we need to skip or work ahead. Don't worry - it's all explained in the techniques below!
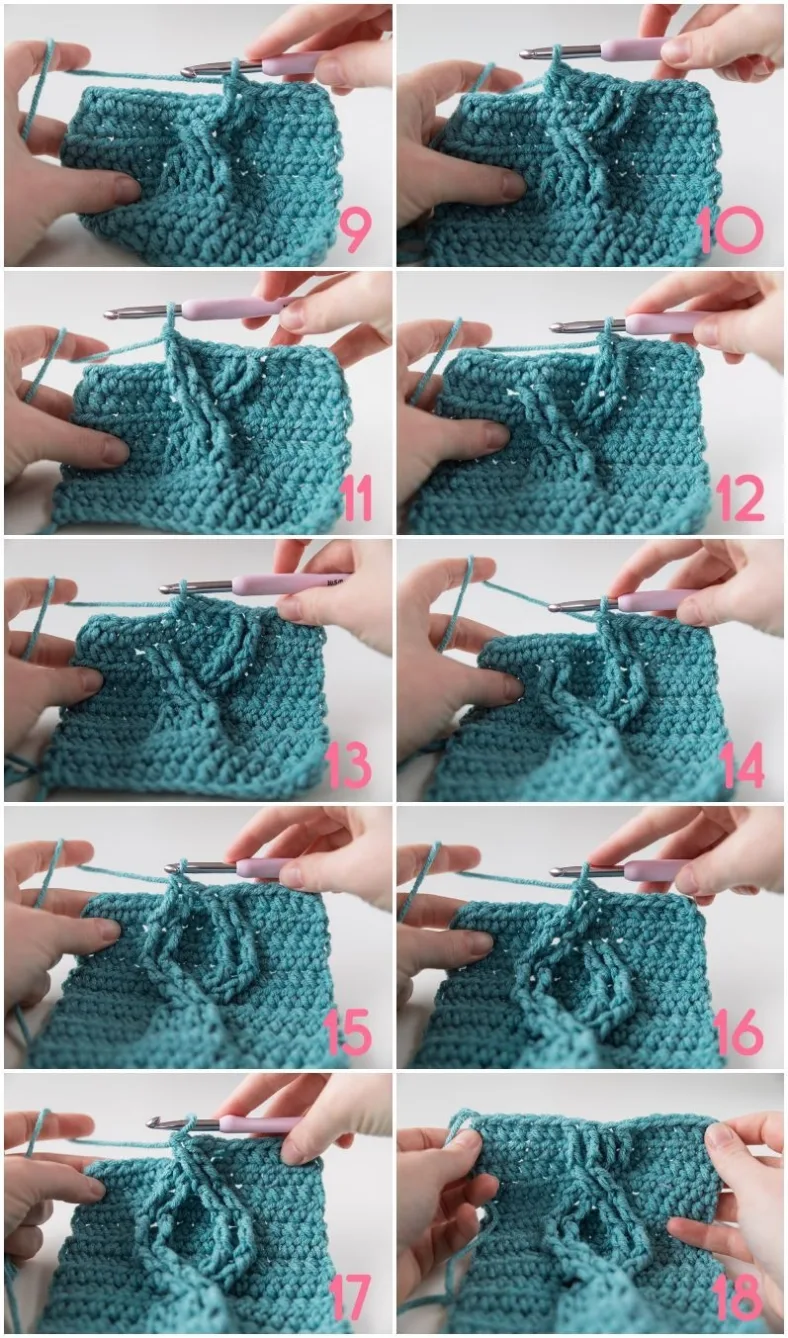
Straight cables (Row 4)
When the pattern instructs you to make a FPtr, yarn over twice (see photo 1). Insert your hook from front to back and back to front around the post of the indicated hdc two rows below, (‘FP’ portion of the stitch, photo 2). Yarn over again and pull up a loop (photo 3). Now, yarn over and pull through two loops three times, until you have finished the ‘tr’ portion of the FPtr. (photo 4). This is how you make a FPtr. Make 4 straight FPtr next to each other (photo 5), continue with the pattern as written.
Crossing cables (Row 6)
We’re splitting the cable in Row 6. When you reach the cable section (photo 6), skip the first two FPtr and make a FPtr around the 3rd and 4th FPtr of Row 4 instead (photo 7). Next, create a FPtr around both the 1st and 2nd FPtr. This causes your cable to split, with the right-hand side being on top (photo 8). Continue with the pattern as written.

Diverging cables (Row 8)
When you reach the cable section, work a FPtr in the 1st and 2nd FPtr (so the ones on the bottom, (photo 9)). This might require you to pick the stitches up with your finger as they are buried under the other part of the cable. Don’t be alarmed if a small gap appears on the sides of the FPtr - this is because you’re working diagonally and will lessen when blocking the blanket. Next, you will crochet 4hdc (photo 10), and work another two FPtr on the 3rd and 4th FPtr of Row 6 (the ones on the top, photo 11). This causes the cables to move apart. Continue with the pattern as written.
Parallel cables (Row 10)
This part is really easy and mirrors the part in Row 4. You will crochet two FPtr in the first two FPtr of Row 8 (photo 12), crochet 4hdc (photo 13) and then make two FPtr in the next two FPtr of Row 8. Continue with the pattern as written.
Converging cables (Row 12)
When you reach the cable section in Row 12, you will make two diagonal FPtr in the 1st and 2nd FPtr of Row 10 (photo 14). Because the cables are moving back together, we’ll skip the regular hdc in between and immediately continue with the 3rd and 4th FPtr around the 3rd and 4th FPtr of Row 10 (photo 15). These stitches are made right next to each other. Continue with the pattern as written.
Crossing cables (Row 14)
These crossing cables are identical to the first, as we aim to maintain the twist in the cable. You’ll make the 1st and 2nd FPtr in the 3rd and 4th FPtr of Row 12 (photo 16), and the 3rd and 4th FPtr in the 1st and 2nd FPtr of Row 12 (photo 17). Continue with the pattern as written.
Straight cables (Row 16)
Row 16’s FPtr are the same as Row 4. You’ll make four FPtr next to each other, all shooting up from the FPtrs in Row 14 (photo 18). Continue with the pattern as written.
This is the pattern repeat (photo 19). You keep on repeating this pattern, changing colours as you go.

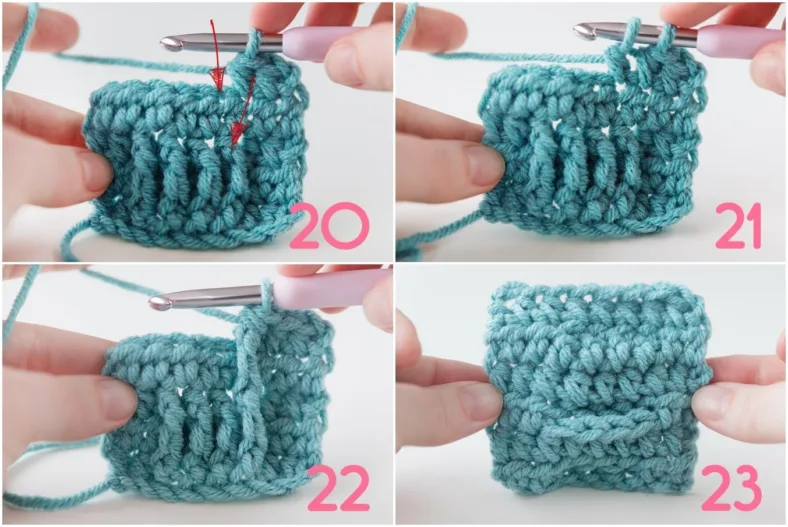
Hdc-FPtr2tog stitch
This stitch is a hdc2tog (2 half double crochet together), but instead of picking two stitches next to each other, we’re picking two stitches right above one another in different rows (red arrows (photo 20)). One leg of the stitch will be a hdc, and the other will be a FPtr.
To crochet them: yarn over, insert hook in stitch that you would normally skip, yarn over, pull up loop, yarn over, pull through first 2 loops on hook (hdc-part made (photo 21)), yarn over twice, insert hook around FPtr 2 rows back, yarn over, pull up loop, yarn over, pull through first 2 loops, yarn over, pull through another 2 loops, yarn over, pull through final 3 loops (FPtr part made (photo 22)).
You can see the difference on the backside in photo 23: the bottom FPtr are made like normal ones, while the top is made with hdc-FPtr2togs. You see, fewer gaps, also on the sides!
Crochet pattern
Blanket Body
With Colour A, ch105.
Row 1 (WS) Starting in second ch from hook, 104hdc, ch1, turn. [104 hdc]
Row 2 (RS) 104 hdc, ch1, turn. [104 hdc]
Row 3 Repeat Row 2.
From here on, every WS row is a repeat of Row 2 (so 104 hdc across all stitches).
Row 4 10hdc, *1FPtr in each of the next 4 sts 2 rows below, 12hdc; repeat from * another 4 times, 1FPtr in each of the next 4 sts 2 rows below, 10hdc, ch1, turn. [6 cables with each 4 FPtr, 80 hdc]
Pro tip: if you don’t like the holes that the FPtr have on either side where you skip stitches, you can create a hdc-FPtr2tog stitch. Instead of making a FPtr and skipping the stitch behind it, you do the following (find a photo tutorial in the Techniques section):
Yarn over, insert hook in stitch that you would typically skip for the FPtr, yarn over, pull up loop, yarn over, pull through first 2 loops on hook (hdc-part made), yarn over twice, insert hook around FPtr 2 rows back, yarn over, pull up loop, yarn over, pull through first 2 loops, yarn over, pull through another 2 loops, yarn over, pull through final 3 loops.
This stitch instruction looks complex, but it is basically an hdc2tog, where the second hdc is your FPtr. Please note that each hdc-FPtr2tog stitch replaces a FPtr and the skipped stitch behind it (ergo, you do not skip stitches anymore while doing this). You can replace any FPtr in the pattern with this stitch. Play around!
Crossing cables
Row 6 10hdc, *skip first 2 FPtr, 1FPtr in each of the next 2 FPtr, 1FPtr in each of the 2 skipped FPtr (this causes your cables to cross each other with the right hand cable on top), skip 4 sts, 12hdc; repeat from * another 4 times, skip first 2 FPtr, 1FPtr in each of the next 2 FPtr, 1FPtr in each of the 2 skipped FPtr, skip 4 sts, 10hdc, ch1, turn. [6 cables with each 4 FPtr, 80 hdc]
I find it easiest just to pick up an underlying FPtr with my fingers while working around them instead of poking around and possibly picking up half of the stitch.
Row 8 8hdc, *1FPtr in each of next 2 FPtr (so the ones on the bottom of the cable), skip 2 sts, 4hdc, 1FPtr in each of next 2 FPtr (so the ones on the top of the cable), skip 2 sts, 8hdc; repeat from * another 5 times, ch1, turn. [6 cables with each 4 FPtr, 80 hdc]
Row 10 8hdc, *1FPtr in each of next 2 FPtr, skip 2 sts, 4hdc, 1FPtr in each of next 2 FPtr, skip 2 sts, 8hdc; repeat from * another 5 times, ch1, turn. [6 cables with each 4 FPtr, 80 hdc]
Row 12 10hdc, *1FPtr in each of next 4 FPtr, skip 4 sts, 12hdc; repeat from * another 4 times, 1FPtr in each of next 4 FPtr, skip 4 sts, 10hdc, ch1, turn. [6 cables with each 4 FPtr, 80 hdc]
Row 14 Repeat Row 6, cut yarn. [6 cables with each 4 FPtr, 80 hdc]
Row 16 Repeat Row 4, omit the ch1, cut yarn. [6 cables with each 4 FPtr, 80 hdc]
Rows 3-16 form the pattern repeat. Repeat the pattern repeat for Colours B, C, D, E, F, G and H. Don’t cut yarn when you finish Row 16 in Colour H.
Second to last row 101 (WS) Repeat Row 2.
Last row 102 (RS) 104 hdc, cut yarn, turn work. [104 hdc]
The main body of your blanket is now finished.

Border
You’ll be working a border in Colour I all around the blanket. To prevent the side stitches from looking messy (white yarn in coloured blocks contrasts hugely), we’ll make a base row in the colour of the underlying colour blocks. This creates a neat base for the border rounds.
Please note that you only work this first row on the long sides. This is because you might not have enough yarn in Colour A and H to make an extra row on the short sides.
Base row left side (RS) Join Colour H in the top left corner stitch. Ch1, 1hdc in side of each row made in Colour H, *cc to next colour, 1hdc in side of each row made in underlying colour; repeat from * for each colour until you’ve made the last stitch in Colour A. Cut yarn, fasten off.
Base row right side (RS) Join Colour A in the bottom right corner stitch. Ch1, 1hdc in side of each row made in Colour A, *cc to next colour, 1hdc in side of each row made in underlying colour; repeat from * for each colour until you’ve made the last stitch in colour H. Cut yarn, fasten off. [116 hdc on each side]
If you find the distance between rows is too large for one hdc per row, you can smuggle in some extra stitches on the long sides. It won’t matter for the following pattern instructions.
Border Round 1 (RS) Join Colour I in any st on the top side of the blanket. Ch1, 1hdc in same st, *1hdc in each st to end of side, ch2, rotate blanket 90 degrees; repeat from * another 3 times, 1hdc in each st to beginning of round, join with ss to first st. [104 hdc on short sides, 116 hdc on long sides, 4 ch-2 sps]
Border Round 2 (RS) Ch1, 1hdc in same st, *1hdc to end of side, (2hdc, ch2, 1hdc) in corner-sp, rotate blanket 90 degrees; Repeat from * another 3 times, 1hdc to end of side, join with ss to first st. [107 hdc on short sides, 119 hdc on long sides]
You're making 2hdc on one side of the corner and 1hdc on the other side. When you work in Rounds, the slanting of stitches causes the corners to look slightly crooked. By working 2hdc, we're offsetting this slant and making perfectly square corners. Trust me, it works!
Repeat Border Round 2 until you run out of yarn (most likely after 5 border rounds). Cut yarn and fasten off. [119 hdc on short sides, 131 hdc on long sides]
Block your blanket to size.
Changing the size of the blanket
It’s easiest to adjust the pattern by adding or removing cables and the space between. The pattern repeat is 16 stitches wide. So I would suggest adding multiples of 16 chains to the beginning chain number (i.e. start with 121, 137, 153 chains, etc). This adds ~16 cm (~6¼in) to your blanket width. If you do this, you don’t have to alter any pattern instructions other than repeating the parts between * and ; a different number of times.
To change the height, simply adjust the number of rows. A full cable consists of 14 rows, measuring ~ 16cm (~6¼in). However, nothing is stopping you from only adding half a cable (7 rows) or any other number of rows. I would recommend always crocheting the instructions for the second-to-last row and the last row after your final cable row, so the start of the blanket is mirrored at the end of the blanket.
Diagram
Crochet diagram: Body of blanket
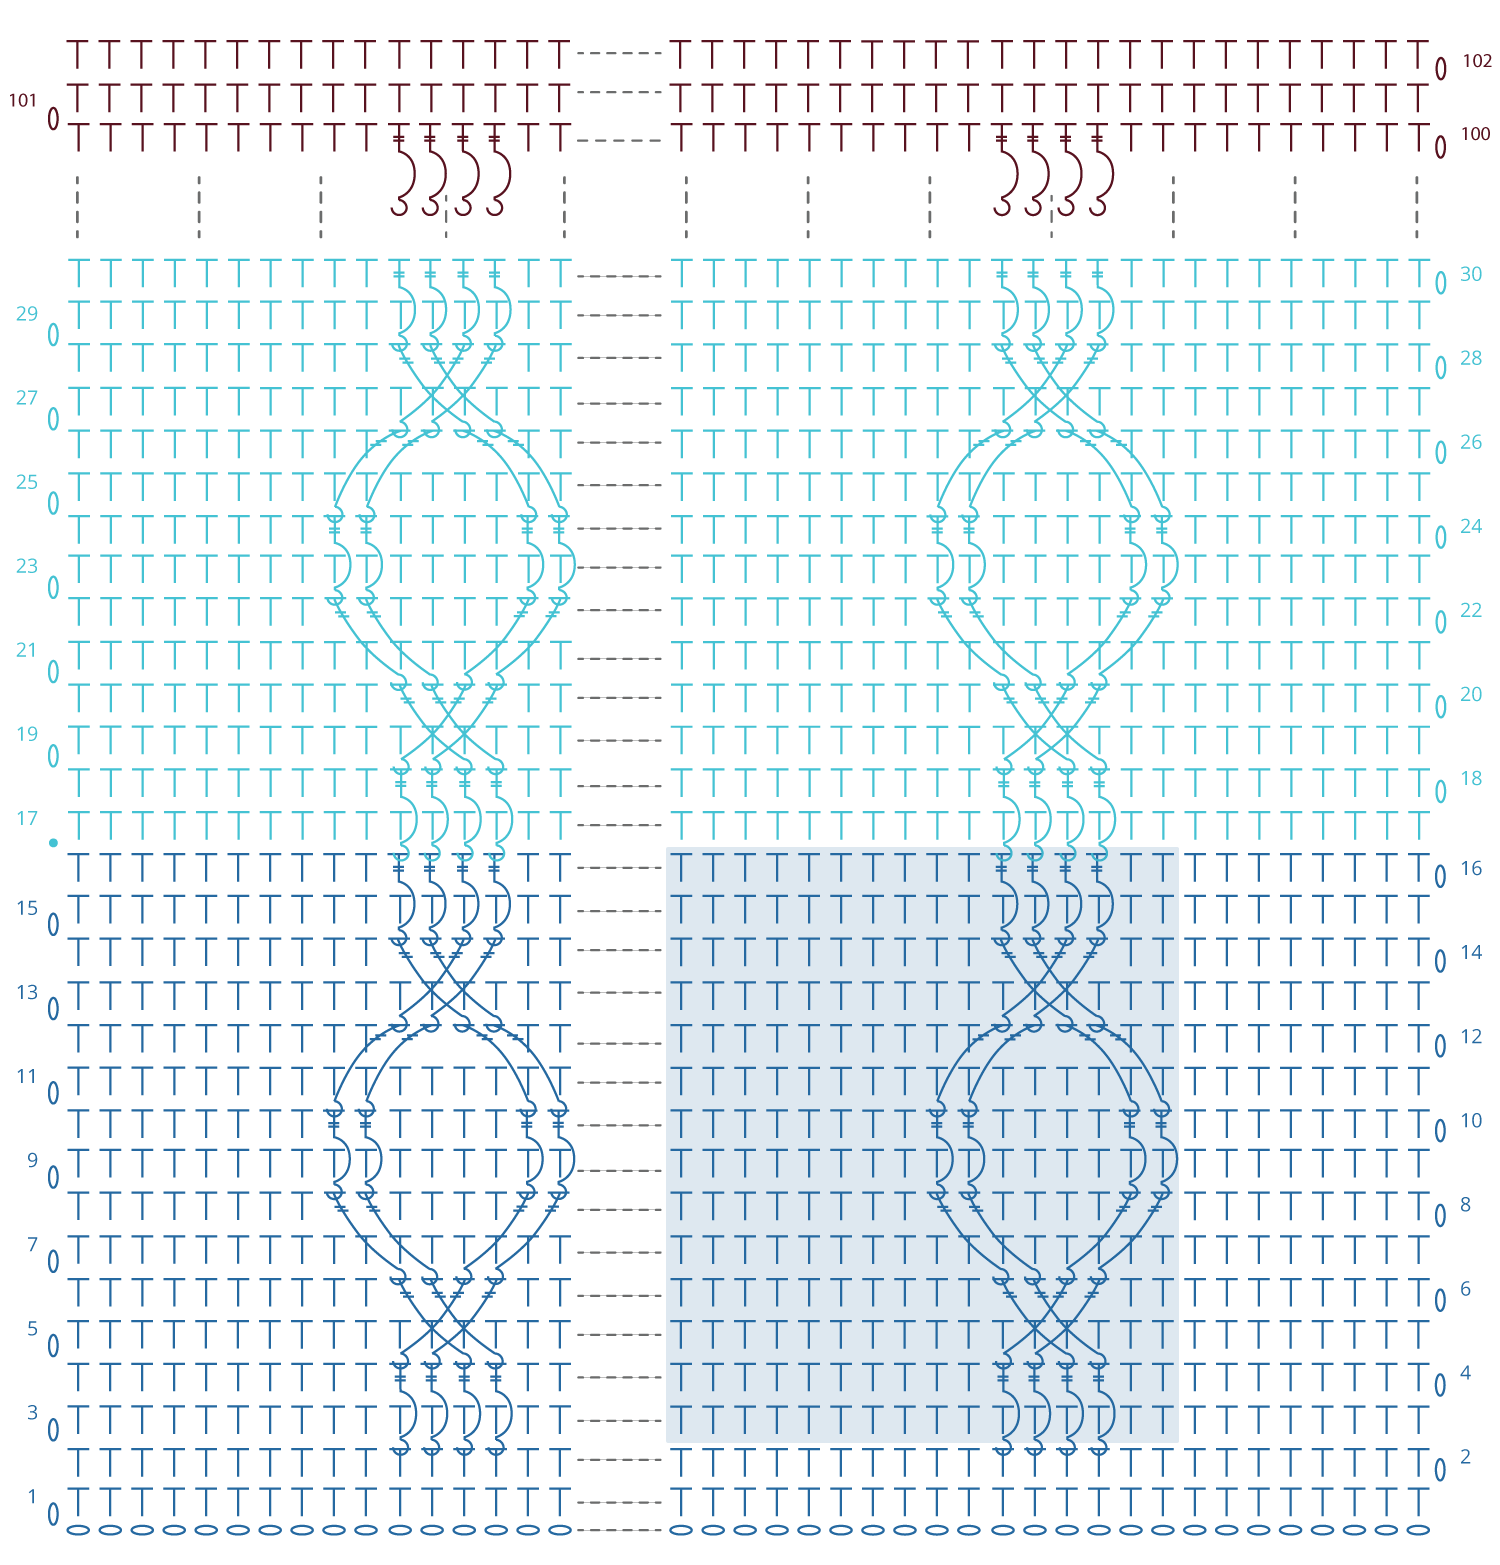
Key (US terms)


Comments
Be the first to comment to this post!