Rainbow Granny Square Blanket
01.Mar.19 / Kirsten BalleringThe colourful Rainbow Granny Square Blanket is the perfect pattern to learn how to crochet. If you can crochet a double crochet and a chain, you've got all the tools in your arsenal to get started on this stunning blanket!
You can easily modify this pattern to your own colour preferences and size as it’s join-as-you-go. That means that you crochet the blocks together while working on the blanket, instead of at the end. Once you’re satisfied, you’ll finish the blanket with a nice edge. Read on for the full pattern!

Materials and preparation
Yarn
- Colour A: 1246 Maastricht x 1 ball
- Colour B: 1132 Leek x 1 ball
- Colour C: 1081 Gouda x 1 ball
- Colour D: 1263 Leerdam x 1 ball
- Colour E: 1065 Assen x 1 ball
- Colour F: 1316 Almelo x 1 ball
- Colour G: 1422 Eelde x 1 ball
- Colour H: 1068 Den Helder x 1 ball
- Colour I: 1034 Urk x 1 ball
- Colour J: 1019 Texel x 1 ball
- Colour K: 1003 Middelburg x 1 ball
- Colour L: 1082 Zwolle x 1 ball
- Colour M: 1188 Rhenen x 1 ball
- Colour N: 1432 Heerlen x 1 ball
- Colour O: 1061 Meppel x 1 ball
- Colour P: 1084 Hengelo x 1 ball
- Colour Q: 1390 Amersfoort x 1 ball
- Colour R: 1241 Den Bosch x 1 ball
- Colour S: 1083 Tilburg x 1 ball
- Joining Colour: 1005 Barneveld x 6 balls
Shop the yarn
You can find Scheepjes Colour Crafter at Scheepjes retailers, or webshops such as:
Crochet hook
5.0mm (US size H).
Measurements
100 x 175cm (40 x 69in).
Gauge/tension
1 granny square measures 9 x 9cm (3.5 x 3.5in). Gauge isn’t critical for this project though.
Notes
- A granny cluster is a set of 3 dc (or ch3 + 2dc if you’re starting with your round). Granny clusters are worked in the chain spaces in between clusters or in corners of the previous round.
- Do you want to swap yarns to Catona? Then follow my Colour Crafter to Catona conversion table.
Abbreviations (US terms)
- ch: chain
- ch-sp: chain space
- dc: double crochet
- dc2tog: double crochet 2 stitches together: yarn over, insert hook in stitch, yarn over, pull up loop, yarn over, pull through first 2 loops on hook. Next, yarn over again, insert hook in next stitch, yarn over, pull up loop, yarn over, pull through first 2 loops on hook. Finally, yarn over, pull through all remaining loops on hook
- RS: Right side
- ss: slip stitch
Repeat formats
- *….; rep from * once/twice/3x Crochet the instructions after * and then repeat that section a further number of times as indicated.
- (…) once/twice/3x Crochet the instructions between brackets the total number of times indicated.
- […] Indicates the amount of stitches at the end of a row or round.
- (…) in same st/sp Indicates that all instructions between brackets are worked in the same stitch or space.
Colour layout
In order to create your rainbow squares, arrange the balls in alphabetical order in a circle with Colour S next to Colour A as displayed below (leave the Joining Colour out of this circle). Pick any colour for your first round. The three colours next to it on either side are used in order to create Round 2, 3 and 4.
For example: If you choose Colour K to create Round 1, pick Colour L, M and N for Round 2, 3 and 4. Or pick Colour J, I and H for Round 2, 3 and 4.
Another example: If you choose Colour R to create Round 1, pick Colour S, A and B for Round 2, 3 and 4. Or pick Colour Q, P and O.
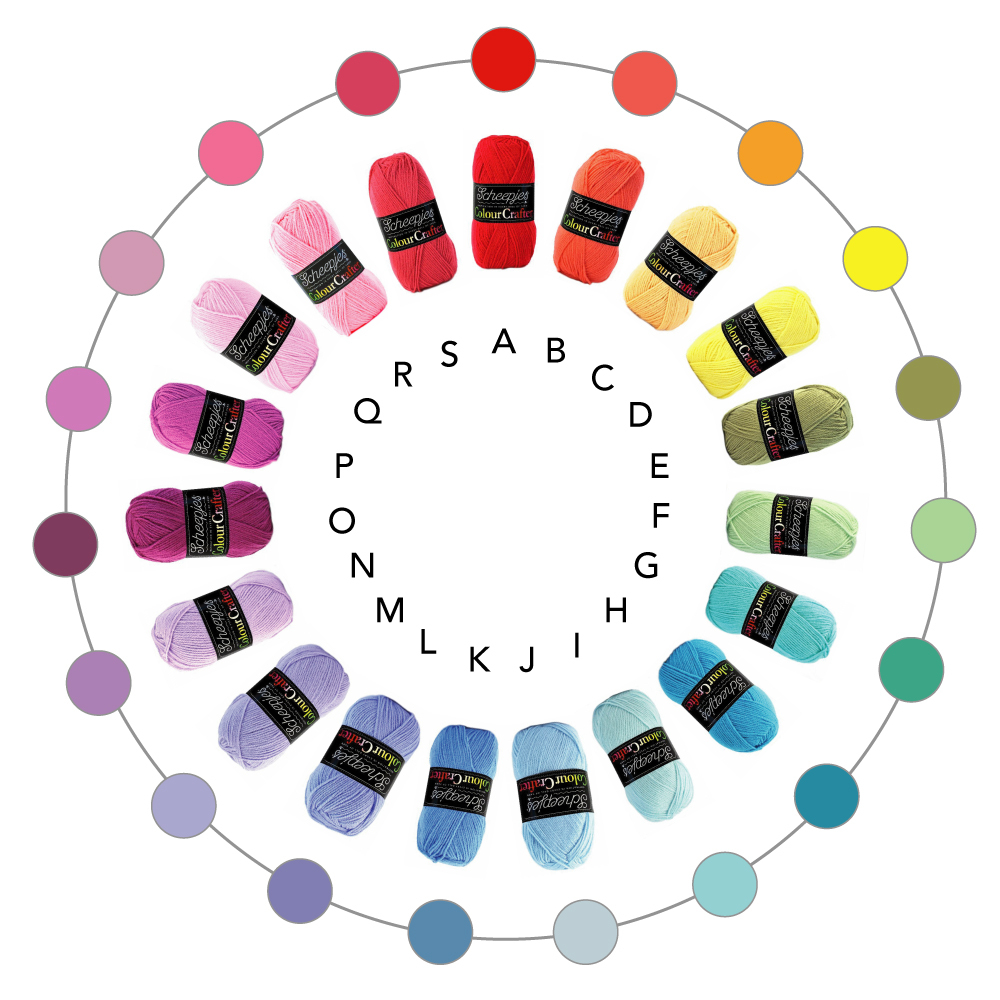
Looking back on the original blanket, I see a few 'mistakes' where I didn’t follow my own instructions. I’ve corrected these in the final colour chart below. However, if you’re charmed by them, feel free to sneak one of these squares in every once in a while. These squares look ‘soft’, and are really quite beautiful! I’ve selected a few colour combinations which are in the original blanket but are not quite as per my own rules above:
Crochet pattern
Basic Granny square (make 135)
Round 1 (RS) Take your first colour and ch5, join with ss in fifth ch from hook to form a ring. Ch3 (counts as first dc here and throughout pattern), 2dc in ring (first granny cluster made), ch3, *3dc in ring, ch3; repeat from * another 2 times, join with ss in first dc. Cut yarn. [4 clusters consisting of 3 dc, 4 ch-2 corner spaces]
Round 2 (RS) Join your next colour with a ss in a corner ch-sp, (ch3, 2dc, ch3, 3dc) in same corner ch-sp, ch1, *3dc in next corner ch-sp, ch3, 3dc in same corner ch-sp, ch1; repeat from * another 2 times, join with ss in first dc. Cut yarn. [8 clusters consisting of 3 dc, 4 ch-1 spaces, 4 ch-2 corner spaces]
Round 3 Join your next colour with a ss in a corner ch-sp, (ch3, 2dc, ch3, 3dc) in same corner ch-sp, ch1, *3dc in next ch-sp, ch1, (3dc, ch3, 3dc) in corner ch-sp, ch1, 3dc in next ch-sp, ch1; repeat from * another 2 times, join with ss in first dc. Cut yarn. [12 clusters consisting of 3 dc, 8 ch-1 spaces, 4 ch-2 corner spaces]
Round 4 Join your next colour with a ss in a corner ch-sp, (ch3, 2dc, ch3, 3dc) in same corner ch-sp, ch1, *3dc in next ch-sp, ch1, 3dc in next ch-sp, ch1, (3dc, ch3, 3dc) in corner ch-sp, ch1, 3dc in next ch-sp, ch1; repeat from * another 2 times, join with ss in first dc. Cut yarn. [16 clusters consisting of 3 dc, 12 ch-1 spaces, 4 ch-2 corner spaces]
Weave in all ends.
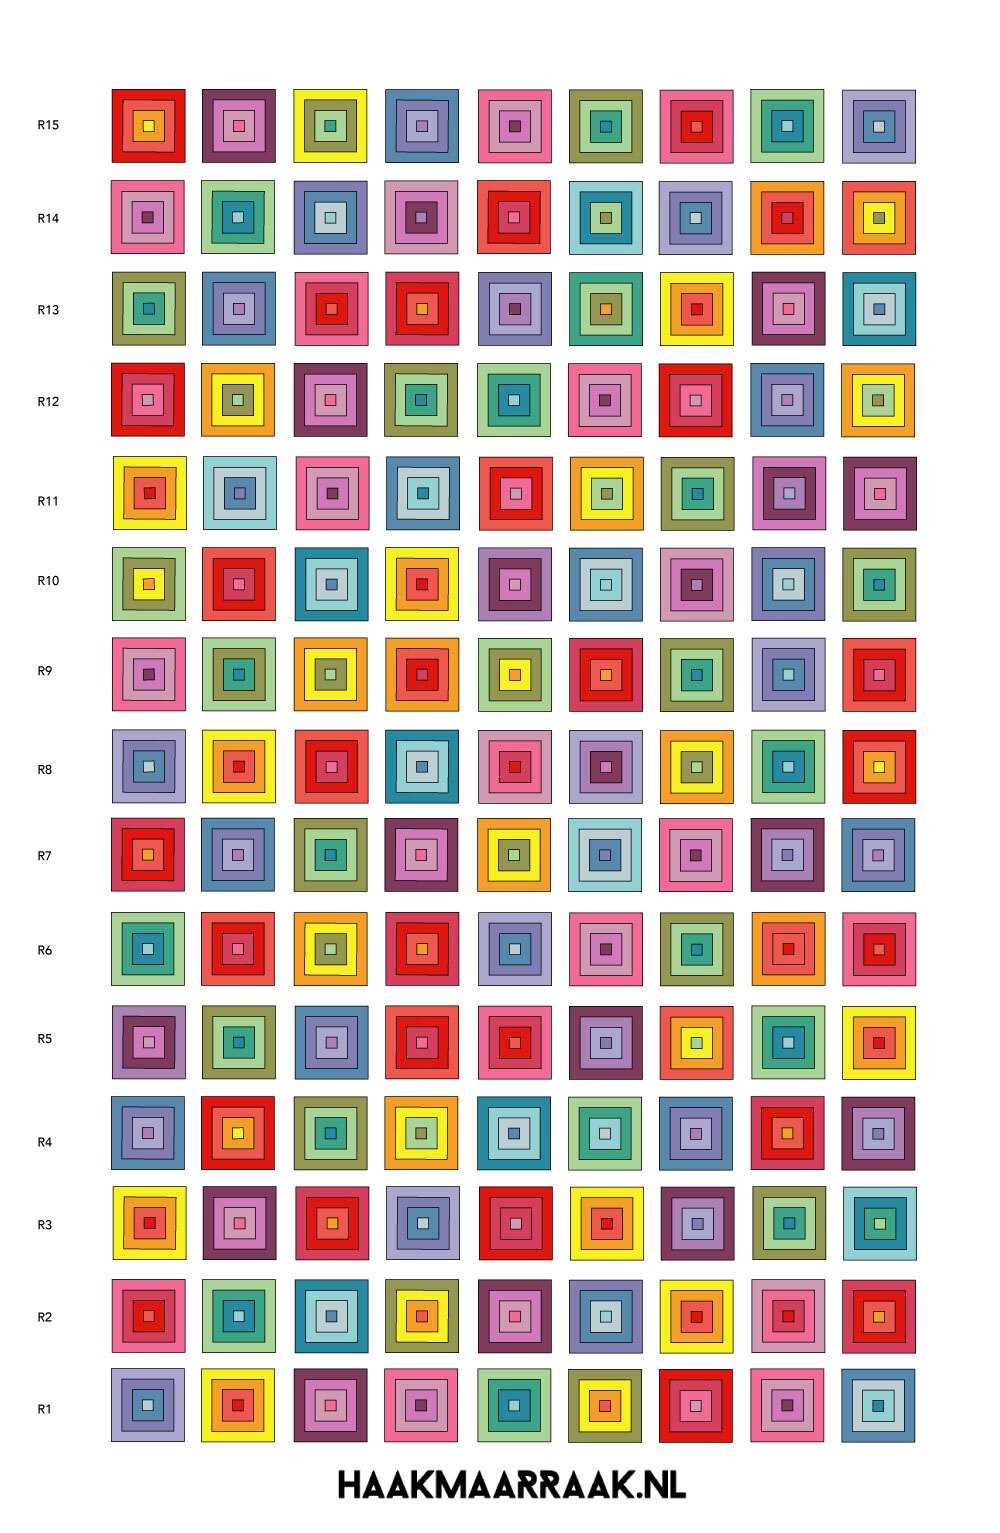
Square arrangement
The Granny Square blanket contains 135 squares if you join the motifs in 15 rows of 9 motifs each. While you can make them all in advance and lay them down to determine your final arrangement, I made this blanket on-the-go.
My way of doing this was by crocheting 15-20 squares. Then I chose the arrangement for 1 row from the squares I made and joined those together. I repeated this for the next rows. This way, you won’t have to think about the whole blanket in advance and still have plenty of motifs to choose each time.
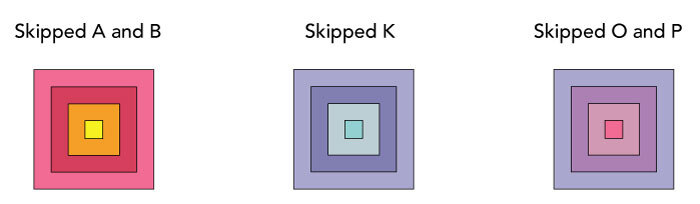
If you follow this method, keep an eye on ‘dark’ and ‘light’ squares. Dark squares are squares that have, for example, colour O and P in them. Light squares are squares which have colour D and E in them. Try to keep these squares evenly spread out and never place two right above or next to each other, in rows as well as in columns. It’s visually more appealing, I find.
If you like a full overview of the blanket as I’ve made it, check out the colour placement image below.
Joining motifs
First motif
Join Joining Colour with a ss in any corner ch-sp, (ch3, 2dc, ch3, 3dc) in same corner ch-sp, ch1, *(3dc in next ch-sp, ch1) until you reach the next corner ch-sp, (3dc, ch3, 3dc) in corner ch-sp, ch1; repeat from * another 2 times, (3dc in next ch-sp, ch1) until you reach the next corner ch-sp join with ss in first dc. Fasten off.
Subsequent motifs
Repeat the instructions for the first motif. However, when you reach a side that should be joined to another square replace the ch1 between granny clusters with a ss in the adjacent square. Replace the ch3 in corners with ‘ss in adjacent square, ch1, ss in next adjacent square’.
Edge
Round 1 (RS) Join Joining Colour with a ss in any corner ch-sp, (ch3, 2dc, ch3, 3dc) in same corner ch-sp, ch1, *(3dc, ch1) 3 times, 1dc in next corner ch-sp, dc2tog in same corner ch-sp and corner ch-sp on next square, 1dc in same corner ch-sp, ch1; repeat from * for each square until you reach the other corner of the blanket, (3dc, ch3, 3dc) in blanket corner ch-sp, ch1**, repeat from * to ** for each side of the blanket, join with ss in first dc. Cut yarn.
Round 2 (RS) Join joining yarn with a ss in any corner ch-sp, (ch3, 2dc, ch3, 3dc) in same corner ch-sp, ch1, *(3dc, ch1) until you reach the next blanket corner ch-sp, (3dc, ch3, 3dc) in blanket corner ch-sp, ch1; repeat from * for each side of the blanket, join with ss in first dc. Cut yarn.
Round 3-4 Repeat Round 2.
Weave in all remaining ends and block the blanket to size. If you’re not familiar with blocking, visit my blocking tutorial.
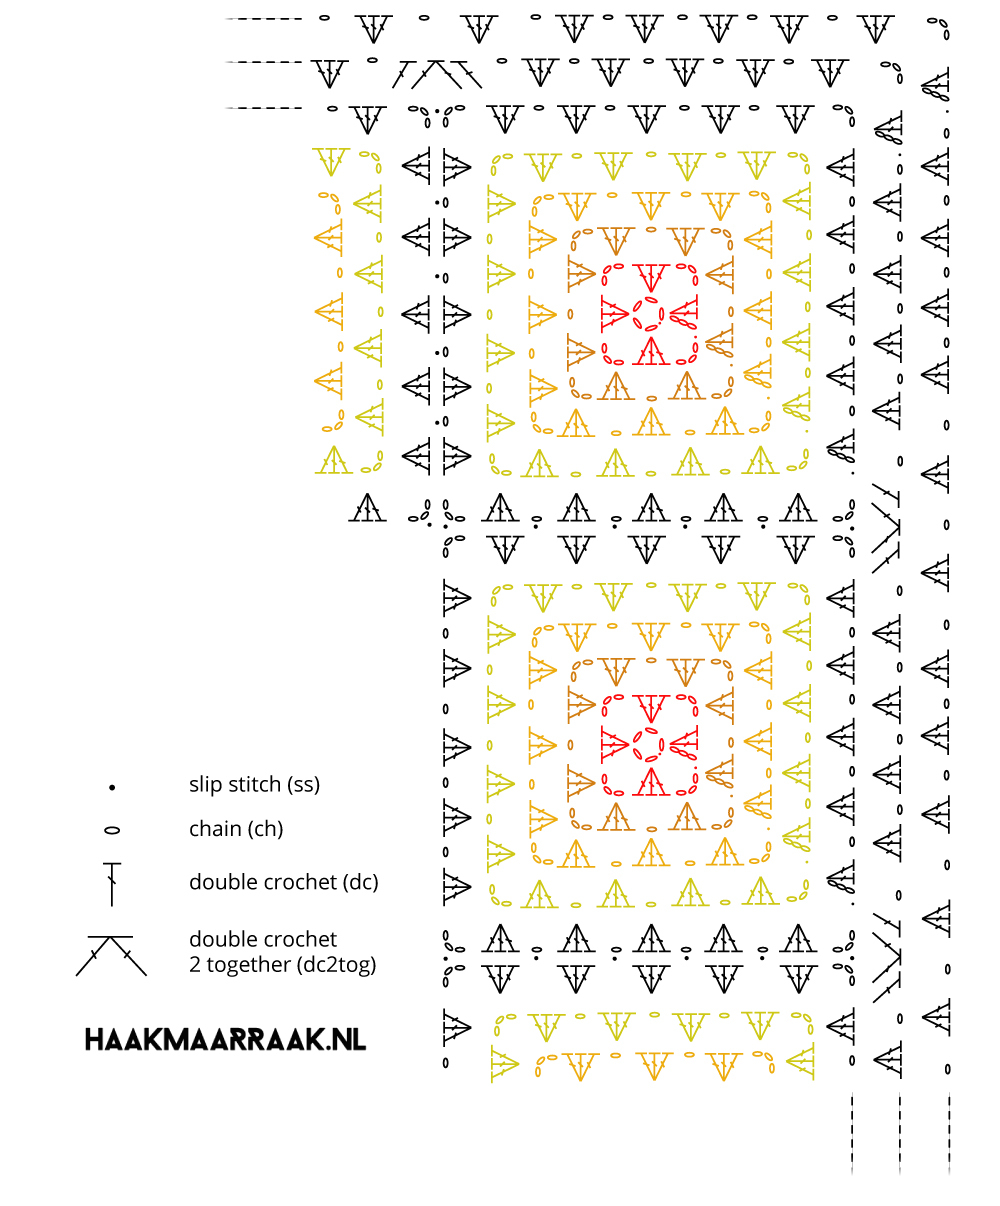
Diagram
Granny Square and Border Diagram


Comments
thank you for your message! It's really easy to adjust the measurements for this blanket. You can simply add rows and columns of squares wherever you like, following the joining instructions. That way you can completely modify it to you needs!
Kind regards,
Kirsten April 28, 2022 08:23 - Reply
we gaan ervoor!
met lieve groeten Chantal July 12, 2022 20:39 - Reply