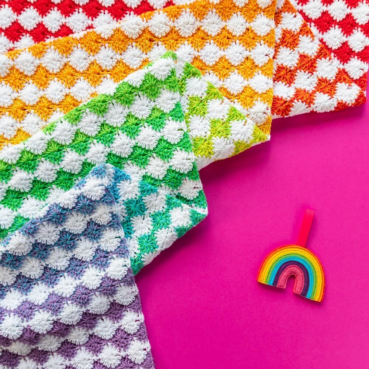
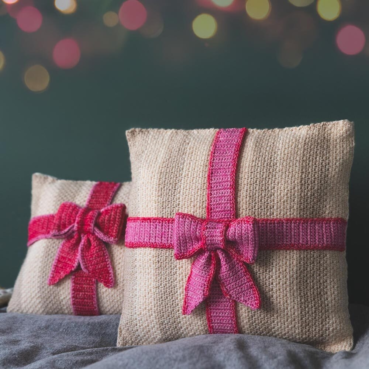
Granny Square Pillow
29.Aug.24 / Kirsten BalleringThe Granny Square pillow checks all the boxes: quick, easy to customise and as colourful as you'd like it to be! This project is perfect for scraps of yarn, or project leftovers.
Materials and preparation
Yarn
- Colour A: 1083 Tilburg x scrap
- Colour B: 1123 Roermond x scrap
- Colour C: 1132 Leek x scrap
- Colour D: 2004 Brussel x scrap
- Colour E: 1821 Terneuzen x scrap
- Colour F: 1725 Ameland x scrap
- Colour G: 1422 Eelde x scrap
- Colour H: 1068 Den Helder x scrap
- Colour I: 1432 Heerlen x scrap
- Colour J: 1188 Rhenen x scrap
- Colour K: 1390 Amersfoort x scrap
- Colour L: 2006 Luik x scrap
- Colour M: 1828 Zutphen x scrap
- Colour N: 1011 Tynaarlo x 2 balls

- Pillowcase, sample made for a 60x60cm( 23½ x 23½in) pillow
- Needle
- Sewing thread matching colour N
This pillow is a perfect scrap project, but you need two balls of the background colour. Scheepjes Colour Crafter is available at several stores, such as:
Crochet hook
4.0mm (US size F/6).
Measurements
Made for a 60x60cm (23½ x 23½in) pillow.
Gauge/tension
Gauge is not that important. Make one motif. Take the width and height of the pillow, subtract 4cm/1in from both measurements and divide it by the size of your motif to estimate how many motifs you need.
Abbreviations (US terms)
- BL: back loop
- ch: chain
- dc: double crochet
- hdc: half double crochet
- RS: right side
- ss: slip stitch
- st(s): stitch(es)
- WS: wrong side
Repeat formats
- *….; rep from * once/twice/3x Crochet the instructions after * and then repeat that section a further number of times as indicated.
- *…; rep to end Crochet the instructions after * and then repeat that section to the end of the row or round.
- (…) once/twice/3x Crochet the instructions between brackets the total number of times indicated.
- […] Indicates the amount of stitches at the end of a row or round.
- (…) in same st/sp Indicates that all instructions between brackets are worked in the same stitch or space.
Colour layout
When I joined my motifs, I placed them at random. For a genuinely random look, you can do the same! If you like the look of the pillow, I've charted out my colour combination below.

Do you want to put together your own colours? Use this colouring template!

Techniques
Video tutorial
Granny Square
The Granny Square motif consists of so-called ‘Granny Clusters’: groups of 3dc, separated from each other by chains. Each round you’ll crochet more Granny clusters on each side, thereby growing your motif.
Take your colour for Round 1 and make a magic loop. Ch3 (counts as your first dc, (photo 1)). Next, make 2dc in the magic loop (photo 2). This is your first granny cluster. Ch2 to turn the corner (photo 3), and make 3dc in the magic loop again (second cluster made, (photo 4)). Continue making 2 ch and 3dc until you have 4 clusters, one on each side (photo 5). After your last ch2, join with a ss in the third ch of your beginning dc and cut your yarn (photo 6). That’s the first round of your Granny Motif sorted!
To start round 2, take your next colour and join with a ss in any ch2-corner space. Ch3 (counts as first dc, (photo 7)). In the same corner space, make 2 more dc, then a ch2 and 3dc. You’ve now made the corner for round 2 (photo 8). Ch1 to bridge the gap to the next corner space, and repeat the 3dc, ch2, 3dc for the corner. Work your way around until you’ve covered all four corner spaces. Ch1 to bridge the last cluster of the previous round (photo 9) and join with a ss in the third ch of the beginning dc (photo 10). Cut yarn and weave in ends.


Joining
Start by putting the motifs together RS together (so WS out). Join the joining colour with a ss in the corner spaces of both motifs (photo 11). We’ll be working in the back loops of each stitch. If you look closely, the back loops will be slightly raised compared to the front loops; this makes them easier to isolate.
Start with picking up the outer loops of the ch’s in the corner space. Insert your hook through both outer loops and make a single crochet (photos 12-13). Next, you’ll pick up the outer loops of the next stitch, which is the first dc of a granny cluster. Make a sc again (photos 14-15). Continue like this all across the motif to the corner space on the other side (photo 16). Don’t cut your yarn when you’ve made your last sc in the corner space, but grab the following two motifs WS together, and continue working sc’s in the back loops of those.
This join creates a cute little ridge on the front side of your work; it is the unworked front loops (photo 17). While the join might be very noticeable in this tutorial, you barely notice it when you use a colour close to your Round 2 colour (photo 18).


Crochet pattern
Motif (make 81)
The first round of each motif is made with Colours A-M. Colour N is reserved for the second round and joining. I tend to make a bunch of motifs in each colour and figure out where to place them later.
With your selected colour, make a magic loop.
Round 1 (RS) Ch3 (counts as first dc), 2dc, (ch3, 3dc) 3 times, ch3, join with ss to third ch from starting chain. Cut yarn and pull the loop tight. [4 sides of 3 dc, 4 ch3-sps]
Round 2 (RS) With Colour N join with a ss in any ch-3 sp. Ch3 (counts as first dc), (2dc, ch3, 3dc) in ch-3 sp, *ch1, (3dc, ch3, 3dc) in next ch-3 sp; repeat from * 2 more times, ch1, join with ss to third ch of starting chains. Cut yarn and weave in all ends. [4 sides of 2 x 3 dc with ch1, 4 ch3-sps]
Joining
You will join the motifs with a single crochet on the wrong side. First you'll join all columns. Once all motifs are joined in columns, you will join the rows together. All joins are made in in the back loops (BL) of each stitch. This creates a little ridge on the front side of your pillow.
Start by laying your motifs in the layout you want to join. Then, stack all motifs from a column together, ending with the top motifs of each column on top. It's good practice to secure your stacks with a scrap of yarn and label them as you won't know which stack is which otherwise.
Sizing the front
Please note that you want to end up with a crochet fabric about 5cm/1.25 inches shorter than your pillow on all sides (so-called negative ease). This stretches the fabric taut over the pillow and, as a bonus, means you don't have to block your work. Keep this in mind when joining your motifs, and add or remove motifs when necessary.
Joining
If you're righthanded, you will likely join from right to left. So pick the first motifs from columns 9 and 8 (or whatever column is your last column and the one before that). Ensure you have the motifs facing with the RS, so WS to you.
First motif
Join Colour N with a ss through the BL of the third ch in a ch-3 sp on both motifs (so the loops furthest apart from each other), make a sc. Make sc's through the BL of the 3 dc, ch and 3 dc on that side. Finally, make a BL sc in the first ch of the ch-3 sp. You now joined the first motifs of columns 9 and 8. [9 sc's per motif]
Next motifs
Select your second motifs of both columns RS together and make a BL sc in the first ch of the ch-3 sps of both motifs. Continue making BL sc's across the motifs until you reach the ch3 space on the last motifs of your columns. Cut yarn.
If BL's are too fidgety, you can join through both loops. It won't make a difference in size, but you won't have that ridge around the motifs on the right side.
Next, select the motifs for column 7 and join them to the left side of column 8. Continue like this until all motifs have been joined in columns. Next, do the same for the rows in the pillow until all motifs form a continuous fabric.

Assembly
I sewed my crochet front on the pillowcase. Sizingwise, your front should measure ~5cm/1.25in less than the measurements of your pillow. Next, crochet the round below to end up with a negative ease of around 4cm/1in.
Hdc edge round
Round 1 (RS) Join Colour N with a ss in any st. Ch1, 1hdc in each st or ch-sp to end, *(2hdc, ch2, 2hdc) in ch-3 sp, 1hdc in each st or ch-sp to end; repeat from * another 3 times and join with a ss to the first hdc. Cut yarn and weave in ends.
If you feel your pillowfront is too small for the pillow (even with stretching), add more hdc rounds here. I added two rounds myself. It can be a bit of trial and error to figure out what works for you and your crochet tension.
Sewing the front on
Once the measurements are correct, Lay your pillow(case) flat and place the front on top, RS facing towards you. Pin the pillow in the corners and halfway through each side with a pin. Use a sharp needle and matching sewing thread to sew the back loop of each hdc stitch to the pillowcase with small backstitches as you can see below. Because you’re sewing in the back loop, the front loop will slightly fall over the edge, hiding your sewing from sight. It will make for a neat finish.
Work your way around, knot the sewing thread and weave in any ends. You're done!

Diagram
Motif

Key (US terms)


Comments
Be the first to comment to this post!