Hygge Pincushion
26.May.17 / Kirsten BalleringTo make the most out of Hygge leftovers, I’ve designed a few bonus patterns to keep your hands busy a little bit longer! You also have a chance to use the kit extra’s here. And since I’m not one for wasted squares, I created a cute pincushion based on the gauge square! You can whip this up in a few moments because technically you already did half the work on the start of the CAL!
Materials and preparation
The Hygge Pincushion is made from the leftovers of the Hygge CAL. Please check the kit contents for the Hygge CAL to see the exact colours for your colourway.

Yarn
Shop the yarn
Do you want to shop the yarn? You can still purchase Hygge kits from Wool Warehouse. If you rather buy the yarn separately, you can do so via the following links:
Crochet hook
4.5mm (US size 7).
Measurements
Approximately 10cm (4in) square.
Gauge/tension
Gauge is not critical for this project.
Abbreviations (US terms)
- ch: chain
- dc: double crochet
- ss: slip stitch
- st(s): stitch(es)
Crochet pattern
Squares
Make two gauge squares. You can use the gauge square already made for the Hygge CAL, or follow the instructions below to make two new ones.
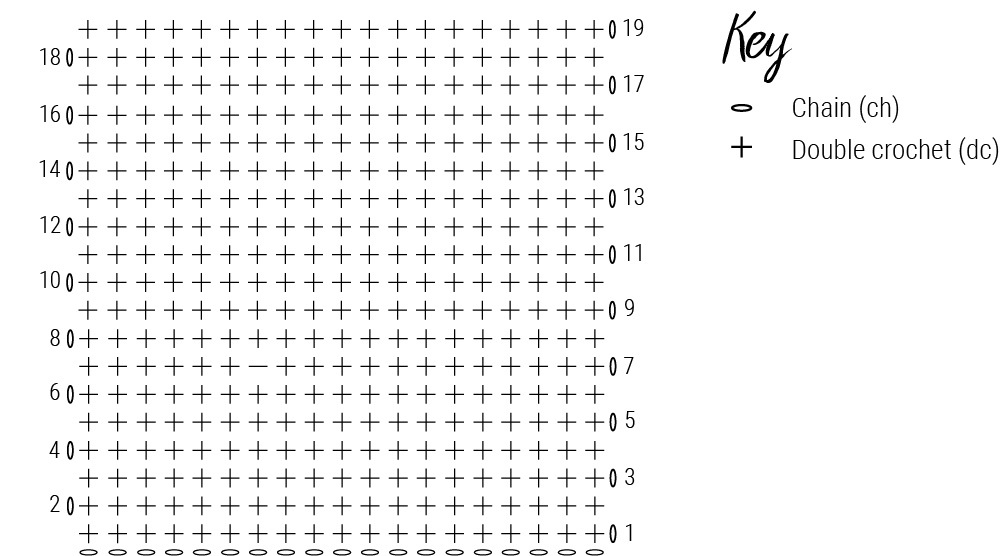
With Stone Washed, ch20.
Row 1 Starting in second ch from hook dc to end, ch1, turn. [19 dc]
Rows 2-18 19dc, ch1, turn.
Row 19 19dc, cut yarn and fasten off.
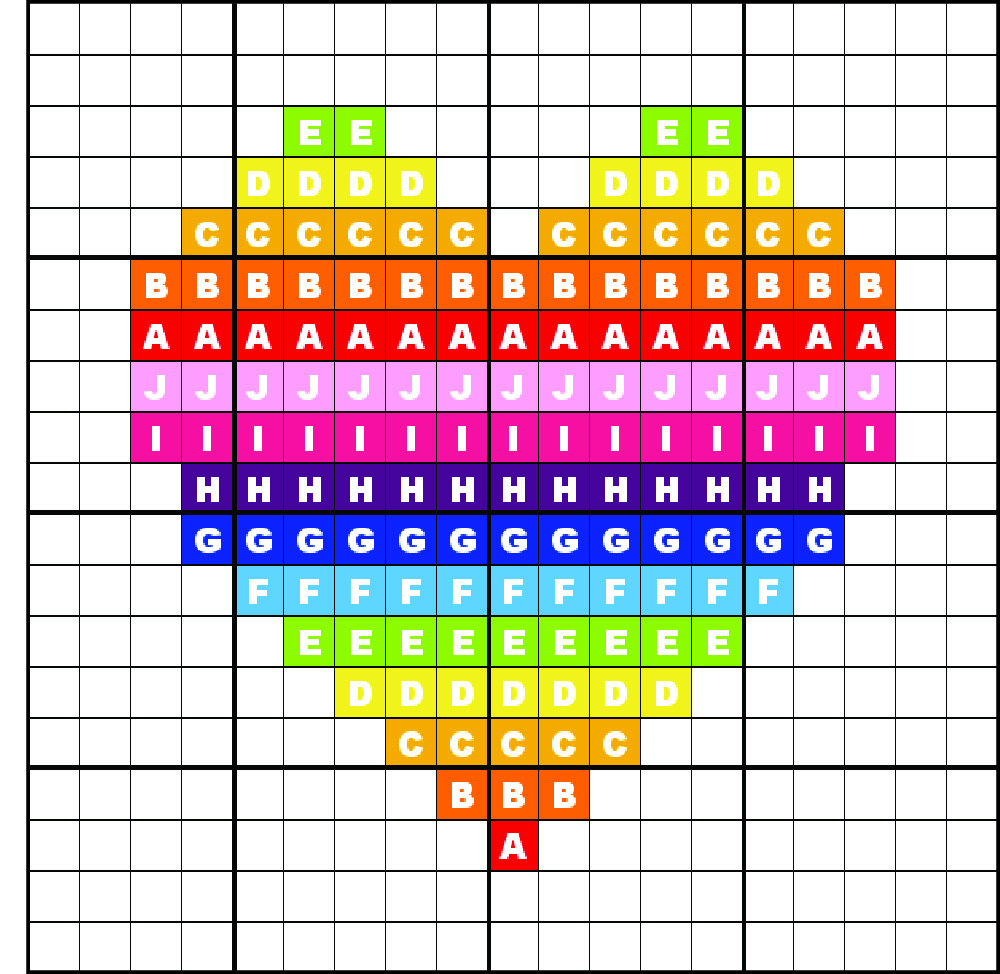
Embroider one, or both of the squares following the provided embroidery pattern. Instructions for embroidery are on the next page.
Border each square by joining SW with a ss in the corner st, *(dc, ch1, dc) in corner st, 17dc along side of square; repeat from * for each side. Join with ss in first dc, fasten off.
Put the squares with the wrong sides together. Take Colour D and keeping the yarn on the bottom of your squares, insert the hook from above through border sts of both squares. Pull up loop, insert hook from above through next st, pull up loop, pull through loop on hook (ss made). Ss in each st around. When you have finished approximately half of the sts on the fourth and final side, stuff the pillow lightly and keep stuffing it as you close each st. After finishing the last stitch, cut yarn and weave in ends. Sew the little wooden snowflake charm on the bottom left of your embroidered gauge square with Colour D. I unwinded the cotton thread and used one floss thread of it.
Charm Stitch Markers
Use your pliers to pry open the silver ring. put both the lobster clasp and the charm on the metal ring, shut it with the pliers again. Simple as that!
Embroidery
Work your embroidery on the gauge square in cross stitch according to the embroidery scheme. You read the scheme as follows:
Every square represents a crocheted stitch in your gauge square. The white squares will not be embroidered. The coloured squares represent the cross stitches you’re going to make. in every square there’s a letter, corresponding to the colour you use for the embroidery.
For details regarding how you embroider read the Tips & Tricks document, or watch the video tutorial provided by Esther for week 2 of the Hygge CAL.
Download the pattern
You can download the pattern as PDF here.
Diagram
Crochet Diagram

Embroidery Diagram


Comments
Be the first to comment to this post!