

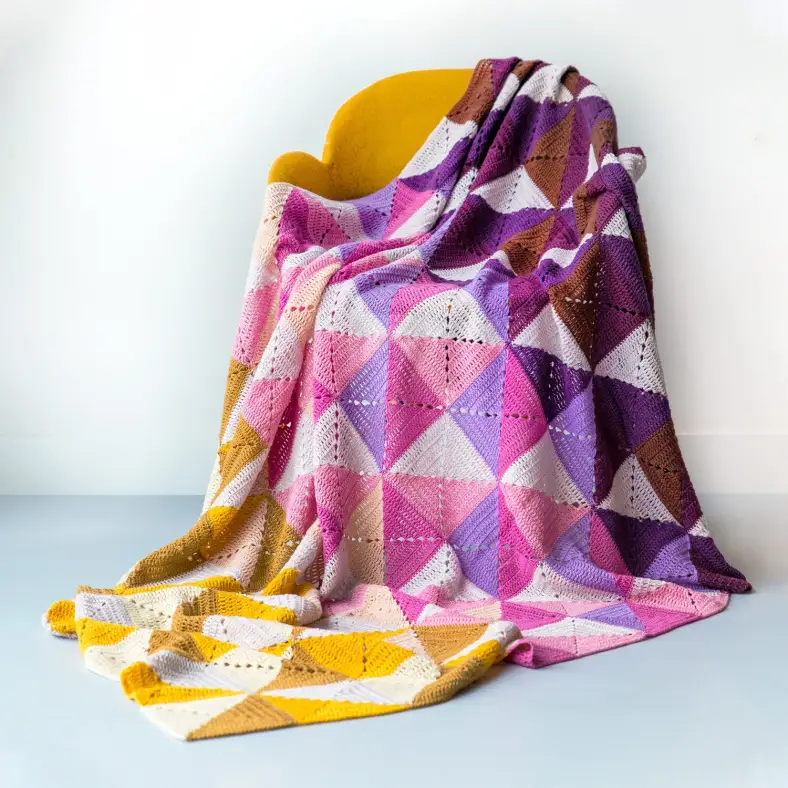
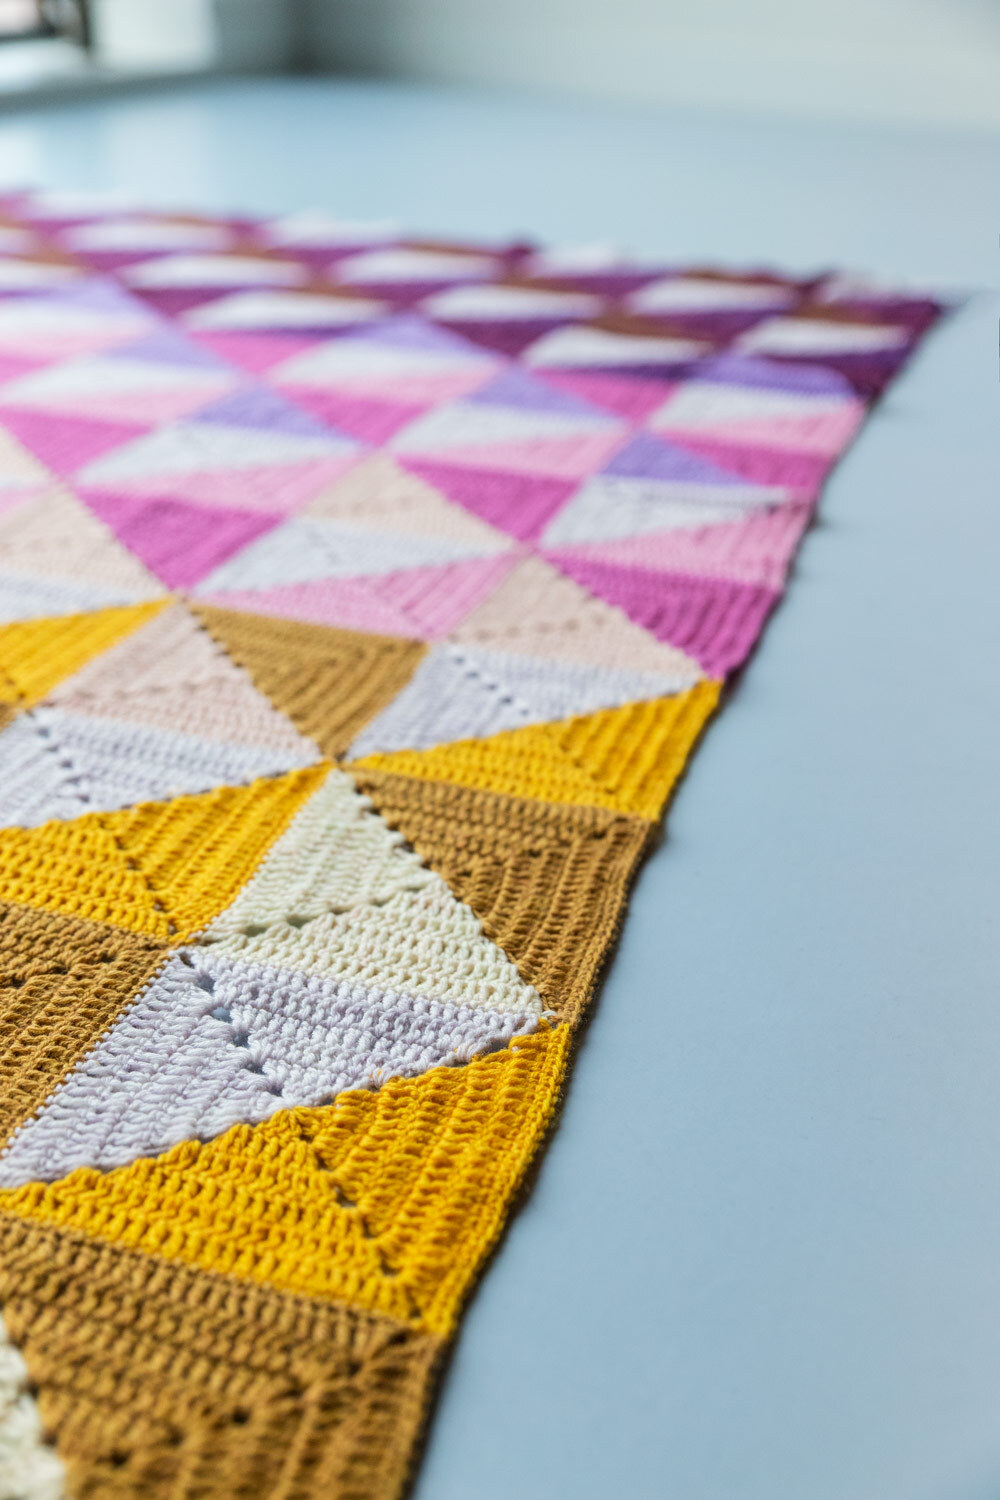
The Origami Blanket brings your favourite colour combinations to life! The two-toned squares are arranged in such a way that a beautiful and vivid gradient becomes visible over time. The resulting blanket is soft, supple and comfortably big. The pattern is written in US terms, and contains a written pattern, photo tutorials, crochet diagrams and schematics. It’s suitable for advanced beginners.
Materials and preparation
I've created two colourways for the Origami Blanket: The Spring and Summer colourpack. Each colourpack comes in two types of yarn: The luxurious Metropolis yarn for if you want to go all-in with this blanket, and the more affordable Colour Crafter. Metropolis is a Extra fine Merino Blend, while Colour Crafter is a premium acrylic.
Yarn
| Label | Colour name | Code | Amount |
|---|---|---|---|
| Colour A | Cota | 024 | 6 balls |
| Colour B | Toulouse | 030 | 2 balls |
| Colour C | Istanbul | 037 | 2 balls |
| Colour D | Seoul | 035 | 2 balls |
| Colour E | Sydney | 048 | 2 balls |
| Colour F | Bangalore | 052 | 2 balls |
| Colour G | Marrakech | 051 | 2 balls |
| Colour H | Lima | 055 | 2 balls |
| Colour I | Santiago | 053 | 2 balls |
| Colour J | Ajman | 049 | 2 balls |
| Colour K | Valencia | 062 | 2 balls |
| Label | Colour name | Code | Amount |
|---|---|---|---|
| Colour A | Almaty | 056 | 6 balls |
| Colour B | Leeds | 046 | 2 balls |
| Colour C | Montreal | 059 | 2 balls |
| Colour D | Jaipur | 060 | 2 balls |
| Colour E | Taipei | 006 | 2 balls |
| Colour F | Marseille | 019 | 2 balls |
| Colour G | Pasay | 022 | 2 balls |
| Colour H | Suwon | 018 | 2 balls |
| Colour I | Madrid | 009 | 2 balls |
| Colour J | Boston | 011 | 2 balls |
| Colour K | Dallas | 003 | 2 balls |
| Label | Colour name | Code | Amount |
|---|---|---|---|
| Colour A | Weert | 1001 | 3 balls |
| Colour B | Hasselt | 2010 | 1 ball |
| Colour C | Eindhoven | 1114 | 1 ball |
| Colour D | Haarlem | 1054 | 1 ball |
| Colour E | Lelystad | 1026 | 1 ball |
| Colour F | Sittard | 1130 | 1 ball |
| Colour G | Luik | 2006 | 1 ball |
| Colour H | Heerlen | 1432 | 1 ball |
| Colour I | Amstelveen | 1277 | 1 ball |
| Colour J | Spa | 2007 | 1 ball |
| Colour K | Veendam | 1004 | 1 ball |
| Label | Colour name | Code | Amount |
|---|---|---|---|
| Colour A | Barneveld | 1005 | 3 balls |
| Colour B | Leek | 1132 | 1 ball |
| Colour C | Tilburg | 1083 | 1 ball |
| Colour D | Den Bosch | 1241 | 1 ball |
| Colour E | Helmond | 1724 | 1 ball |
| Colour F | Goes | 1820 | 1 ball |
| Colour G | Enschede | 1824 | 1 ball |
| Colour H | Dordrecht | 1062 | 1 ball |
| Colour I | Alphen | 1722 | 1 ball |
| Colour J | Alkmaar | 1708 | 1 ball |
| Colour K | Oostende | 2005 | 1 ball |
Shop the yarn
You can buy Metropolis or Colour Crafter via Scheepjes retailers such as:
Crochet hook
Metropolis: 4.0mm (US size G/6).
Colour Crafter: 4.5mm (US size 7).
Measurements
Metropolis blanket: 145 x 175cm (57 x 69in).
Colour crafter blanket: 140 x 170cm (55 x 67in).
Gauge/tension
One square measures 14 x 14cm (5.5 x 5.5in) unblocked over tr. You use 4.2g of every colour for each square (8.4g per square in total).
This goes for both the Colour Crafter and Metropolis blanket.
Abbreviations (US terms)
- beg
- begin
- cc
- change colours (see techniques)
- ch
- chain
- ch-sp
- chain space
- dc
- double crochet
- RS
- Right side
- sc
- single crochet
- st(s)
- stitch(es)
- ss
- slip stitch
- WS
- Wrong side
Repeat formats
- *….; rep from * once/twice/3x — Crochet the instructions after * and then repeat that section a further number of times as indicated.
- (…) once/twice/3x — Crochet the instructions between brackets the total number of times indicated.
- […] — Indicates the amount of stitches at the end of a row or round.
- (…) in same st/sp — Indicates that all instructions between brackets are worked in the same stitch or space.
Colour layout
On the colour placement chart, you can see which two colours you need for each square, indicated with letters. In the pattern, the colours are referred to as colour 1 and 2.
Which colour you pick to be 1 or 2 doesn’t matter, but for the squares with colour A in them I’d suggest picking the non-white colour as colour 1, so you can use the remaining end after round 6 to directly join your square to the adjacent square. If you mix this up, no worries. It just means you’ve got an extra end to weave in, that’s all.
I’ve also created an empty colour chart for if you want to colour in your own combination. You can download it here.
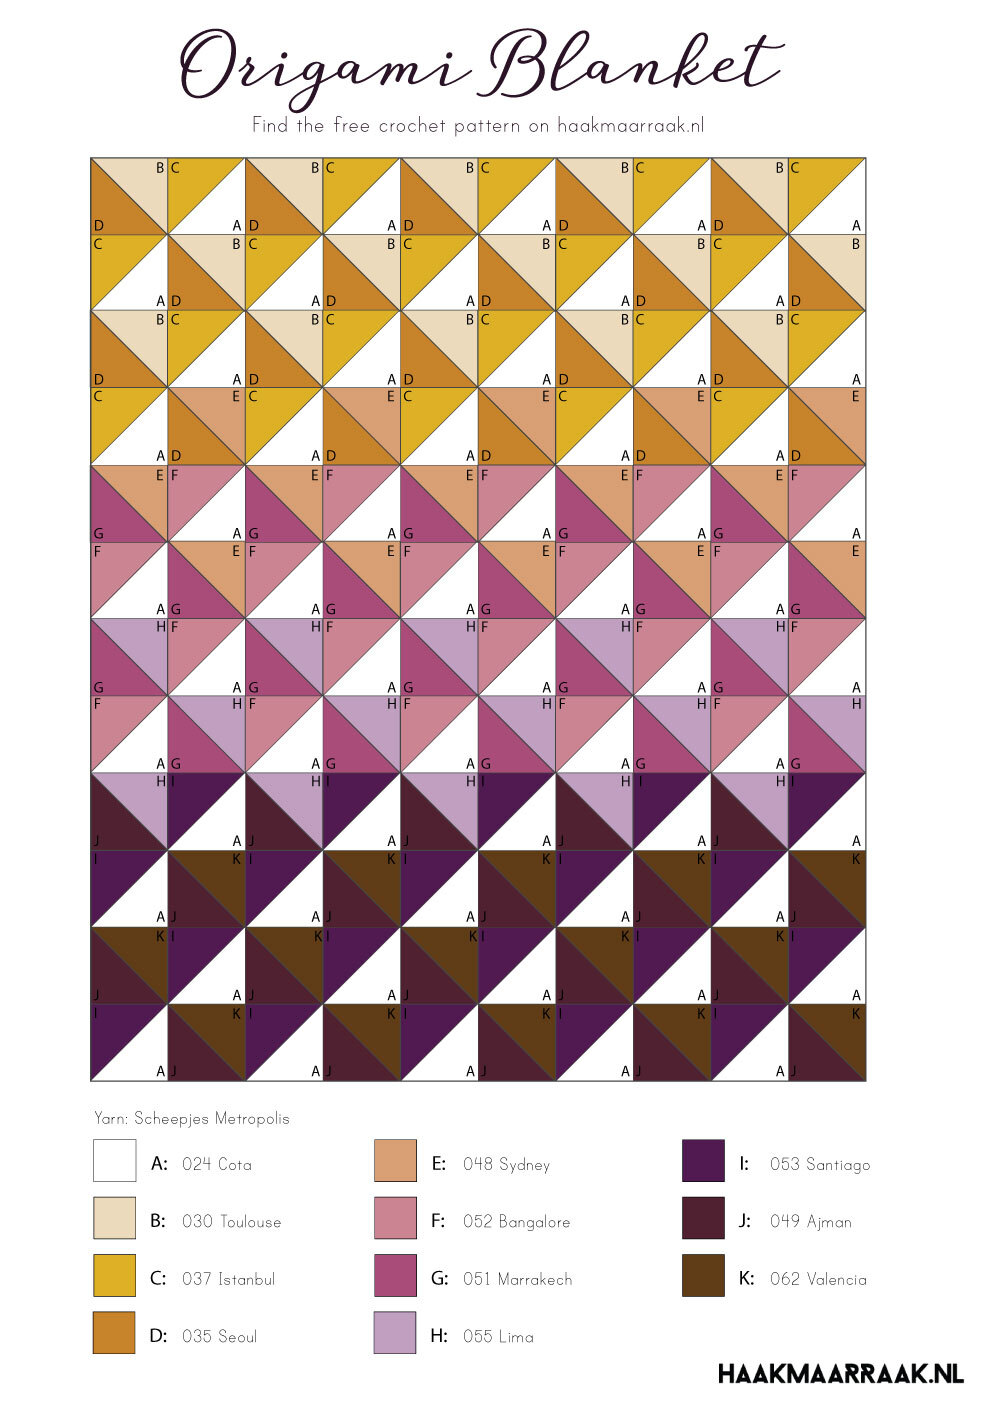
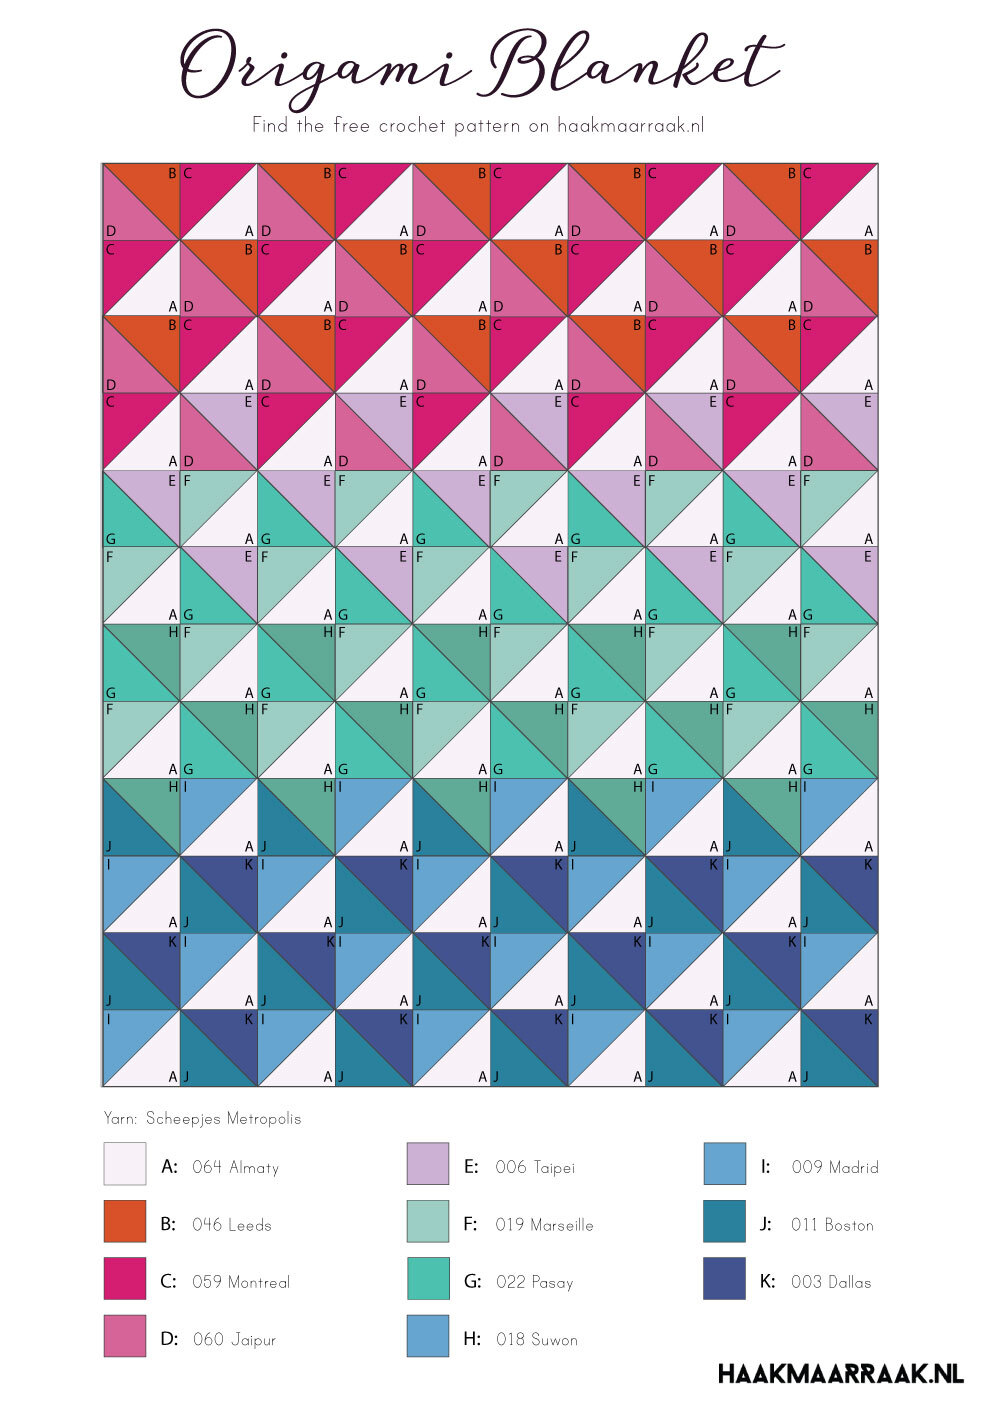
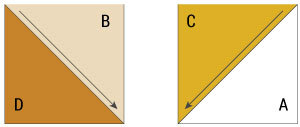
The colour placement chart also indicates how the squares should be placed in the Origami Blanket. As you can see, the diagonal lines of the squares alternate. Be mindful of this when joining!
Techniques
Changing colours (the special way)
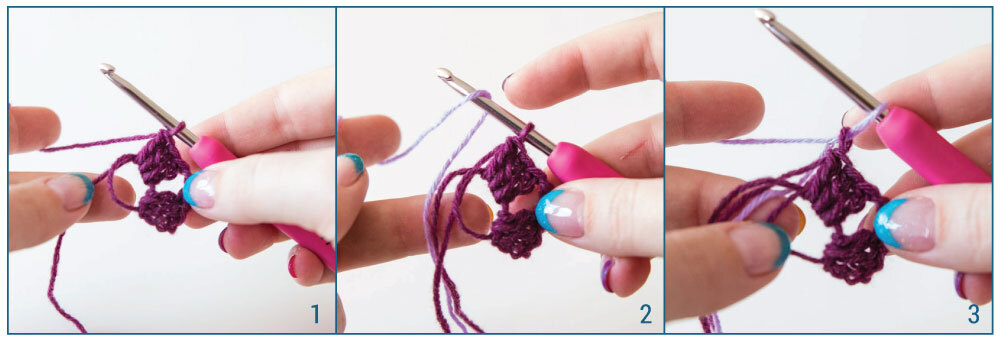
In the pattern, you will encounter the abbreviation ‘special cc to next colour’, which means that you have to change colours. Each square is made with two colours. To equally divide the colours over each half of the square, you’ll need to change colours in the corners. To achieve this, we need to introduce a variant on the standard colour change.
Normally, if you change colours, you don’t finish your last stitch but instead work the last part of your stitch in the new colour, changing colours as you finish the stitch. We’re changing colours in a chain-space corner, though, and if we used that method, it means both chains would be the same colour instead of one in colour 1 and one in colour 2. So we’re going to change colours after finishing the last stitch while crocheting the squares. I’ve illustrated this with photos below.
Please note: the colours you need to use for each square are indicated on the colour placement schematic. This is just an example.
Start the pattern with colour 1 and follow the pattern until you encounter a special colour change (photo 1). Remember to finish your stitch (a dc in this case). Next, pick up a loop of colour 2 (photo 2). Pull the loop through the loop on your hook. This automatically creates a chain in colour 1, and leaves you ready to work a chain in colour 2 (photo 3). Leave the strand of colour 1 hanging behind your work, you will pick that up in the next round when you change back to colour 1. Continue the pattern.
After the first colour change, your strand of colour 2 will not be secured yet as it’s the first time you use that colour. So hold your end until you’ve crocheted a few stitches and it won’t become undone. For every next colour change, simply leave your changing strand and crochet over the loose strand when you work your next row of stitches in that ch-sp.
Continuing and picking up colours in Rounds 2-6
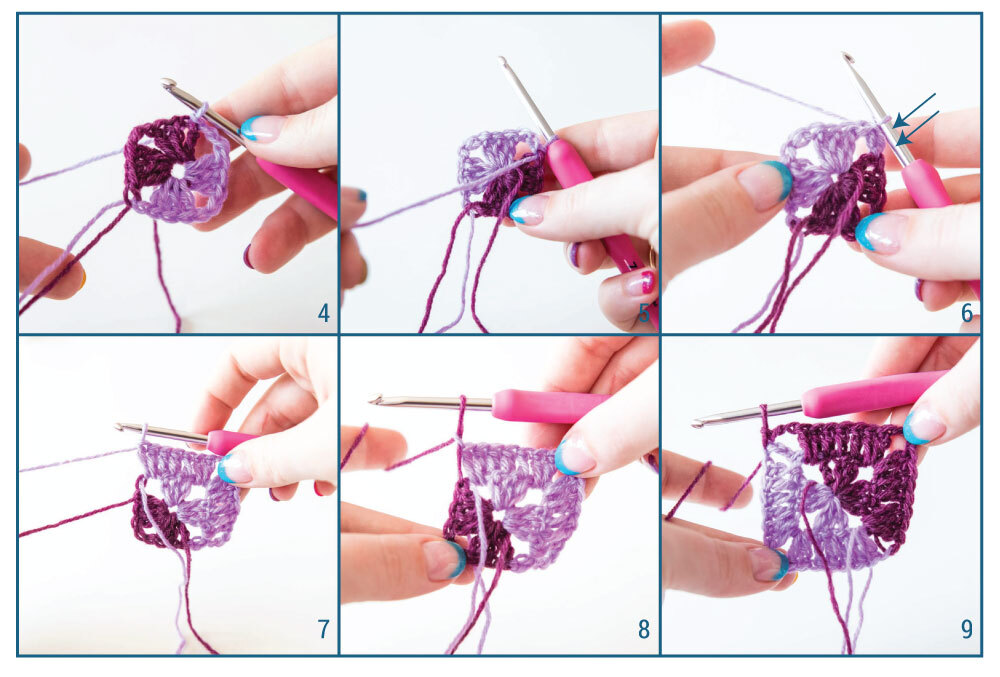
We’re not cutting and rejoining the yarn after we finish a round but rather work our way back via the chains. Once you’ve finished your first round (photo 4), turn your work (photo 5). Make 1 slip stitch in each of the 2 chains in the ch-sp, indicated by the blue arrows (photo 6). Now you’re ready to start your new round.
Halfway through your next round, you’ll encounter a ‘change colours’ instruction again (photo 7). Simply pick up the loose strand of colour 1 again as explained in photos 2-3, keeping your loose strand of colour 2 at the back of your work and continue the round. Once you’ve finished your round (photo 9), turn your work and repeat the steps from photo 5-6.
Crochet pattern
Squares
Please note: Read through the square and joining instructions before starting. The blanket is created by first joining individual squares to make rows, and then joining rows together. You can either create all squares beforehand or join rows as you progress.
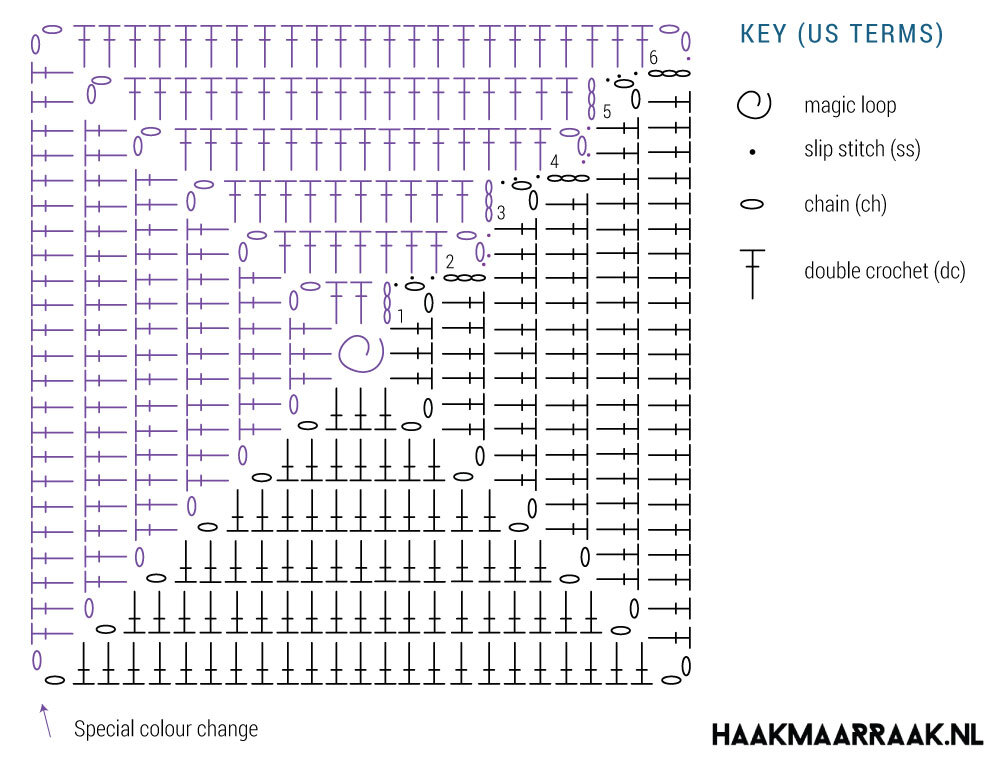
With Colour 1, make a magic ring.
See the photo tutorial for instructions on the special CC.
For Metropolis, continue with Round 6.
If you’re crocheting the Colour Crafter version of the blanket, cut yarn and fasten off. Your square should now measure 14cm (5½in) across. If not, you can crochet Round 6 as well, but make sure that you do not use more than 4.2 grams of each colour per motif.
Cut yarn, weave in ends.
Joining
My first priority for this blanket was an invisible join between the squares. My second priority was trying to weave in as few ends as possible. I found that it’s best to join individual squares into rows, and then join the rows to each other. By using this method you only have to use two colours to join a row to the blanket and carry the colour you don’t use along while joining.
Joining Squares into a row
If you tend to crochet sc’s tightly, consider going up a hook size to create a flexible and supple join.
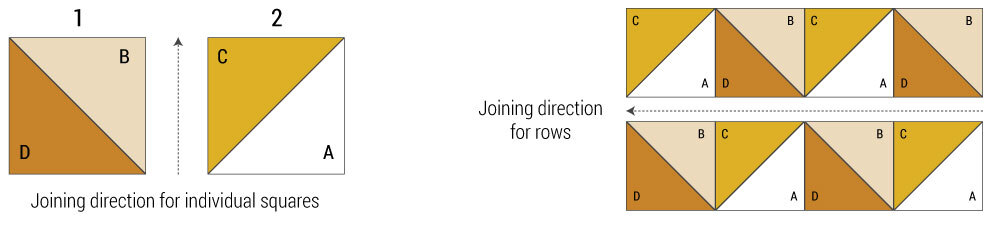
The blanket consists of 12 rows of 10 squares each. The schematic below shows the first 2 squares of Row 1. Take square 1 and 2 RS facing, making sure the diagonals match the diagram. Fold square 2 over square 1 (the RS facing towards each other and the WS facing outwards) as if you are closing a book, and turn the squares counterclockwise so the sides you’re joining are on top. This seems like an extra step but it ensures that you a. join the right sides together and b. that your diagonals match up correctly after joining.
Pick a yarn in the colour of either one of the joining sides (either B or C in the example). You’ll be crocheting through both loops on both squares. Join the yarn with a ss through the top-right ch-sps of both squares, 2sc in same ch-sp, 1sc in each dc on both squares to end, 2sc in final ch-sp, cut yarn. Your join is on the WS of the work, and it’s nearly invisible on the RS. Repeat this for the other squares in the row until you’ve joined all 10 squares. Weave in ends.
Joining rows
Please note that you’re going to change colours the regular way in the joining and edging, as opposed to the special method we used in the squares. This means that when you come across the instruction to change colours you don’t finish the last pull-through in your stitch (a sc in this case), but instead pick up a loop of the other colour and pull that through to finish your stitch and change colours.
Joining rows is similar to joining individual squares. Take two rows RS facing, and fold the top row over the bottom row with WS facing outwards and RS facing towards each other. Because of the symmetry of the blanket, for every pair of squares on the opposite rows you have the same two colours next to each other. I always pick the two colours that are used on the bottom triangles of the top row. In the example above on the right, that’s colour A & D.
Join colour D with a ss in both ch-sps of opposing squares, 2sc in same ch-sp, 1sc in each dc across on both rows, 2sc in next ch-sp, *1sc in sc that forms join on both rows, regular CC to colour A, 2sc in ch-sp on next squares, 1sc in each dc across on both rows, 2sc in next ch-sp; repeat from * until the end of the row. Fasten off, weave in ends.
When changing colours, simply crochet over the strand of yarn you’re not using and pick it up again at the next colour change.
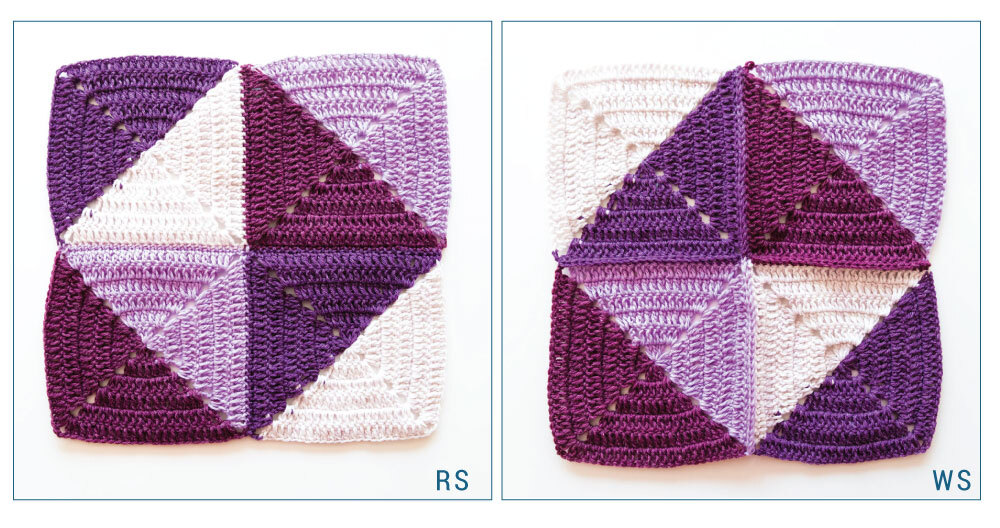
Your joins should look like this. It’s okay if the squares are still a bit wonky. You’ll fix that with the edging or blocking.
Edging (optional)
I’ve crocheted a single round of sc around my Origami blanket to reduce the puckering that sometimes occurs at the joins.
Please note that you’re combining the regular colour change and special colour change methods in the edging. You’ll be working the regular colour change when changing colours between squares on the sides, and the special colour change in the corners. On the long sides you’re going to have to cut your yarn every time you change colours. On the short side you can carry them along hidden in your stitches, just as you did for the row joining.
Start in the bottom right corner of your blanket, RS facing.
Join Colour K with a ss in the ch-sp, 2sc in ch-sp, 1sc in each dc to next ch-sp, *2sc in ch-sp, skip join, regular CC to next colour, 2sc in ch-sp of next square, 1sc in each dc to next ch-sp; repeat from * another 10 times, matching the colour change to your underlying square as you progress.
(2sc, special CC to next colour, ch1, 2sc) in top-right corner ch-sp, 1sc in each dc to next ch-sp, *2sc in ch-sp, skip join, regular CC to next colour, 2sc in next ch-sp, 1sc in each dc to next ch-sp; repeat from * another 8 times.
(2sc, special CC to next colour, ch1, 2sc) in top-left corner ch-sp, 1sc in each dc to next ch-sp, *2sc in ch-sp, skip join, regular CC to next colour, 2sc in ch-sp of next square, 1sc in each dc to next ch-sp; repeat from * another 10 times.
(2sc, special CC to next colour, ch1, 2sc) in bottom-left corner ch-sp, 1sc in each dc to next ch-sp, *2sc in ch-sp, skip join, regular CC to next colour, 2sc in next ch-sp, 1sc in each dc to next ch-sp; repeat from * another 8 times.
(2sc, ch2) in bottom-right corner ch-sp, join with ss to first sc.
Fasten off, weave in all ends.
Blocking
I recommend wet-blocking for this blanket. Have a look at my blocking tutorial if you are not familiar with blocking.
Diagrams
You might also like
Comments
Fran
June 23, 2019 14:50
Zouglou Nette
October 29, 2019 12:28
Sam
November 07, 2021 23:12