Baby Rainbow Sampler Blanket 2 (Part 12)
18.Jul.24 / Kirsten BalleringThe Baby Rainbow Sampler Blanket 2 is a small version of the Big Rainbow Sampler Blanket 2. It features all the different stitches used in the original blanket, just smaller. It's a great project for an ambitious beginner who wants to learn more crochet stitches and perfect for gifting to your loved ones. This blanket is a journey in itself!
You can find the other pattern parts here:
Materials and preparation
The pattern is available in two colourways: A Organicon rainbow colourway, and a Catona gradient colourway. Instructions for both colourways are included in the pattern. Be aware that they do use different amounts of each colour for each version.
Yarn
Organicon Rainbow
Scheepjes Organicon (100% Soft Organic Cotton, 50g/170m)- Colour A: 219 Oxygen x 4 balls
- Colour B: 259 Lucky Heather x 1 ball
- Colour C: 257 Perfect Plum x 1 ball
- Colour D: 246 Dahlia x 1 ball
- Colour E: 247 Swaying Tulip x 1 ball
- Colour F: 248 Pink Elephant x 1 ball
- Colour G: 245 Amaranth x 1 ball
- Colour H: 244 Red Rose x 1 ball
- Colour I: 224 Deep Tangerine x 1 ball
- Colour J: 238 Happy Sunflower x 1 ball
- Colour K: 239 Baby Chick x 1 ball
- Colour L: 213 Sapling x 1 ball
- Colour M: 228 Olive x 1 ball
- Colour N: 215 Bright Ocean x 1 ball
- Colour O: 264 Happy Thoughts x 1 ball
- Colour P: 268 Sleepy Cyan x 1 ball
- Colour Q: 267 Ticklish Turquoise x 1 ball
- Colour R: 255 Bluebell x 1 ball
Catona Gradient
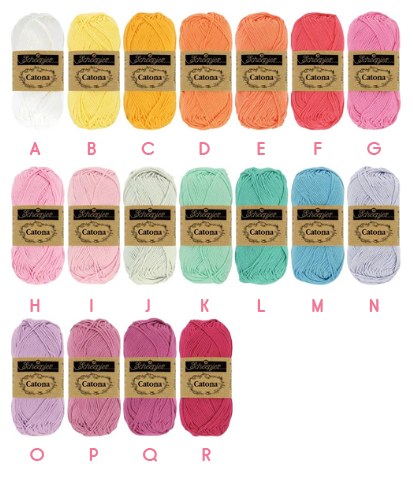
Scheepjes Catona (100% Cotton, 50g/125m)- Colour A: 106 Snow White x 6 balls
- Colour B: 522 Primrose x 1 ball
- Colour C: 208 Yellow Gold x 1 ball
- Colour D: 386 Peach x 1 ball
- Colour E: 410 Rich Coral x 1 ball
- Colour F: 256 Cornelia Rose x 1 ball
- Colour G: 519 Fresia x 1 ball
- Colour H: 222 Tulip x 1 ball
- Colour I: 246 Icy Pink x 1 ball
- Colour J: 172 Light Silver x 1 ball
- Colour K: 385 Chrystalline x 1 ball
- Colour L: 253 Tropic x 1 ball
- Colour M: 510 Sky Blue x 1 ball
- Colour N: 399 Lilac Mist x 1 ball
- Colour O: 520 Lavender x 1 ball
- Colour P: 398 Colonial Rose x 1 ball
- Colour Q: 251 Garden Rose x 1 ball
- Colour R: 413 Cherry x 1 ball
Shop the yarn!
Do you want to make this blanket? You can find the yarn for this blanket in several stores, such as:
Crochet hook
3.5mm (US size E/4) for both versions.
Measurements
Organicon blanket measures 110 x 85cm (43 x 33½in) after blocking. Catona blanket measures 122 x 94cm (48 x 37in).
Gauge/tension
Gauge is not critical for this pattern. If you want precise gauge instructions, check out Part 1.
Notes
- The pattern for this blanket is long. To keep track of where you are, I’ve divided it into different parts. Each part introduces a new section with Techniques and also contains a crochet diagram.
- In most rows you’ll make a ch1 before turning your blanket. This is a turning chain and does not count as a stitch. If you find a ch1 is too small, you can also make a ch2. This depends on how tight you crochet.
Abbreviations (US terms)
- ch: chain(s)
- hdc: half double crochet
- RS: right side
- ss: slip stitch
- s(ts): stitch(es)
- WS: wrong side
Repeat formats
- *….; rep from * once/twice/3x Crochet the instructions after * and then repeat that section a further number of times as indicated.
- (…) once/twice/3x Crochet the instructions between brackets the total number of times indicated.
- […] Indicates the amount of stitches at the end of a row or round.
- (…) in same st/sp Indicates that all instructions between brackets are worked in the same stitch or space.
Colour layout
Part 12 Weekly overview
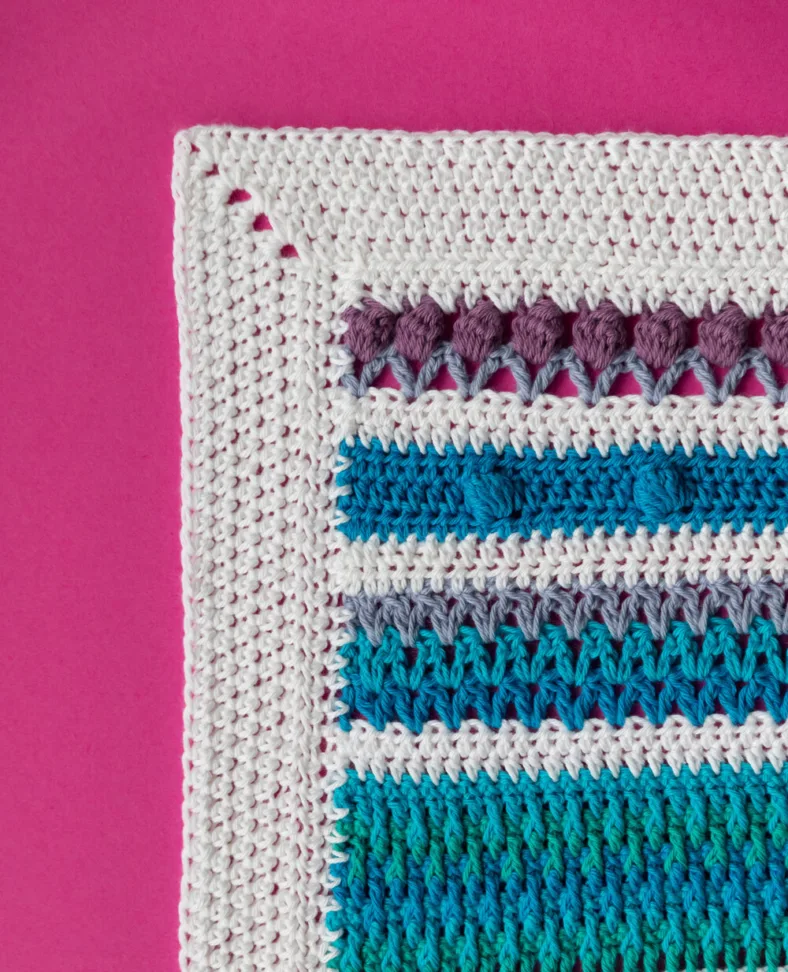
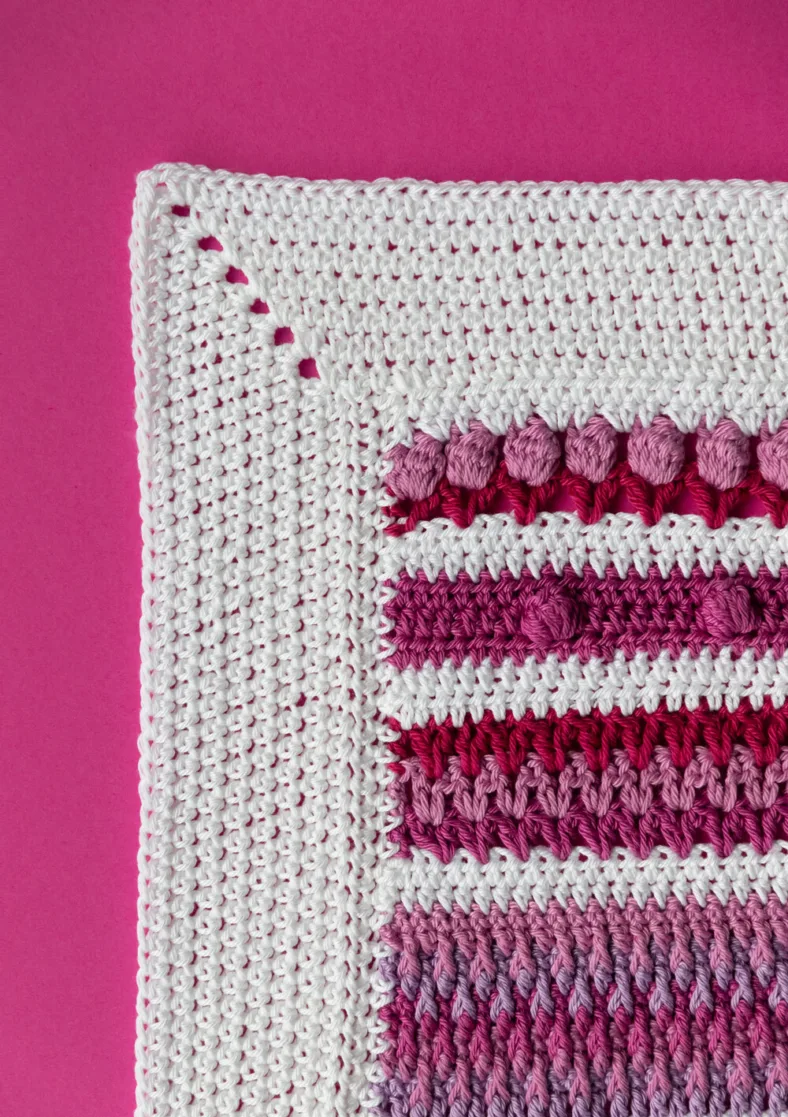
Crochet pattern
Border
The instructions for the border contain many tips and explanations because the border is usually the part of a blanket where tension issues reveal themselves. Luckily, it’s also the most forgiving when fudging. So, I’m giving you lots of tips to professionally fudge the border. Read them before starting, and see which ones are useful to you!
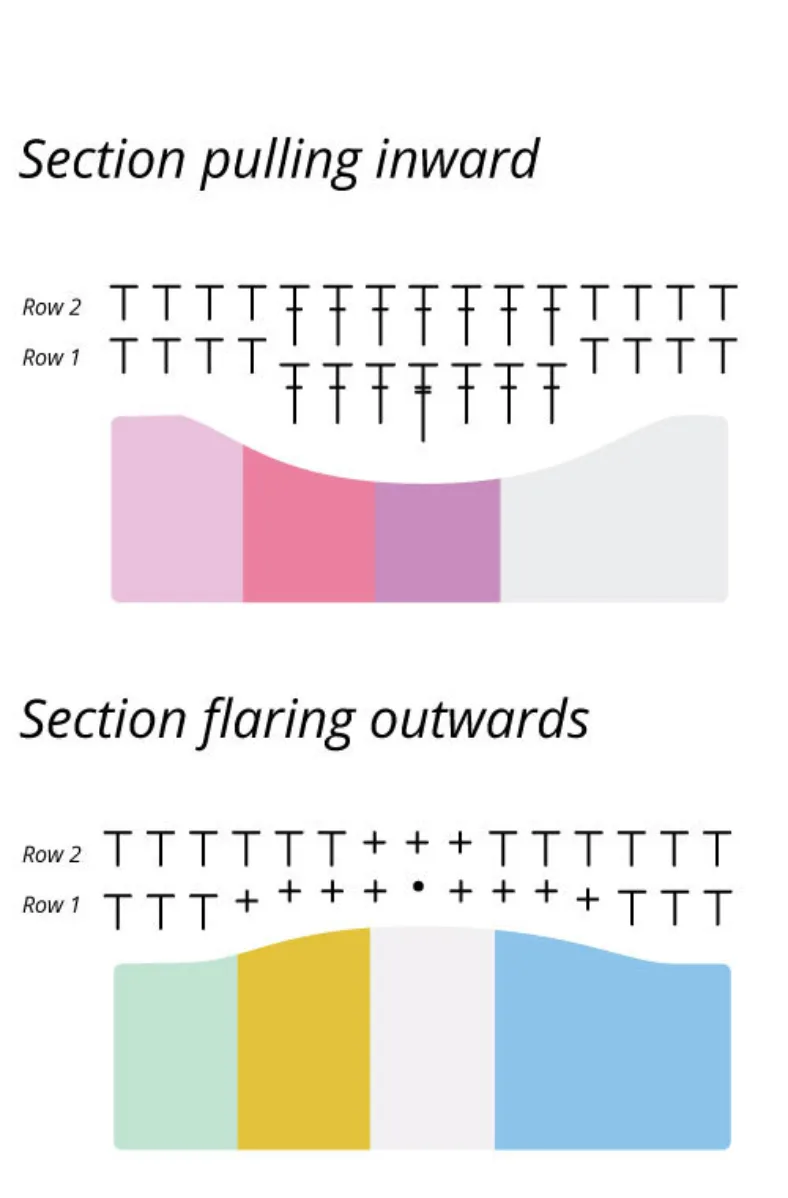
Countering flaring or pulling sections
When we’re making the edging, if you encounter a section that you wrote down, do one of two things:
- when it flares outwards, crochet a sc or ss instead of a hdc.
- When it pulls inwards, crochet a dc or a tr instead of a hdc.
The height difference in these stitches helps to fill any gaps or bumps. The aim is to have a smooth, straight border. If one row doesn’t fix it, do the same in the next row(s) until the border is more or less straight.
Border foundations for long sides
I like a border that’s equally wide on all sides, and since the top and bottom rows already have two rows of white hdc’s each, I want to add two rows of hdc on both long sides before going all the way around the blanket.
A note before we start: The stitch count on the long sides is less important than to have a flat border. I think you better have too few than too many stitches on your border. If you have too few stitches, the remaining stitches tend to stretch out to ‘just enough to lay flat’, but if you have too many stitches, the border will definitely ruffle. To check, lay the section(s) flat and smooth with your hands. It’s okay if there’s a bit of tension in the border, as long as your blanket doesn’t curl up on itself.
The perfect amount of stitches for the border depends on how long your blanket ends up after blocking, but a great rule of thumb is to crochet 1 hdc in the side of each sc or hdc row, and 2 hdc’s in the side of each dc row.
Foundation right long side
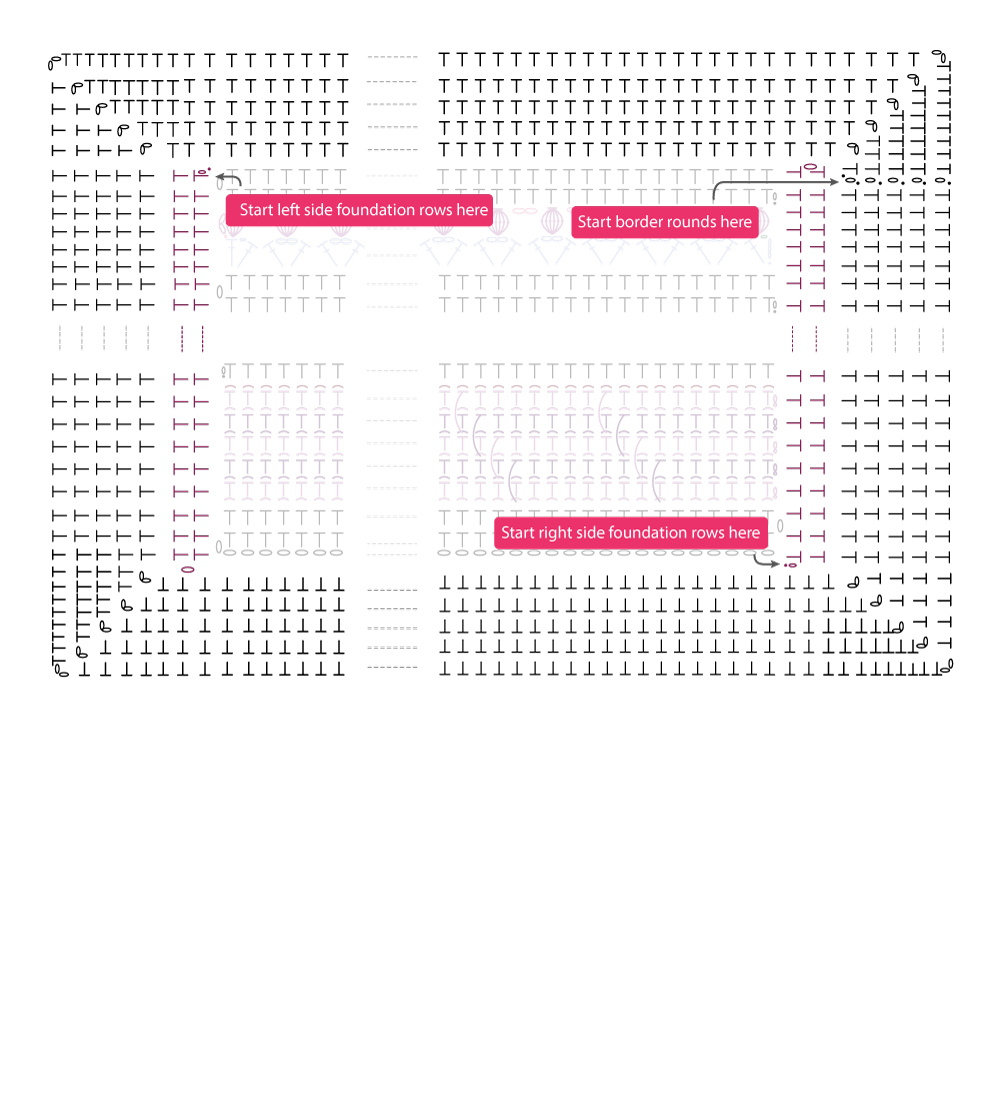
Row 1 (RS) Start at the bottom right side with RS facing you. Join Colour A with a ss in the starting chain, ch1, 1hdc in same stitch, 1hdc in side of next row. Work your way up alongside the blanket, following the rule of thumb and tips above. I ended up with 175 hdc on the long side. Ch1, turn.
Row 2 (WS) 1hdc in every stitch to end of row, ch1, turn.
Foundation left long side
Row 1 (RS) Start at the top left side with RS facing you. Join Colour A with a ss in the side of the last hdc row, ch1, 1hdc in side of row, 1hdc in side of next row. From here on, work your way down the blanket. Try to make the same amount of stitches as you have on the other long side. Ch1, turn.
Row 2 (WS) 1hdc in every stitch to other side, ch1, turn.
I ended up with 175 hdc on both long sides for both blanket versions.
Fudging the numbers
If you don’t have the same number of stitches on both sides, you can always add a little ‘2hdc in one stitch or ‘hdc2tog’ here and there. It’s not strictly necessary to have an equal number of stitches on both sides, but it just works easier in the final round of the edging. This is also the remedy if your blanket has too many or too few stitches in the first round and you want to tweak a bit without frogging the rows.
Border rounds
We will work around the blanket for the final couple of rounds.
Round 1 (RS) Join Colour A with a ss in the top-right corner. Ch1, (1hdc, ch2, 1hdc) in corner stitch, 1hdc in next row-end, 1hdc in each st to end of side, 1hdc in next row-end, (1hdc, ch2, 1hdc) in side of corner-stitch, rotate blanket 90 degrees.
1hdc in each st along long side, (1hdc, ch2, 1hdc) in side of corner-stitch, rotate blanket 90 degrees.
1hdc in next row-end, 1hdc in each st to end of side, 1hdc in next row-end, (1hdc, ch2, 1hdc) in side of corner-stitch, rotate blanket 90 degrees.
1hdc in each st along long side, join with ss in first stitch, don’t turn. [145 hdc on short sides, 177 hdc on long sides].
Again, stitch counts on the long sides are not as important as that it lays flat.
Round 2 (RS) Ch1, *1hdc in each st to end of side, (2hdc, ch2, 1hdc) in corner-space; repeat from * another 3 times, 1hdc in each st to beginning, join with ss in first stitch, turn. [148 hdc on short sides, 180 hdc on long sides]
You’re making 2hdc on one side of the corner and 1hdc on the other side. The reason for this is that when you work in rounds, the slanting of stitches causes the corners to become slightly crooked. By working 2 hdc, we’re offsetting this and making perfectly square corners. Trust me, it works!
Repeat Round 2 another 3 times, giving you five border rounds in total. If you stick to the stitch counts given in Round 2, you end up with a stitch count of 157 hdc on the short sides and 189 hdc on the long sides. Cut yarn, and weave in all your ends.
You can now block your blanket again following the instructions in Part 11. And don’t forget to take a moment to pat yourself on the back—you made it to the end of this big project!

Diagram
Baby Sampler 2 Part 12
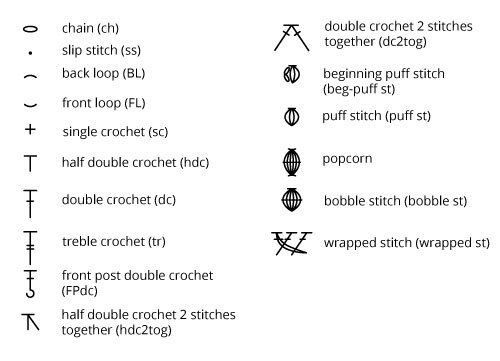
Key (US terms)


Comments