Blocking large crochet projects can be a royal pain. Even when you know how to block, saving enough floor space and finding enough mats can be a challenge. Luckily I've got a few tips for you to help you put those finishing touches in your larger pieces as well!
What is blocking?
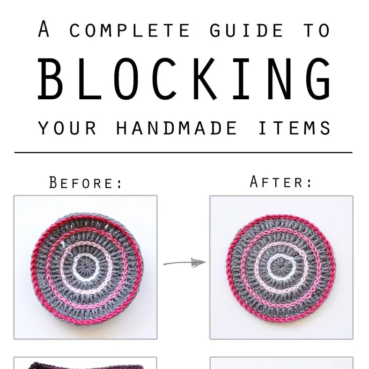
First, a little about blocking: blocking is something you do at the end of your crochet projects, after you've woven your ends in. It involves making the fibres wet and then pinning them on a board to let your project dry up in its final desired shape. This causes the stitches to look much neater, the edges to look much straighter, and your work to feel much softer. In general, you get a more finished look, and sometimes you can even get closer to your desired dimensions!
You can block all different types of yarn, so it doesn't really matter if you have acrylic yarn or more natural fibres. If you're interested in the theory behind it and all the general do's and don'ts, give it a read!👇
Which blocking method do I use?
Generally speaking, there are three different methods of blocking:
- Wet blocking
- Spray blocking
- Steam blocking
The different methods are all explained in the post I linked above. In short, I recommend method 2. Spray blocking is a great way to achieve the best results for projects such as large crochet blankets without using too much excess moisture. All you need is lukewarm water, a spray bottle, a blocking mat (or 22), some fabric softener and some rust-proof pins. It's simply my preferred method.
Method 1 Wet blocking (dunking your project in a basin and soaking it before pinning) can be difficult, as all the excess water weight makes a large project very heavy and bulky. That causes your crochet or knitwork to stretch out once you pick it up after soakin,g and makes it much more difficult to pin it in place neatly. This way of blocking is much more suited to small items as the drying process won't take such a long time.
Method 3 (Steam blocking) is not only an advanced method, but is also cumbersome as you only steam small portions of your project each time. It takes ages for large blankets on an ironing board with a garment steamer or steam iron, and you need to be very careful that you don't use too much heat! Spray blocking is easier on the arms and yields the same results.
Blocking a large crochet blanket
In theory, the process of blocking is relatively easy. Clear some floor space, pin your project to blocking boards or puzzle mats, and mist it with a spray bottle until damp. Let it air dry and unpin - that's it. Unfamiliar with the technique? Read my full tutorial for spray blocking.
With large projects, the issue usually isn't in the technique. Instead, it's having enough floor space, mats and pins to let it dry. Luckily, I have a few tips to help you when space or materials are an issue.
Tip 1: Block in sections
Laying it flat is an essential step in spray blocking, but sometimes you don't have the floor space to lay your larger items on a flat surface. When this is the case, you can block your project in parts. You can, for example, block the first half of your blanket and, when that's finished, the second half.
Pin up the first half, cover the unpinned half of your blanket with another blanket or cloth and spray the pinned section with water. Once it has airdried, repeat for the second section. It's not ideal, but it works wonders in a pinch, and you can still get very straight edges!

Tip 2: Only use mats for the edges
You don't want to use your yoga mat, and who wants to stack up on (expensive) blocking mats? When you can't borrow them from a friendly neighbourhood crafter, there are other ways to reduce the number of foam boards you need for this method of blocking.
My go-to trick is to place mats under a project's edges only. Let's say you block a 150 x 180cm (60 x 70in) blanket. Using the standard 30cm (12in) blocking mats, you'd need around 5 x 8 = 40 blocking mats to cover the complete surface area.
When you use mats for the edges only, you need just 22 mats. Those mats don't have to fit together either, so you can mix and match different sets. The pins and tension in your blanket will keep them in place, and you will end up with a nicely blocked crochet blanket.

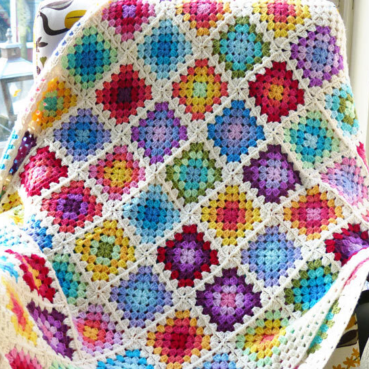
This is a snapshot of my Sampler blanket. I mixed different sets of blocking mats and puzzle mats. You can put a tarp or cloth beneath your project to prevent the dampness from getting on your floor. I didn't bother with it, as it evaporates pretty quickly anyway.

Tip 3: Pin efficiently
When you need to pin a big blanket, you want a better solution than individual T-pins because you'll need a gazillion. This is where both blocking wires and knit blockers come in handy. These tools are made to block large sections easily.
I've used three sets of knit blockers for the blanket above. It's not cheap, but it's a one-off purchase, and they come in handy with each project!

Tip 4: Rustproof pins
Sadly, there is no such thing as dry blocking. And sometimes, we use a little too much water, or we accidentally use cold water, and the project can take significantly longer to dry.
When this happens, your pins can actually start to rust. If this happens to you, you'd better hope you have rust-proof pins; otherwise, you will be looking for the washing instructions on your yarn label as you try to wool wash the stains from your delicate yarn.
Tip 5: Get a proper spray bottle
One of the hard parts about spray blocking a very large blanket is, not surprisingly, that they're so large. So once you find enough space for your large crochet blanket, a thousand blocking mats, and a million rust-free pins, you may feel a sense of relief. You're almost there.
But now the actually tricky parts will begin. How will you make sure that you distribute the water evenly across the entire surface of your blanket? You need to ensure that you don't have excess moisture, but that you do make the entire blanket wet enough with lukewarm water for it to block properly. I jest about the severity, but a good spray bottle comes in handy.
If you have the opportunity, a husband or partner to do the spraying for you can also come in handy. But if you can't find a willing subject, you might as well get a spray bottle that is not too big and not too small, and most of all, easy to squeeze. Some bottles are very heavy to squeeze, which will definitely tire out your hands and lower arms when you're blocking a crochet blanket.
What not to do when blocking large projects
There are also a few things you want to avoid when blocking larger pieces, when it can be helped:
- Hang it from a clothesline. The water weight combined with the project weight will result in sagging and stretching in the corners or around the clothesline. There's a reason every handmade item comes with instructions to dry flat!
- Soaking it through and through. A damp spray is enough. Soaking it completely will only take longer to dry and will add no other benefits.
- Pinning it on a mattress. Honestly, it will do if you really can't free up the floor space. But a mattress is quite often not firm enough to pin your project neatly. You also don't want to risk missing any pins, especially if you sleep in the same bed!
- Overstretching. Maybe this sounds like an open door, but you need to make sure you apply even tension whilst blocking large crochet blankets or other crochet pieces. If you overstretch it, you will most likely not end with the professional finish you were going for, and while blocking can get you closer to your desired dimensions, it is in no way a magic fix for a blanket that is way too short.
- Just start blocking. If you're unsure if the yarn fibres you are using in your crochet item react to blocking, you should start with a small swatch. That's the best way to make sure you don't ruin the entire blanket! You should also keep in mind the symmetry of the motifs in your crochet blanket; you don't want to end up with a crooked blanket.
I hope these tips give you the confidence to block your next large project. If you have any more suggestions or questions, please feel free to add them to the comments! Happy crocheting, I mean, happy blocking!


Comments
Thanks again. May 30, 2023 14:10 - Reply
What I usually do with my projects is decide how the giftee is going to use it and match that: baby blanket? Besides wanting to gift it as clean as possible it also needs to be washed quite often, so chances are momma's going to throw it in the washing machine at some point. So I do a gentle wash. Any ends that come undone - that's the moment to fix that.
You really don't want to do anything other than a soak for delicate threads tough. Alpaca, Mohair, stuff like that just doesn't match with friction and washing machines. So I always hand wash those, no matter the giftee. March 14, 2024 15:50 - Reply
Marvellous! If your yarn bleeds while you work, definitely use a colour catcher or two. You'll be amazed (and slightly scared) to see how much colour can end up in those sheets! October 10, 2024 18:00 - Reply