Free crochet pattern: Lifeline motif
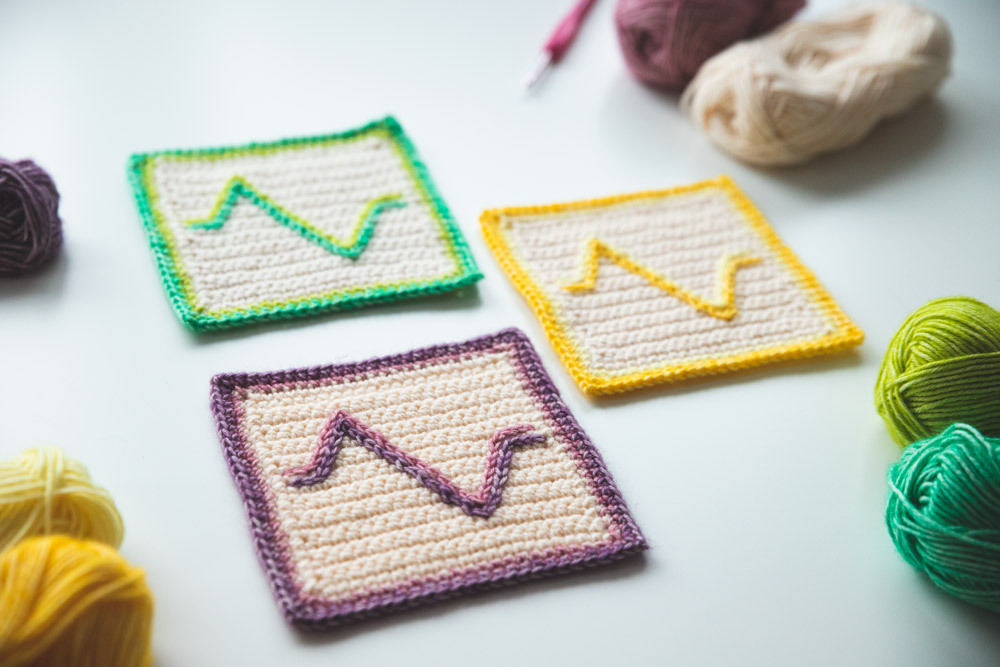
28.Sep.20 / Kirsten BalleringFor a while now I wanted to create something new with surface crochet. The idea was not fully-fledged, rather one of those earworms in the back of your brain. When I read that today (the 29th of September) is World Heart Day, this idea suddenly took shape. Just like in many other families, there are multiple heart- and coronary diseases doing the rounds in my family tree. I have family members (both young and old) suffering from various heart diseases. With them in mind, I designed this motif. A little motif that's done in a jiffy, but with a little twist in the form of surface crochet. It's nothing grand or spectacular, but I wouldn't want to distract from the message for today anyway: take care of your heart, it's your lifeline.
Materials and preparation
Yarn
Green motif
Scheepjes Stonewashed (78% cotton, 22% acrylic)- Colour A: 821 Pink Quartzite x 1 ball
- Colour B: 827 Peridot x 1 scrap
- Colour C: 825 Malachite x 1 scrap
Yellow Motif
Scheepjes Stonewashed (78% cotton, 22% acrylic)- Colour A: 821 Pink Quartzite x 1 ball
- Colour B: 817 Citrine x 1 scrap
- Colour C: 833 Beryl x 1 scrap
Purple Motif
Scheepjes Stonewashed (78% cotton, 22% acrylic)- Colour A: 821 Pink Quartzite x 1 ball
- Colour B: 808 Corundum Ruby x 1 scrap
- Colour C: 811 Deep Amethyst x 1 scrap
Crochet hook
4.0mm (US Size G/6).
Measurements
A blocked motif measures 14 x 14cm (5.5 x 5.5in).
Gauge/tension
Not critical for this project.
Abbreviations (US terms)
- ch: chain
- ch-sp: chain-space
- RS: right side
- sc: single crochet
- ss: slip stitch
- WS: wrong side
Repeat formats
- *….; rep from * once/twice/3x Crochet the instructions after * and then repeat that section a further number of times as indicated.
- […] Indicates the amount of stitches at the end of a row or round.
- (…) in same st/sp Indicates that all instructions between brackets are worked in the same stitch or space.
Crochet pattern
The Base
With Colour A, ch22.
Row 1 (RS) Starting in second ch from hook, 21sc, ch1, turn. [21 sc]
Rows 2-20 21sc, ch1, turn. [21 sc]
Row 21 21sc, don't cut yarn. [21 sc]
Edging Round (RS) Ch2, 1sc in the side of each row including row 21, ch2, 21sc along other side of beginning ch, ch2, 1sc in the side of each row up and including row 21, ch2, 21sc in top of row 21. Join with ss in ch-sp, cut yarn, weave in ends. [21 sc on each side, 4 ch2-corners]
Surface crochet
Surface crochet is a technique where you work over the stitches (over the surface, hence the name) instead of in the stitches. It's fairly easy, but keep in mind that your stitches need to be loose in order to lay comfortable on your crochet fabric. If you feel your stitches are not loose enough, use a hooksize (or two) bigger.
You'll be making two surface crochet lines. One will be worked in between Row 9 and Row 10 of the original square (the edging round does not count, see photo 1 for the position). The other one will be worked between Row 10 and 11.
With RS towards you, locate Row 9 and 10. Grab your Colour B and insert your hook in the space between those rows where the 'head' of the first stitch of Row 9 meets the bottom of the first stitch of Row 10. Pull up a loop of Colour B from the back (photo 2).

Next, insert your hook into the stitch to the left (photo 3). Pull up a loop again (photo 4).
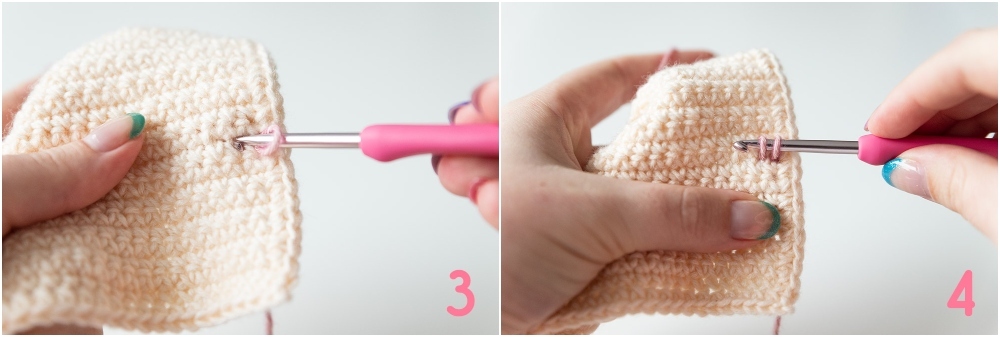
Pull that second loop through the first loop, effectively creating a slip stitch (photo 5). Repeat the proces of photo 3-5 for the next 2 stitches, creating 3 slip stitches in a row (photo 6).
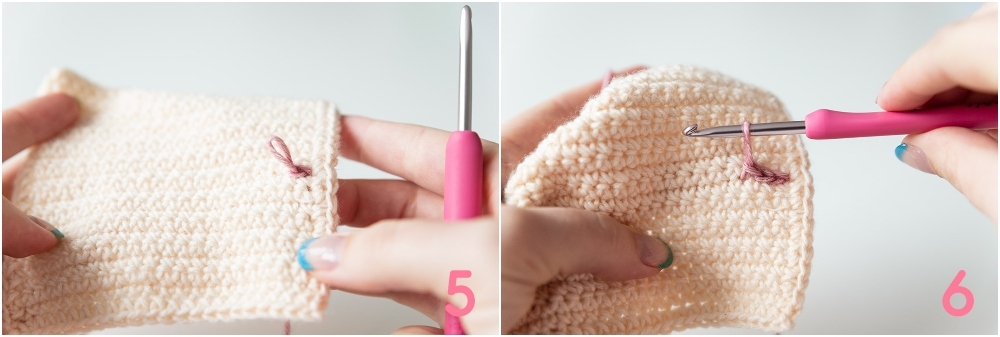
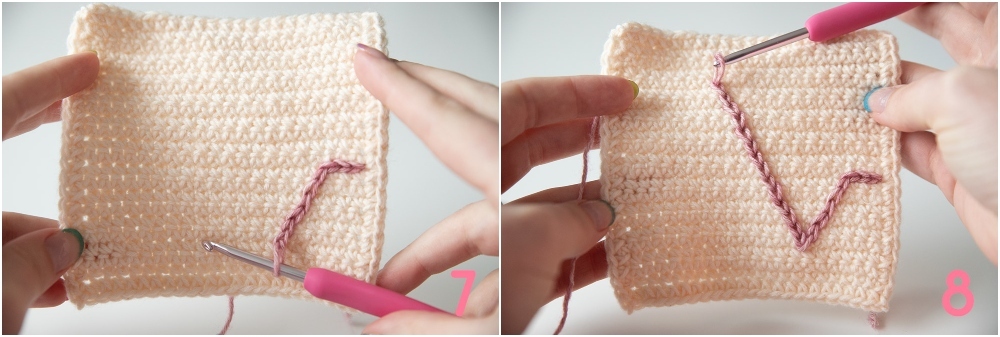
You'll now be progressing to the diagonal line in the heartbeat. To create a diagonal line in the angle that we want, we'll be moving one stitch to the left for every two rows. So insert your hook in the space directly below your last stitch, and make a ss. Next, insert your hook in the space one stitch to the left and one row below, and make a ss. Repeat this another two times to create six ss (photo 7). You have progressed 3 stitches to the left. Your line might be slightly wobbly like mine in photo 7, but that will sort itself out once you crochet the second line in Colour C.
You'll now be working the big diagonal line upwards. We'll be sticking to the same principle, moving one stitch to the left for every two rows. Make 14 ss, which means that you have now crossed an additional 6 stitches towards the left (photo 8).
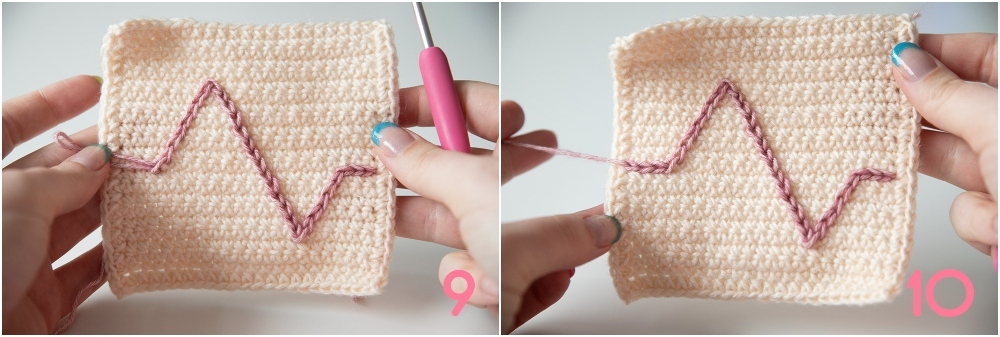
We'll now be going back to the base line. Make 8 slip stitches back down, moving one stitch to the left for every two rows (photo 9). Finally, make 3 horizontal ss towards the final stitch of the row. Cut yarn, and pull the loose end through the loop (photo 10). That's it for the first line!
You'll be making your second line in exactly the same way, only one row up. Join Colour C in between Row 10 and 11 and follow the same pattern as for the first line. On the diagonal lines, you'll sometimes have to insert your hook into spaces that you've also gone in with Colour B (when you go down/up a row but do not yet go one stitch to the left). That's normal and makes sure your lines snuggle up towards each other.
After finishing your second line, fasten off and weave in the ends. You should have 3 rows of Colour A above and below each line, visually aligning the heartbeat in the centre.
Border
Round 1 (RS) Join Colour B with a ss in any ch-sp, *(1sc, ch2, 1sc in ch-sp,) 21sc; repeat from * another 3 times, join with ss to first st, cut yarn. [23 sc on each side, 4 ch-2 sps]
Round 2 (RS) Join Colour C with a ss in any ch-sp, *(1sc, ch2, 1sc in ch-sp,) 23sc; repeat from * another 3 times, join with ss to first st, cut yarn. [25 sc on each side, 4 ch-2 sps]
Fasten off all loose ends and block to size.


Comments
http://ivei.in/
http://ivalueeveryideadiy.blogspot.com/2020/09/best-way-to-use-plain-products-for.html
http://ivalueeveryideadiy.blogspot.com/2020/09/best-budget-made-in-india-corporate.html
http://ivalueeveryideadiy.blogspot.com/2020/10/bulk-orders-made-in-india-corporate.html
http://ivalueeveryideadiy.blogspot.com/2020/10/bulk-orders-made-in-india-corporate.html
http://ivalueeveryideadiy.blogspot.com/2020/10/why-is-plain-wooden-products-most.html
http://ivalueeveryideadiy.blogspot.com/2020/10/best-table-top-gifts-for-home.html
http://ivalueeveryideadiy.blogspot.com/2020/10/all-you-need-to-know-about-plain-wooden.html October 15, 2020 12:39 - Reply