Apache tears are dropped stitches, that are crocheted in the front loops of stitches one row below. The pattern is very versatile and works with any stitch multiple by simply increasing or decreasing the space between dropped stitches.
All stitches in the Apache tear sections are made in the back loops only. This leaves a front loop that you can pick up later. You work this section of the pattern on the Right Side only - which means that you keep working from right to left without turning your blanket.

Apache tear tutorial
Stitch multiple
Not important, any multiple will work. You can simply change the stitch multiple by increasing or decreasing the amount of hdc's in between your dropped stitches. In the Rainbow Sampler Blanket 2 you will work with a stitch multiple of 8 + 1 stitches. This means that you have 1 dropped stitch with seven regular stitches in between (and you finish the pattern with a dropped stitch for symmetry, hence the +1).
First row
The first row of an Apache tear is a row of hdc's BLO. Make this, cut your yarn and don't turn your blanket. Remember, you're working this pattern on the Right Side only.
Second row
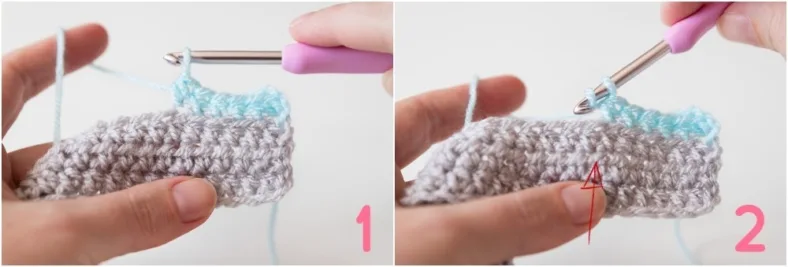
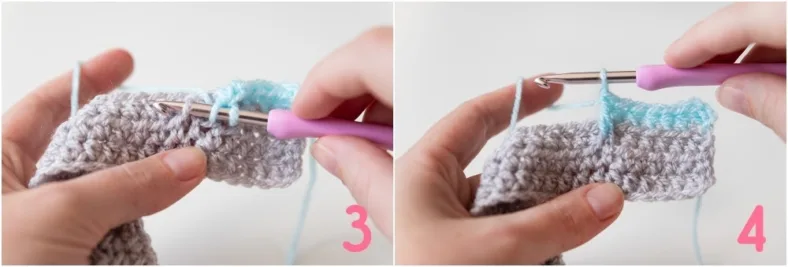
Join your colour with a ss in the back loop of the first st. Make one ch, one hdc BLO in the same stitch. Make five more hdc BLO (photo 1). Your next stitch is a dropped double crochet, and will be made in the front loop of the stitch right below your next stitch on the previous row (indicated with the red arrow in photo 2). This is a complicated sentence, but I promise you that you only need to think about this in the first row. If you find it hard to locate the loop, simply count the loops from the beginning of the row that you will insert your hook in and insert in the seventh loop.
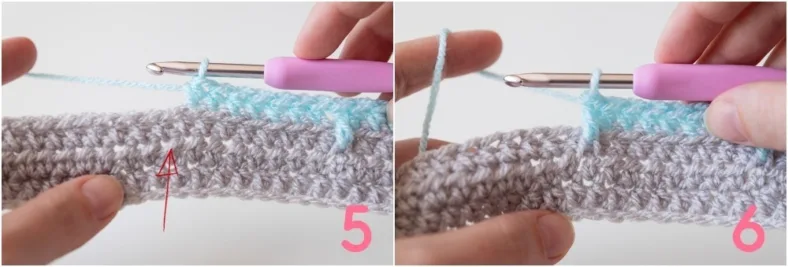
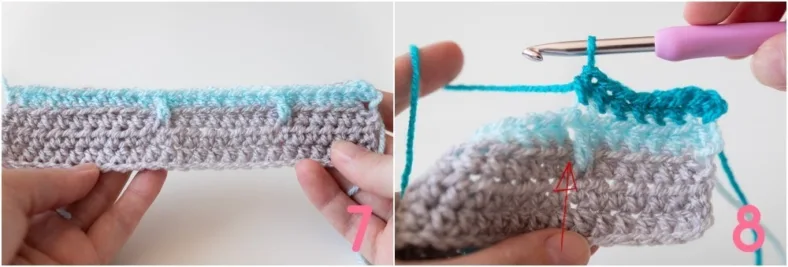
Yarn over, and insert your hook through the loop (photo 3). Yarn over again, pull up a loop, yarn over again and pull through all loops on the hook to finish your dropped double crochet (photo 4). It's just like a regular double crochet, only inserted lower.
Join your new colour, ch1 and make seven hdc BLO. Your next stitch is a dropped dc again (loop is indicated with the red arrow in photo 5). Yarn over, and insert your hook through the loop. yarn over again, pull up a loop, yarn over again and pull through all loops on the hook to finish your dropped double crochet (photo 6).
Follow the pattern instructions and finish your row like this. Your row will look like photo 7. Cut the yarn. This is pretty much all - the pattern is made by moving the dropped stitches by one stitch every row.
Third row and beyond
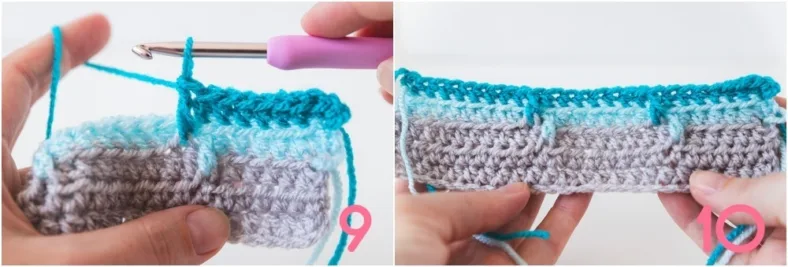
Remember, all stitches in the Apache tear are worked on the front of the blanket. So, without turning your blanket, join your new colour in the BL of the first stitch on the front side again. Make one hdc BLO in the same stitch, then six hdc BLO, the last hdc will be in the top of your dropped stitch (photo 8). Make a dropped dc in the stitch right next to the previously dropped dc (photo 9). Make seven hdc BLO, and then make another dropped dc.
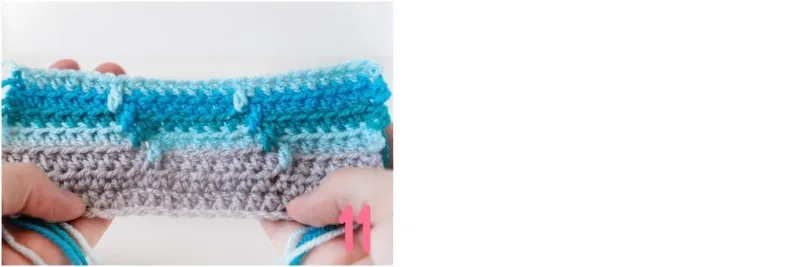
Finish your row according to the pattern instructions. You see the dropped stitch pattern has shifted by one stitch, creating the iconical tear pattern (photos 10-11).


Comments