Rainbow Sampler Blanket 2
27.Sep.23 / Kirsten BalleringAre you ready to continue your Sampler adventure? The Rainbow Sampler Blanket 2 features more stitches, vibrant colours, and a sprinkle of yarn magic.
Designed for adventurous beginners who want to take their crochet skills to the next level, this blanket teaches you everything you need to know about more advanced stitch patterns.
Other pattern parts can be found here:
Materials and preparation
Yarn
Original Colours
Scheepjes Colour Crafter (100% Premium Acrylic, 100g/300m)- Colour A: 1001 Weert x 6 balls
- Colour B: 1132 Leek x 1 ball
- Colour C: 1083 Tilburg x 1 ball
- Colour D: 1123 Roermond x 1 ball
- Colour E: 2004 Brussel x 1 ball
- Colour F: 1277 Amstelveen x 1 ball
- Colour G: 1432 Heerlen x 1 ball
- Colour H: 1130 Sittard x 1 ball
- Colour I: 1241 Den Bosch x 1 ball
- Colour J: 1821 Terneuzen x 1 ball
- Colour K: 1725 Ameland x 1 ball
- Colour L: 1422 Eelde x 1 ball
- Colour M: 2009 Kortrijk x 1 ball
- Colour N: 2006 Luik x 1 ball
- Colour O: 1068 Den Helder x 1 ball
- Colour P: 1034 Urk x 1 ball
- Colour Q: 2015 Bastogne x 1 ball
- Colour R: 1114 Eindhoven x 1 ball
- Colour S: 1263 Leerdam x 1 ball

Shop the yarn!
If you're looking for Colour Crafter, you can find it at your local retailer or online through one of these links:
Crochet hook
5.0mm (US size H/8).
Measurements
The blanket measures 170 x 210cm (67 x 82 ½in) after blocking.
Gauge/tension
Gauge is not critical for this pattern. It’s almost impossible to match gauge for all the different stitches, and since you’ll be making the blanket in one go you don’t have to worry too much about tension changing over time. We’ll have enough yarn leftovers to be flexible. If you want to make sure your blanket measurements are similar to the sample blanket, try to match this gauge: 15 hdc and 11 rows measure 10 x 10cm (4 x 4in) with a 5.0mm hook.
Check your gauge by working a gauge square:
With Colour A, ch26.
Row 1 (RS) Starting in the second chain from hook, work 25hdc, ch1, turn. [25 hdc]
Rows 2-15 25hdc, ch1, turn.
Row 16 25hdc, cut yarn.
Take the measurements in the center of your square (so try not to include the top or bottom row, or the most left or right stitches). Measurements are more reliable that way.
Notes
- Yarn amounts used this week are:
- Colour A: 26g
- Colour B: 10g
- Colour C: 10g
- Colour D: 10g
- Colour E: 8g
- Colour F: 16g
- Colour G: 16g
- An overview of all amounts per colour per week can be found in my general information blogpost.
- In most rows, you’ll make a ch1 before turning your blanket. This is a turning chain and does not count as a stitch. If you find a ch1 is too small, you can also make a ch2. This depends on how tight you crochet.
Abbreviations (US terms)
- begin-bobble: ch2, (yarn over, insert hook in stitch, yarn over, pull up loop, yarn over, pull through two loops on hook) 5x in the same stitch or space, yarn over, pull through all loops on hook
- begin-puff stitch: ch1, (yarn over, insert hook in stitch, yarn over, pull up loop) 3x in the same stitch, yarn over, pull through all loops on hook
- BLO: back loop only
- bobble: (yarn over, insert hook in stitch, yarn over, pull up loop, yarn over, pull through two loops on hook) 6x in the same stitch, yarn over, pull through all loops on hook
- ch: chain(s)
- dc: double crochet
- dc2tog: double crochet 2 stitches together to decrease the stitch count by 1: (yarn over, insert hook in stitch, yarn over, pull up loop, yarn over, pull through first two loops on hook) once in each of two stitches, yarn over, pull through all loops on hook
- dc3tog: double crochet 3 stitches together to decrease the stitch count by 2: (yarn over, insert hook in stitch, yarn over, pull up loop, yarn over, pull through first two loops on hook) once in each of three stitches, yarn over, pull through all loops on hook
- dc7tog: double crochet 7 stitches together to decrease the stitch count by 6: (yarn over, insert hook in stitch, yarn over, pull up loop, yarn over, pull through first two loops on hook) once in each of seven stitches, yarn over, pull through all loops on hook
- FL: front loop
- FPdc: front post double crochet: Yarn over, insert your hook around the post of the stitch indicated in the pattern, yarn over, pull up a loop, yarn over, pull through first two loops on hook, yarn over, pull through all loops on hook
- hdc: half double crochet
- hdc2tog: half double crochet 2 stitches together to decrease the stitch count by 1: (yarn over, insert hook in stitch, yarn over, pull up loop) in each of two stitches, yarn over, pull through all loops on hook
- popcorn: 6dc in same stitch, remove hook from loop, insert hook from front to back through first dc, pick up loop, pull through dc to close popcorn
- puff stitch: (yarn over, insert hook in stitch, yarn over, pull up loop) 4x in the same stitch, yarn over, pull through all loops on hook
- RS: right side
- sc: single crochet
- ss: slip stitch
- s(ts): stitch(es)
- tr: treble crochet
- wrapped st: wrapped stitch: (yarn over, insert hook in stitch, yarn over, pull up loop to working height) 2x in same space, yarn over, pull through all loops on hook
- WS: wrong side
Repeat formats
- *….; rep from * once/twice/3x Crochet the instructions after * and then repeat that section a further number of times as indicated.
- *…; rep to end Crochet the instructions after * and then repeat that section to the end of the row or round.
- (…) once/twice/3x Crochet the instructions between brackets the total number of times indicated.
- […] Indicates the amount of stitches at the end of a row or round.
- (…) in same st/sp Indicates that all instructions between brackets are worked in the same stitch or space.
Colour layout

Adjusting the size of the blanket
Lengthwise, this is simple: Add or remove more sections.
Widthwise it’s another story. I’ve selected the stitches in this blanket to be divisible by 24. You might be wondering: But 217 is not divisible by 24? Nope, that’s correct. But 216 is. And I added an extra stitch because some patterns need a final ‘+1’ stitch. Imagine: A Catherine Wheel consists of a stitch repeat of 6 + 1. Without the +1, you wouldn’t have a stitch to adhere your final Catherine Wheel to. It would just flop about.
What does all of this mean if you want to change the size? It means that you can use multiples of 24 to subtract or add to the blanket, without changing the instructions significantly. You could increase the size by making 241 hdc, or 265. Or make it smaller with 193 or 169 hdc. Every 24 stitches measure about 17cm (6 ¾ in).
How do you apply this?
24 is a great number because it’s fully divisible by many other numbers: 1, 2, 3, 4, 6, 8 and 12. It means that if you have stitches with these stitch repeats, you will only have to adjust the number of repeats, but not the actual repeat instructions itself.
You see, every pattern row in this pattern follows the same formula: (the part before first stitch repeat) + (actual stitch repeat) + (the part that says how often you need to repeat the stitch repeat) + (the part after stitch repeat, this often contains the ‘+1’ stitch).
When a stitch repeat fits in 24, you only have to adjust the third of these four components: the part that says how often you need to repeat the stitch repeat. The part afterwards usually sorts itself: if you have a stitch repeat of 12 and only 5 stitches left, you can be pretty sure you reached the end of your repeat section.
Alternative ways to adjust the size
You can also try some alternative ways to adjust the size slightly. For example, using a larger (or smaller) hook for your blanket results in a different size. Thinner or thicker yarn too. An easy fix is adding more or less rows to the border, as this impacts all sides (left, right, top, bottom. So that's twice the height of one regular row with one edge round added or removed). However, these changes will only go so far - changing hook sizes won't add 30 cm to the width of your blanket, and you have to be mindful of the drape of the blanket too. It will always be a bit a a puzzle!
Techniques
To keep the pattern organised, I placed the techniques on separate pages:
Crochet pattern
Foundation rows
We will set up the blanket with a couple of solid, white rows.
With Colour A, ch218.
Row 1 (WS) Starting in the second chain from hook, 217hdc, ch1, turn. [217 hdc]
Row 2 (RS) 217hdc, ch1, turn. [217 hdc]
Row 3 (WS) 217hdc, cut yarn, turn. [217 hdc]
Apache tear section 1
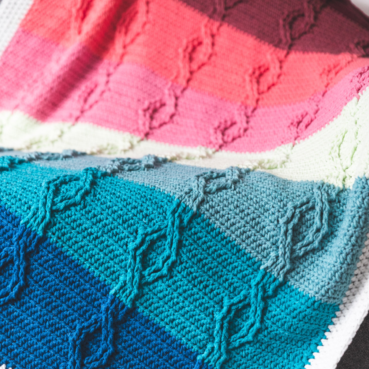
The Apache tear is a decorative stitch that can be used in many ways. It lends itself to all stitch multiples, so you can adapt the basic concept of this stitch to pretty much any idea!
Row 4 (RS) Join Colour B with a ss in the back loop of the first stitch, ch1, 1hdc BLO in the same stitch, 216hdc BLO, cut yarn, don’t turn. [217 hdc]
Row 5 (RS) Join Colour C with a ss in the back loop of the first stitch, ch1, 1hdc BLO in the same stitch, 5hdc BLO, *1dc in FL of stitch two rows below, skip next stitch on current row, 7hdc BLO; repeat from * another 24 times, 1dc in FL of stitch two rows below, skip next stitch on current row, 10hdc BLO, cut yarn, don’t turn. [26 dc, 191 hdc]
If you feel grabbing the front loop only is too loose, you can choose to grab both loops of the stitch as well, or even the loop below the front loop.
The ends of the Apache tear sections tend to flare a little bit, which we’ll sort out with blocking later on. If you feel the flare is too prominent, you can start and end each row with a sc in the first and final stitch, instead of a hdc.
Row 6 (RS) Join Colour D with a ss in the back loop of the first stitch, ch1, 1hdc BLO in the same stitch, 6hdc BLO, *1dc in FL of stitch two rows below (stitch immediately left from the previous dc), skip next stitch on current row, 7hdc BLO; repeat from * another 24 times, 1dc in FL of stitch two rows below, skip next stitch on current row, 9hdc BLO, cut yarn, don’t turn. [26 dc, 191 hdc]
Row 7 (RS) Join Colour B with a ss in the back loop of the first stitch, ch1, 1hdc BLO in the same stitch, 7hdc BLO, *1dc in FL of stitch two rows below (stitch immediately left from the previous dc), skip next stitch on current row, 7hdc BLO; repeat from * another 24 times, 1dc in FL of stitch two rows below, skip next stitch on current row, 8hdc BLO, cut yarn, don’t turn. [26 dc, 191 hdc]
Row 8 (RS) Join Colour C with a ss in the back loop of the first stitch, ch1, 1hdc BLO in the same stitch, 8hdc BLO, *1dc in FL of stitch two rows below (stitch immediately left from the previous dc), skip next stitch on current row, 7hdc BLO; repeat from * another 24 times, 1dc in FL of stitch two rows below, skip next stitch on current row, 7hdc BLO, cut yarn, don’t turn. [26 dc, 191 hdc]
Row 9 (RS) Join Colour D with a ss in the back loop of the first stitch, ch1, 1hdc BLO in the same stitch, 9hdc BLO, *1dc in FL of stitch two rows below (stitch immediately left from the previous dc), skip next stitch on current row, 7hdc BLO; repeat from * another 24 times, 1dc in FL of stitch two rows below, skip next stitch on current row, 6hdc BLO, cut yarn, turn. [26 dc, 191 hdc]
Row 10 (WS) Join Colour A with a ss in the first stitch, ch1, 1hdc in same st, 216hdc, cut yarn, turn. [217 hdc]
Granny Stripe section 1
The Granny Stripes have been used in the first sampler blanket. I really enjoy these stitches as they’re a crochet staple and work up quite quickly!
Row 11 (RS) Join Colour E with a ss in the first stitch, ch3 (counts as first dc), 1dc in same stitch, *skip 2 stitches, 3dc in next stitch; repeat from * another 70 times, skip 2 stitches, 2dc in last stitch, cut yarn, turn. [71 Granny clusters with 3 dc, 2 clusters with 2 dc, 217 dc in total]
Row 12 (WS) Join Colour A with a ss in the first stitch, ch1, 1hdc in same st, 216hdc, cut yarn, turn. [217 hdc]
Catherine Wheel section 1
Like the Granny Stripes, you might have seen the Catherine Wheel in my previous blanket. It’s a stitch that looks beautiful from both the front and the back. It’s both intricate and solid-looking, which makes it perfect to add to this blanket too!
Row 13 (RS) Join Colour F with a ss in first st, 1sc in same st, *skip 2 sts, (3dc, ch1, 3dc) in same st, skip 2 sts, 1sc in next st; repeat from * another 34 times, skip 2 sts, (3dc, ch1, 3dc) in same st, skip 2 sts, 1sc in last stitch, cut yarn, turn. [37 sc, 36 3dc-ch1-3dc clusters, 72 spaces where you skipped 2 sts]
Row 14 (WS) Join Colour G with a ss in first st, ch3 (counts as first dc), dc3tog, ch7, skip ch-1 space, *dc7tog, ch7, skip ch-1 space; repeat from * another 34 times, dc3tog, 1dc in final st, turn. [35 half Catherine wheels, 2 quarter wheels (one on each end), 2 dc, 36 ch-7]
Row 15 (RS) Ch3 (counts as first dc), 3dc in dc3tog (there’s an ‘eye’ in the centre of the wheel, that’s where you’ll be working your stitches), 1sc over the ch7 of your previous row into the ch-1 space of Row 13, *(3dc, ch1, 3dc) in next dc7tog, 1sc over the ch7 of your previous row into the next ch-1 space of Row 13; repeat from * another 34 times, 3dc in final dc3tog, 1dc in last dc (the ch3 with which you started Row 14), cut yarn, turn. [35 half Catherine wheels, 2 quarter Catherine wheels (one on each end), 2 dc, 36 sc]
Since we’re only going to work one row of Catherine wheels the next row will look like Row 14, but will not be exactly the same. If you crochet 7 chains as the ‘top’ row of the Catherine wheel, you can imagine that all your next rows would have quite a big gap. Instead, we’ll be securing the chain to the Catherine wheels. This way, you can continue with the rest of your blanket without big gaps. Basically, we’re mirroring Row 13.
Row 16 (WS) Join Colour F with a ss in the first stitch, 1sc in same st, *ch3, dc7tog, ch3, 1sc in ch-1 space of Row 15; repeat from * another 34 times, ch3, dc7tog, ch3, 1sc in last dc (the ch3 with which you started Row 15). Cut yarn, turn. [37 sc, 36 dc7tog, 72 ch-3]
We’ll need to make sure we’re going back to 217 hdc in the next row. This means counting! Luckily, we can look to Row 13 for help. Each Catherine wheel took up 6 stitches (1 sc, 2 skipped stitches, a wheel and then 2 skipped stitches again). So we just need to make 6 stitches per Catherine wheel, plus the final stitch that we used to fasten the last wheel to get back to 217 stitches.
Row 17 (RS) Join Colour A with a ss in first st, ch1, 1hdc in same st, *2hdc in ch-3 space, 1hdc in dc7tog, 2hdc in next ch-3 space, 1hdc in sc; repeat from * another 34 times, 2hdc in ch-3 space, 1hdc in dc7tog, 2hdc in ch-3 space, 1hdc in last sc, ch1, turn. [217 hdc]
Row 18 (WS) 217hdc, cut yarn, turn. [217 hdc]

Diagram
Crochet diagram part 1

Key (US terms)


Comments
of course, you're right :) Luckily this sorts itself while working on the blanket, but sharp eye! September 28, 2023 20:49 - Reply
I'm in the process of linking all parts together but in the meantime you can find all parts easily lined up through my blog page; https://haakmaarraak.nl/blog. Hope this helps! November 22, 2023 08:04 - Reply