Have you seen a wonderful Corner-to-corner (C2C) crochet pattern, but do you have no idea where to start? Or maybe you've seen something that caught your eye, and you've only just figured out that it's even called corner-to-corner. Anyway, you're in luck!
Today I'll show you how to get started with C2C crochet, how to increase, change colours and decrease. You'll even learn how to read a C2C graph or chart. In short, all the tools you need to get started with this wonderful technique.
What is Corner-To-Corner (C2C) crochet?
In regular crochet, you work in rows or rounds. C2C crochet is a crochet technique that is worked in 'blocks' or 'pixels' on the diagonal axis of a project. You keep increasing until you find your project is big enough. After that, you can maintain the same number of blocks (to make a C2C rectangle) or decrease the number of blocks each row.
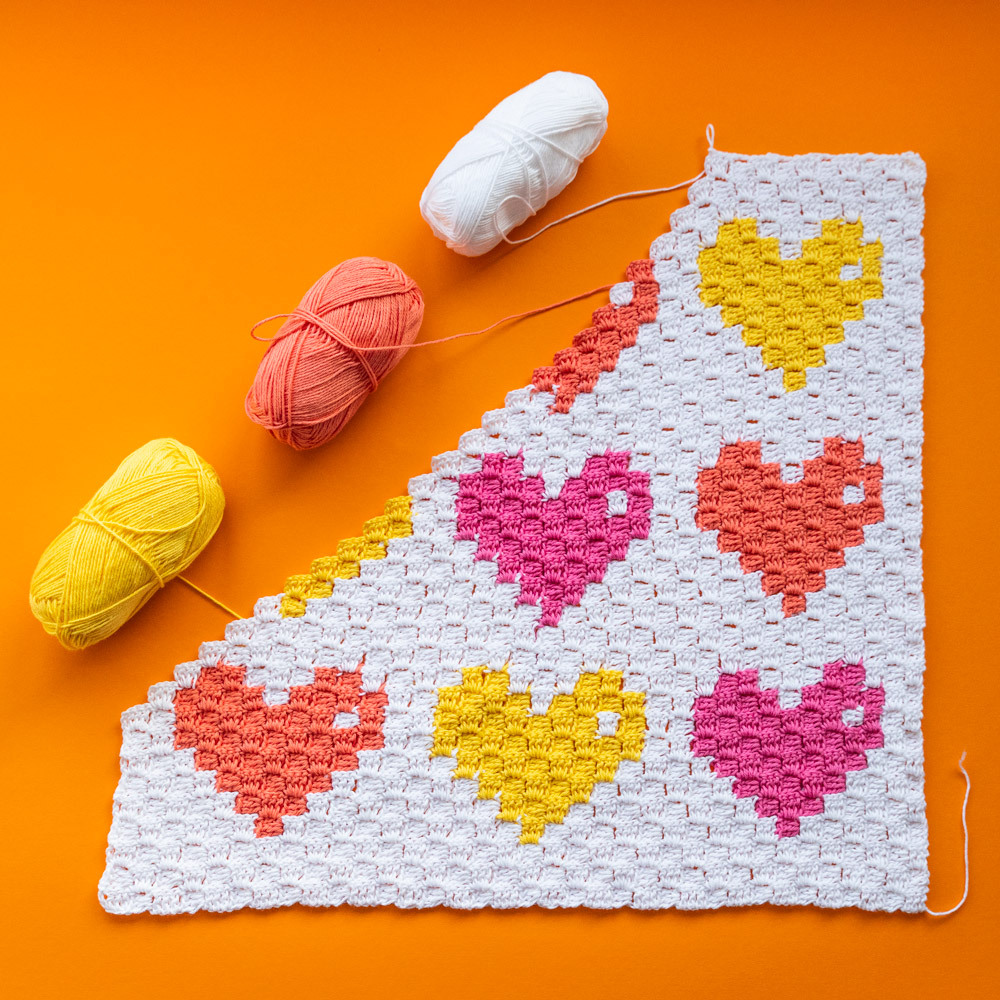
What yarns do I need for C2C crochet?
C2C is a very forgiving technique, and you can create a project with virtually any yarn, solid or self-striping. That being said, your project will look best when the yarn has a bit of 'volume' to it to fill up your stitches. So I recommend using fingering, sport, DK or Aran weight yarns. Lace-weight yarn is quite thin and will not bring out the best in your work. The yarn above is Fingering weight cotton (Scheepjes Organicon) and shows off the individual blocks beautifully.
How to start with C2C crochet
Since C2C projects are block-based, the possibilities to create with this technique are endless! However, you often find that the base of the project is either a rectangle or a square, so being able to create such a shape is important for a good start of your project. Follow the instructions below to get started with a C2C square.
First row
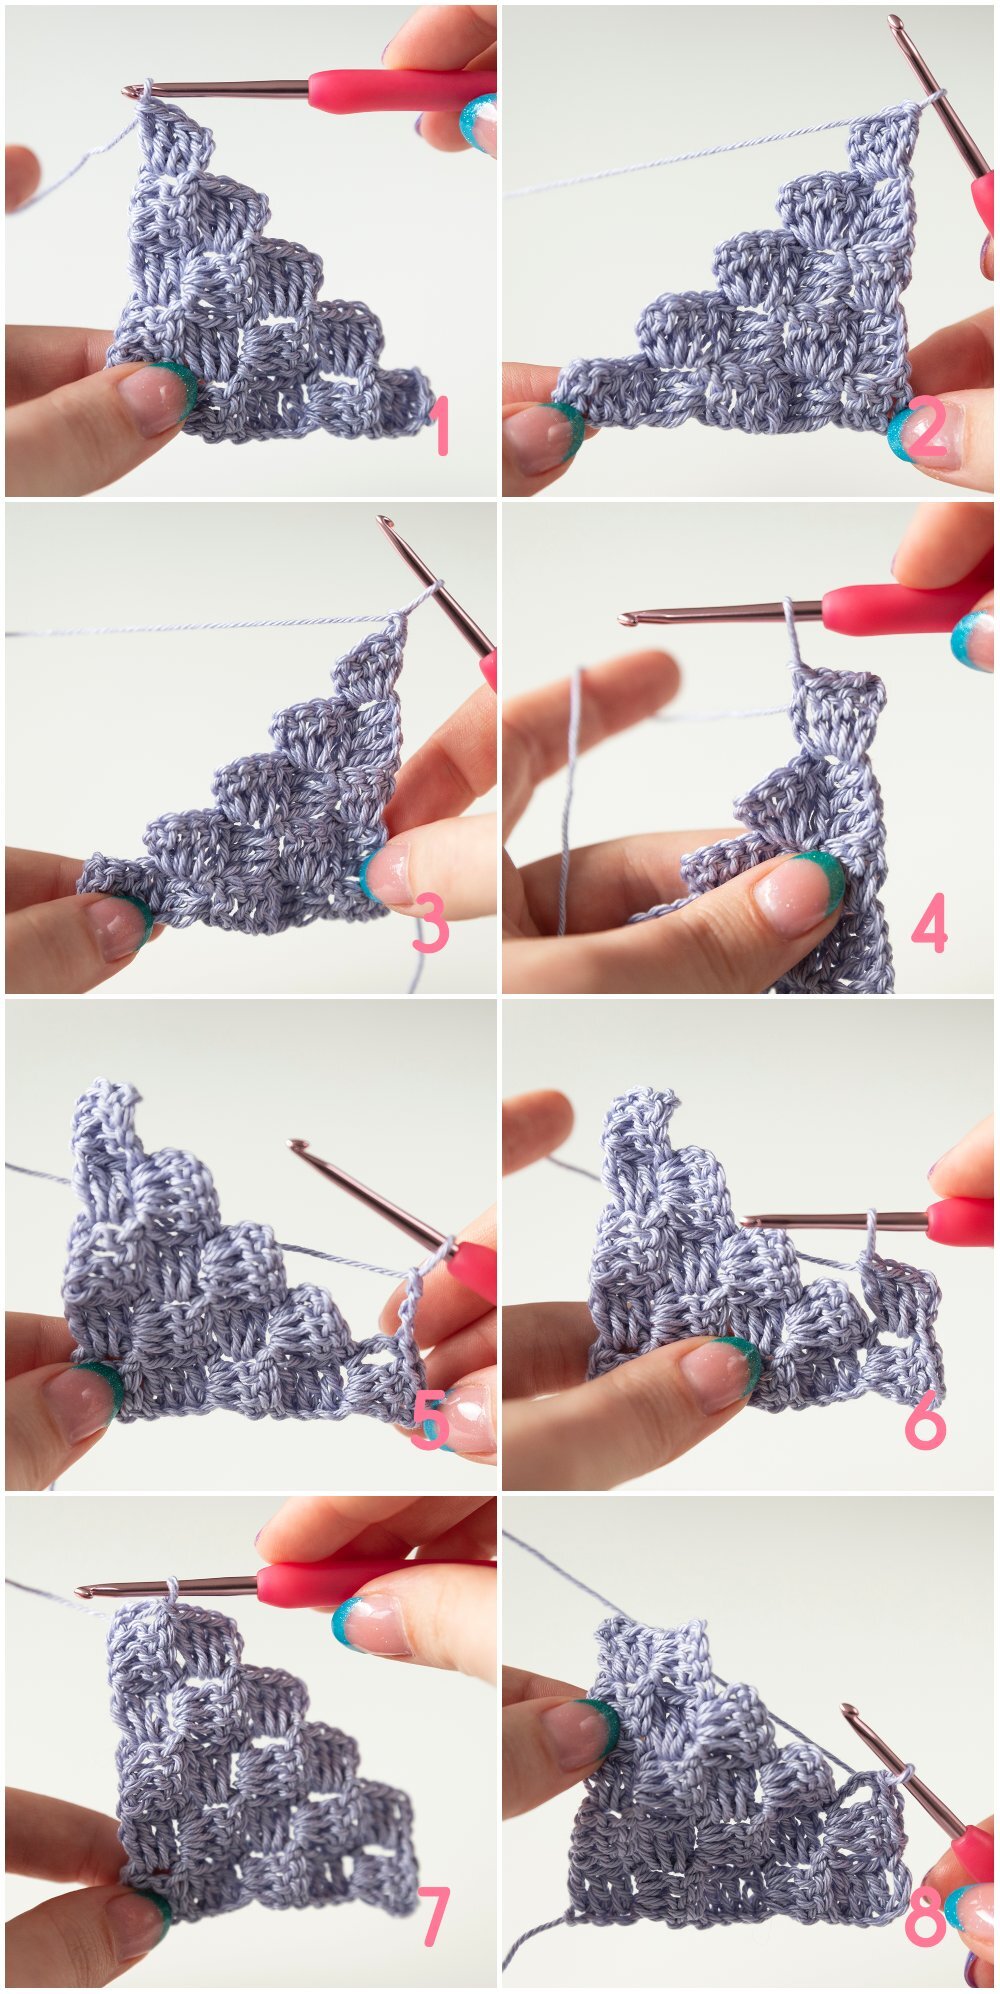
Ch6 to start (photo 1). This will be both the base and the first dc of your first block. Next, make 1dc in the 4th ch from hook (photo 2). Work 1dc in each of the next two ch (photo 3). This forms your first block, consisting of three dc’s and one ch3, which together should be more or less square.
Second Rrow
Ch6 to start (photo 4). Turn your work, make 1dc in the 4th ch from hook (photo 5), and then 2 more dc in the next 2 ch’s. This should bring you right back to your first block (photo 6). To secure your block, ss in the ch-3 space of your first block (photo 7). Ch3 (this forms the first ch3 of your next block, photo 8), and make 3dc in the ch3-space of the block below, the same block as where you just made your ss (photo 9). Your second row is now finished.
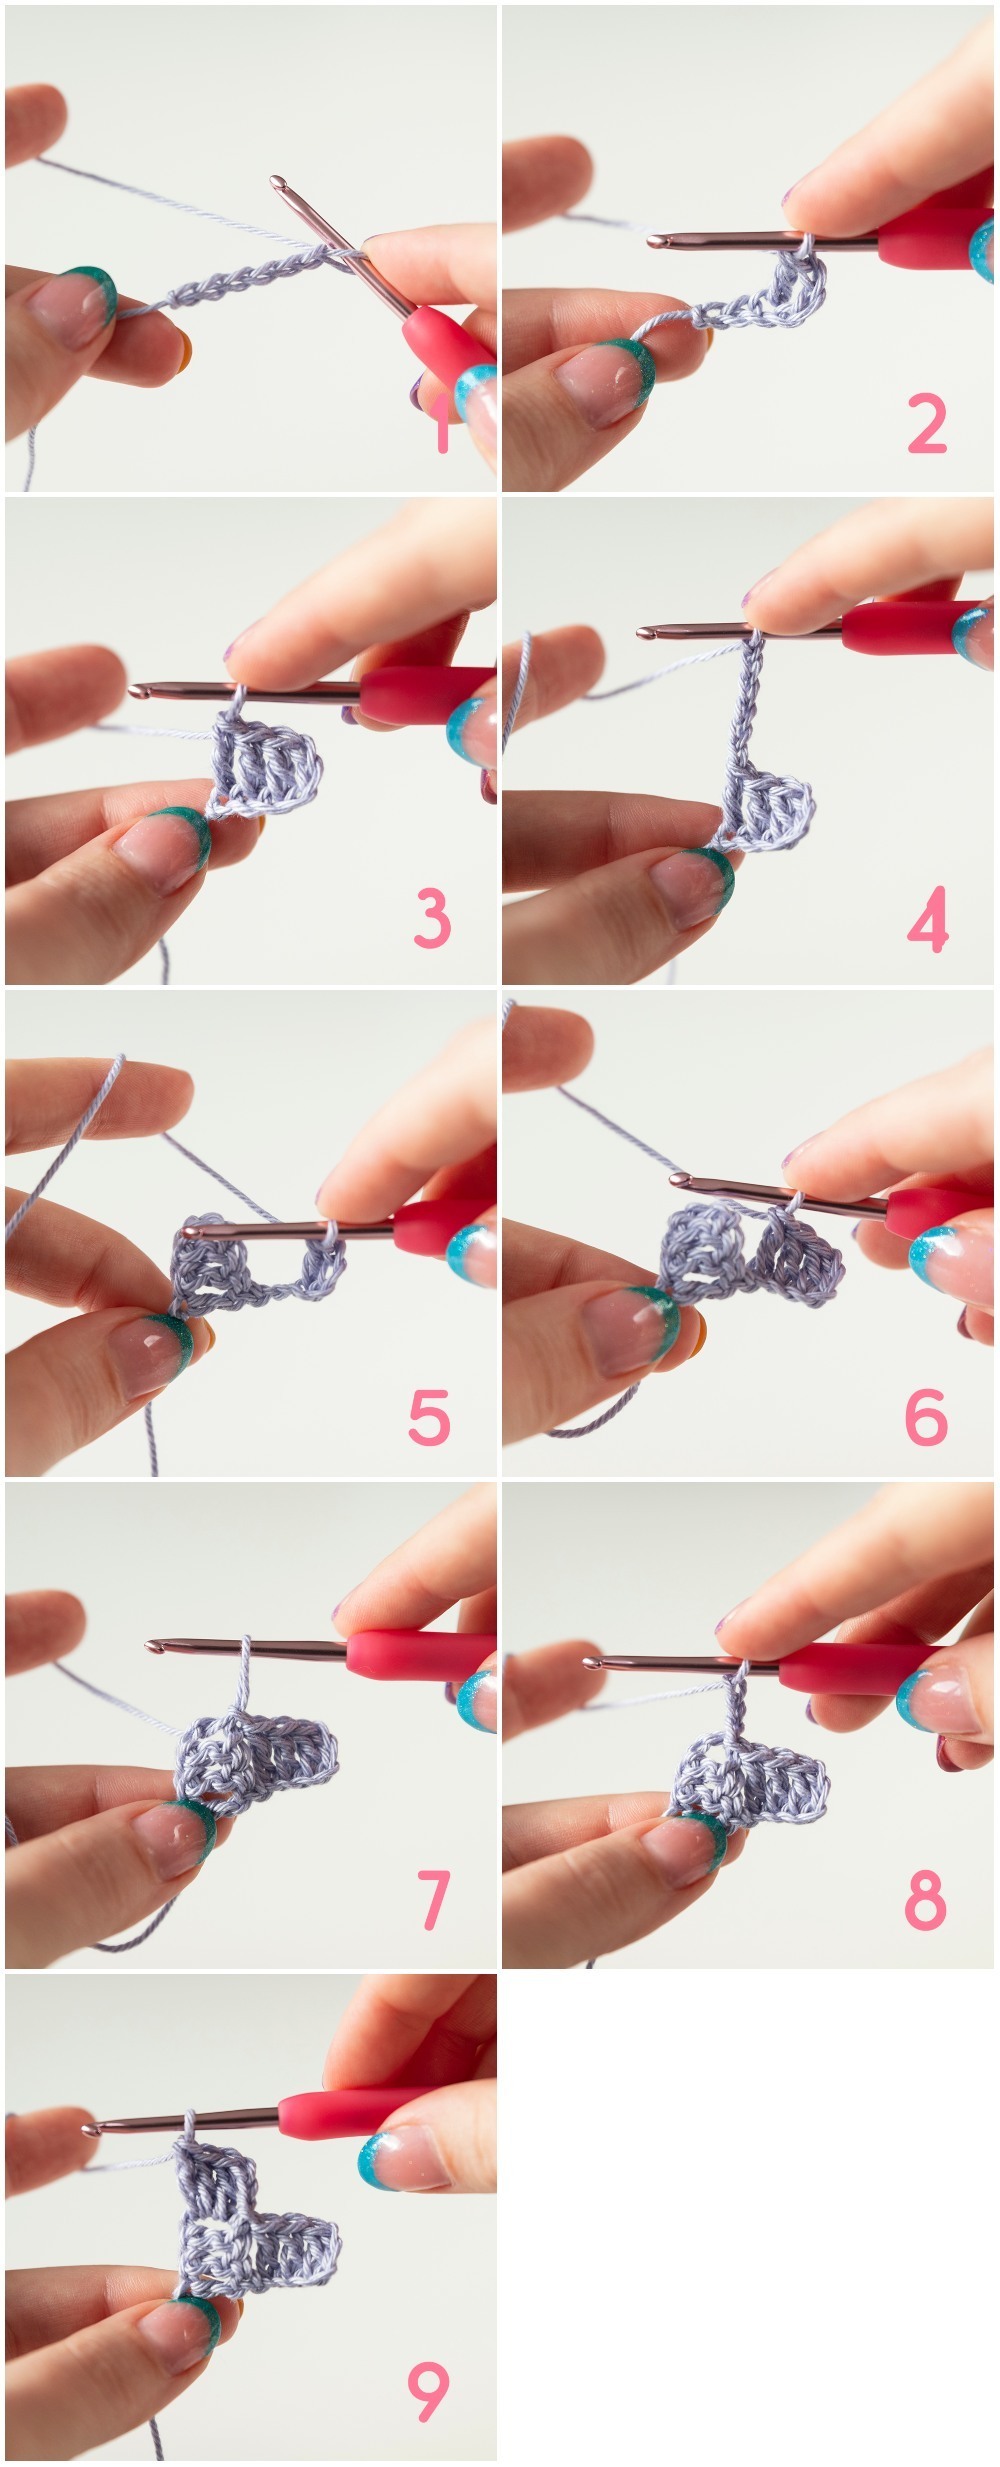
Third row Ch6 (photo 10). Turn your work, make 1dc in the 4th ch from hook (photo 11), and 1dc in each of the next 2 ch’s (photo 12). Secure your block by working a ss in the ch-3 space of the last blow of your previous row (photo 13). Ch3, and work 3 dc in the ch-3 space of that same block (photos 14-15). Secure that block with a ss in the ch-3 space of the previous row’s adjacent block (photo 16). Ch3, and work 3 dc in the ch-3 space of the next block (photos 17-18). Your third row is now finished.
You can continue the method above to grow your C2C project in size, by adding one block of three dc’s and one ch3 in every row.
Changing colours in C2C
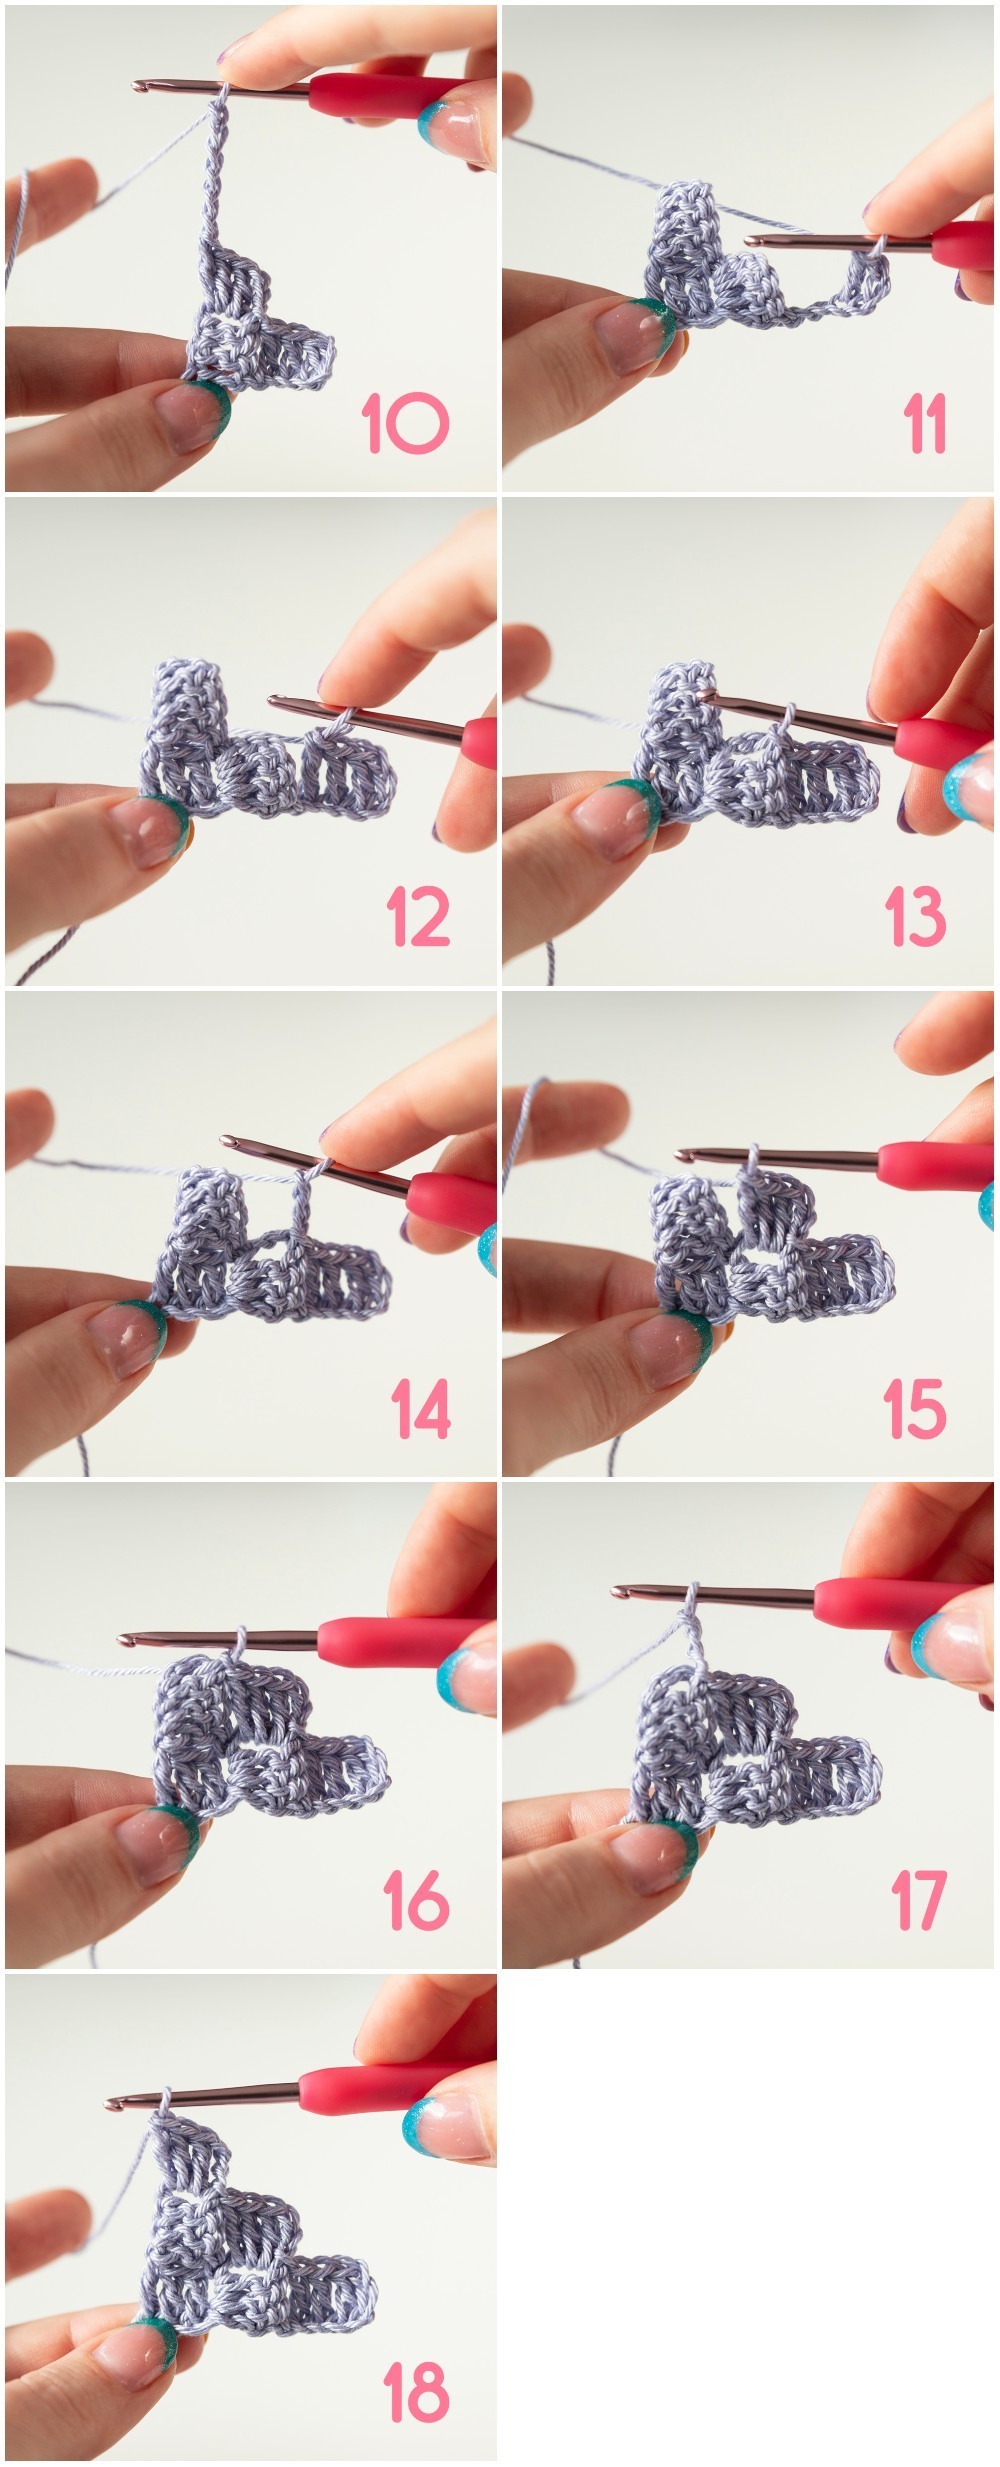
Changing colours is a cornerstone of C2C crochet. You can virtually recreate any image or graphic you want, and colour changes are essential for a beautiful result. To create a smooth colour transition I recommend changing in the last stitch before creating a block in another colour. When a C2C graph indicates that it's time to change to a new colour, do the following:
- Have a strand of the new colour ready.
- When you reach the last block in the old colour, stop before completing the dc’s final yarnover (photos 1-2). Instead, pick up the strand of the new colour, yarn over and pull through (photos 3-4). You’ve now finished the dc in the old colour, and have a loop of the new colour on your hook.
- Ss in the ch-3 sp of the next block to secure your new colour (photo 5).
Changing back to the original colour is done in the same way, by simply picking up the strand of the original colour right before you finish the third dc of a block (photos 6-9).
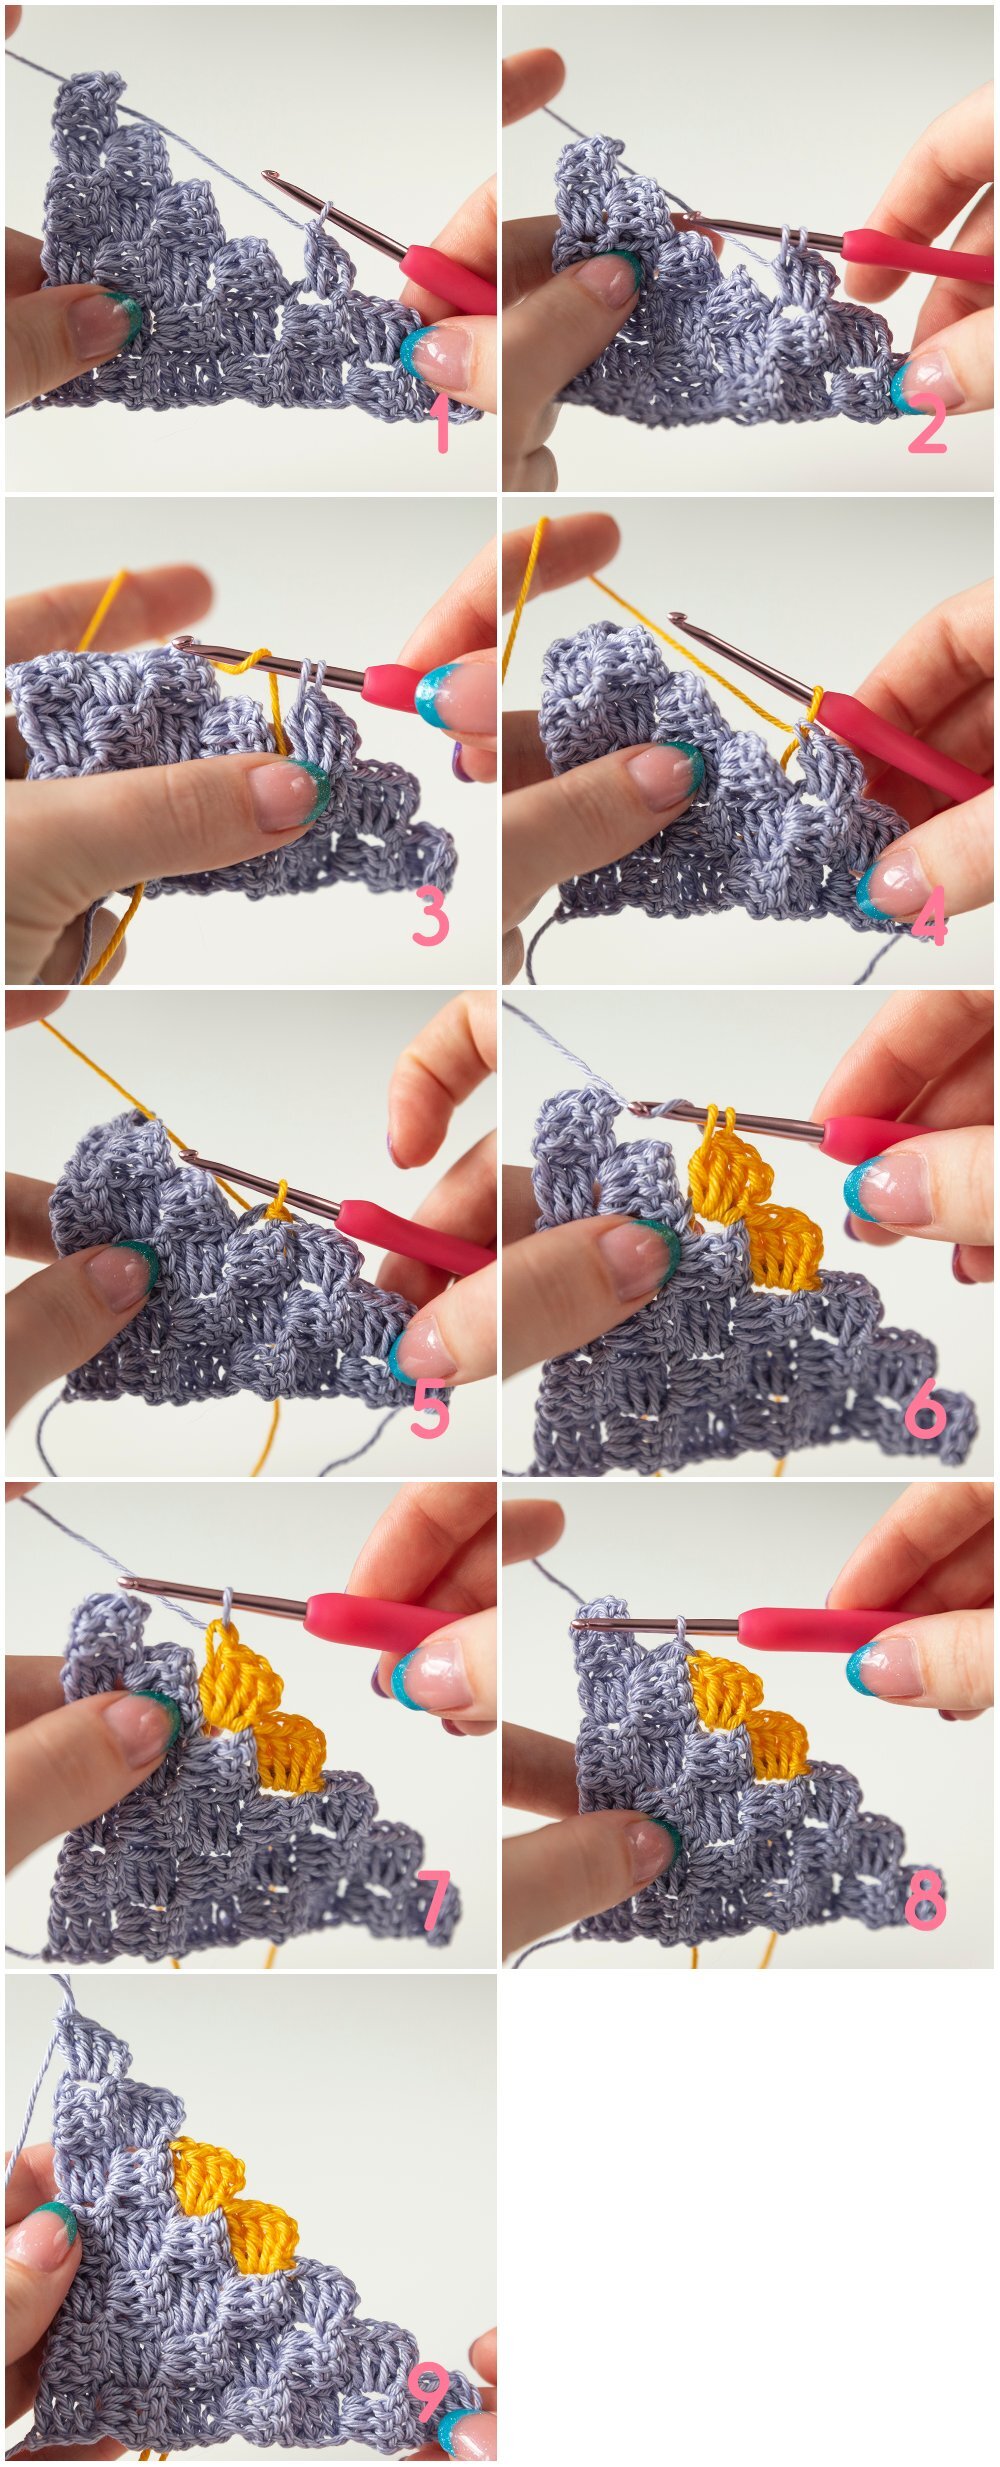
When you work with many colours it can be hard to keep track of all the loose ends. That's why it can be good to roll a couple of yards of yarn onto bobbins. Of course, this depends on how much blocks you need to make with one colour consecutively.
How to make a C2C decrease
Once your project is large enough, it’s time to stop making extra blocks.
Once you’ve reached the point where you no longer need to increase (photo 1), complete your final block and turn your work (photo 2). You want to end up on the left side of the block you just made to start your new row without an extra block on top. To do so, chain 1 (photo 3), and work 4ss (one in each dc and ch3) to the left side (photo 4). Don’t make the ss too tight, as you want to keep the stretch of the original C2C intact. If need be, grab a larger hook to make the slip stitches. Ch3 to start your new block, and work 3dc in the ch-3 space of the block below (photos 5-6). Work your way in regular C2C over to the end of the row.
If you want to maintain the number of blocks (for example, when you're working on a blanket and reached the bottom corner and now want to create the bulk of the body), simply crochet on top of the last block like you've done up until this point. You only need to 'decrease' (which in this context means stopping increasing) at the beginning of each row.
If you actually want to decrease because you're working towards the smaller section of your C2C project, stop crocheting your row when you’ve made a ss in the last block of the previous row (photo 7). Ch1, turn your work and work 4 ss in the top of the three dc’s and ch3 of your last block (photo 8).
Reading a C2C graph
Once you've mastered the C2C technique, it's very easy to work these patterns from a graph. C2C blankets are called 'Graphgans' for a reason! Reading these charts might look daunting, but it really isn't that difficult.
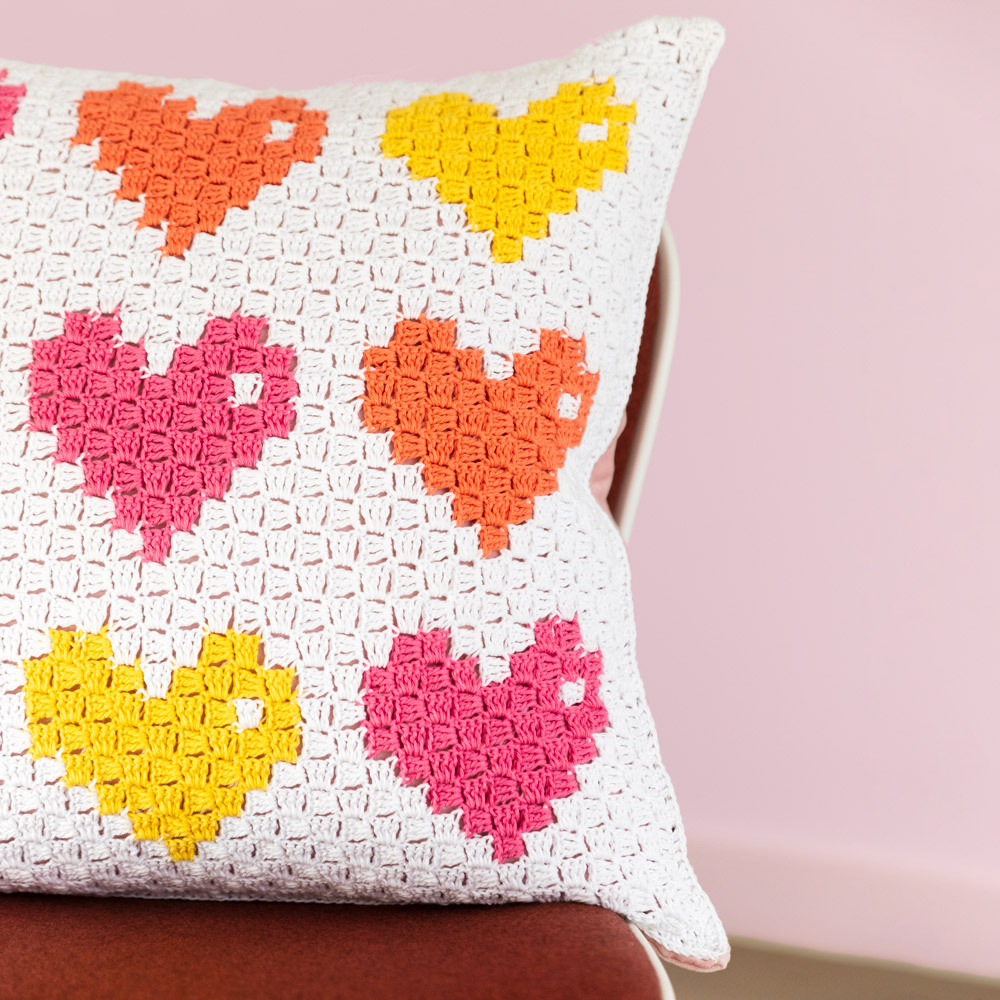
A C2C graph looks like a diagram with all the blocks or pixels drawn in. Because you're working on the diagonal axis, a row is not a traditional left-to-right row as in a regular chart, but rather diagonal. So you read the rows diagonally too. I find it to be easy to strike through the rows I've already crocheted to keep track of where I am. In the chart (borrowed from the C2C 8-bit-love Pillow pattern) below you can see what that would look like:
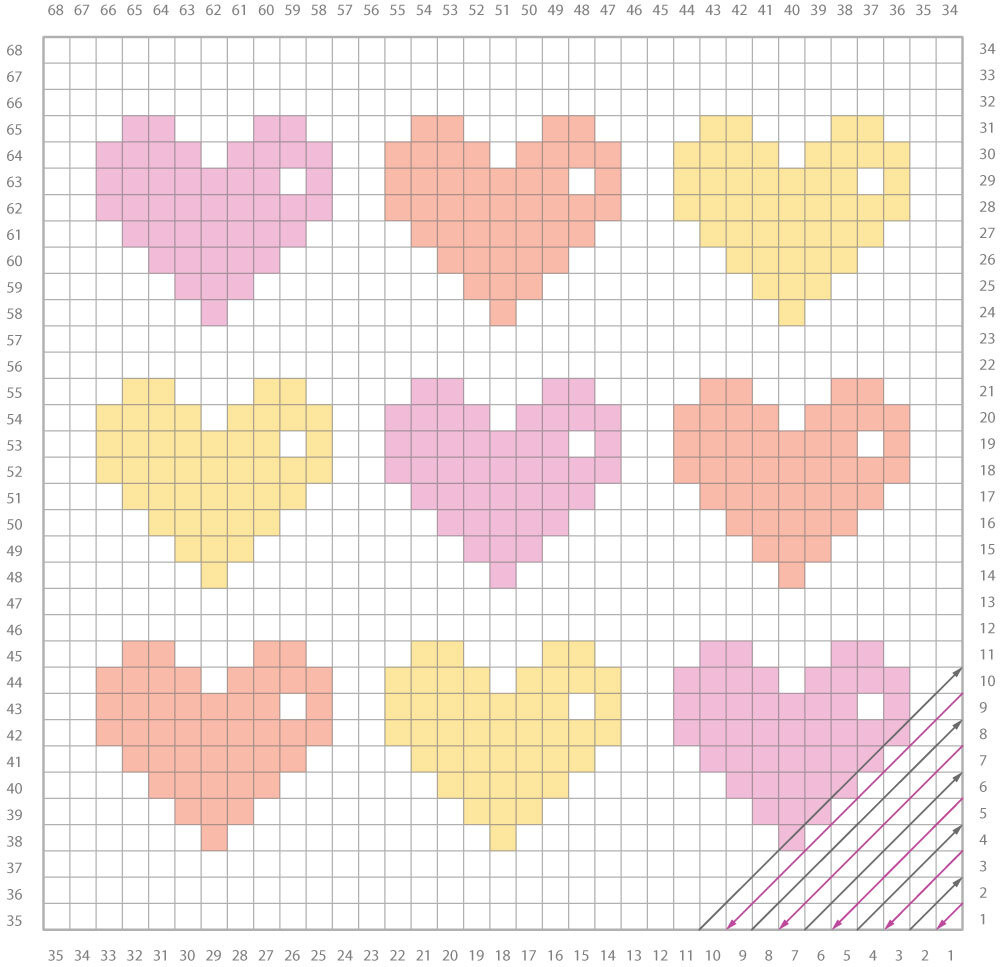
One set of rows is read from top to bottom, while the next is read from bottom to top, akin to how you crochet the different blocks. When you encounter a differently coloured block, that indicates a colour change. You can follow the instructions above to make one.


Comments
For example
Row 51 - cream 6, lavender 22, cream 22.
Row 52 - cream 21, lavender 23, cream 6.
How do I start decreasing the one side and continue increasing the other. November 11, 2022 14:12 - Reply