Hygge Mug Cozy
26.May.17 / Kirsten BalleringTo make the most out of Hygge leftovers, I’ve designed a few bonus patterns to keep your hands busy a little bit longer! You also have a chance to use the kit extra’s here. First up: The Hygge mug cozy. We’ve been working on embroidery throughout all the CAL. And while you want the shawl to be very supple, it’s also a nice change of pace to see how embroidery looks like on a much more densely crocheted fabric!
Materials and preparation
The Hygge Mug Cozy is made from the leftovers of the Hygge CAL. Please check the kit contents for the Hygge CAL to see the exact colours for your colourway.

Yarn
Shop the yarn
Do you want to shop the yarn? You can still purchase Hygge kits from Wool Warehouse. If you rather buy the yarn separately, you can do so via the following links:
Crochet hook
2.5mm (US Size B/1).
Measurements
Fits a mug of 8cm in diameter and 9.5cm in height.
Gauge/tension
Gauge is depending on your mug and hook size. For me, 55 dc on a 2.5mm hook was the right size to fit an 8cm diameter (3in) mug. To determine right size, measure after Row 2: there should be a ~1cm gap between both ends when wrapped around mug.
Notes
To adjust the size of mug cozy: remove or add chains from the base chain and adjust stitch count for each row accordingly. Don’t make less than 54 chains, otherwise the embroidery pattern (which is 47 stitches wide) won’t fit on the cozy. Instead, go down a hook size if possible.
Abbreviations (US terms)
- ch: chain
- dc: double crochet
- ss: slip stitch
- st(s): stitch(es)
Crochet pattern
Mug Cozy
With Stone Washed, ch56.
Row 1 Starting in second ch from hook, 55dc, ch1, turn. [55 dc]
Row 2 2ss, 51dc, skip last 2 sts, ch1, turn. [51 dc]
Row 3 51dc, skip last 2ss, ch1, turn.
Row 4 51dc, ch1, turn.
Rows 5-18 51dc, ch1, turn.
Row 19 51dc, ch23, turn.
The 23 ch are for the button fastening.
Row 20 Skip 23 ch, 51dc, fasten off.
Weave in end on top of cozy, leave the starting tail of the yarn.
The back and front of the cozy are similar. Depending on whether you want your button on the left or right side of the handle, turn the side of your cozy with your 23ch to the right ( = button on right side) or to the left (= button on left side).
Embroidery
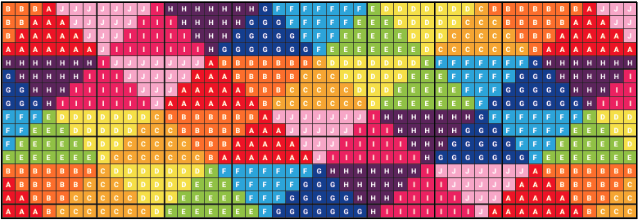
Work your embroidery on Rows 3-18 in cross stitch according to the embroidery scheme, with Row 3 being the bottom, and Row 18 being the top of your embroidered motif (are shown as grey in the crochet diagram). You read the scheme as follows:
Every square represents a crocheted stitch in your cozy. The white squares will not be embroidered. The coloured squares represent the cross stitches you’re going to make. in every square there’s a letter, corresponding to the colour you use for the embroidery.
For details regarding how you embroider read the Tips & Tricks document, or watch the video tutorial provided by Esther for week 2 of the Hygge CAL.
Finishing
Block to straighten the embroidery stitches and cozy (see Tips & Tricks document for instructions on blocking). Make sure not to block it too large in size as otherwise, it will be too big for the cozy. Rather, just straighten out the edges. The cozy needs to hug your mug, not sag.
Fasten the button on the opposite side of the ch-fastening. Use starting yarn end to sew the small end (Rows 1-2) of the cozy together. Weave in any loose ends.
Download the pattern
The pattern is also available as a downloadable file here.
Diagram
Borduurdiagram Hygge Mug Cozy

Crochet Diagram Hygge Mug Cozy


Comments