We've all been there. You are searching for that one project that would be perfect for you. You find it after days of searching and discarding other crochet patterns. However, the pattern instructions in the written pattern are in a language you can't make heads or tails of. It does have a crochet chart, though. How do you read that crochet diagram?!
When this happens, I'm mostly grateful that somebody took the time to create a crochet chart. I'm sure some of you would prefer a video tutorial, but learning to read written crochet pattern instructions and diagrams is so worth it!
I compare it with learning how to read. You need to learn the letters first to understand the words. Luckily, as a crocheter, you already know the written instructions! They're just written in a symbol language you don't fully understand yet. After you know the words, it's just a matter of time before you can read the whole text and see 'the bigger picture'.
Read on, and let me explain to you how you can read these handy crochet diagrams, too. Don't worry too much about your current skill level, I will show you some examples for beginner patterns as well!
The crochet symbols
Basic crochet stitches
For every stitch that exists, there's a matching specific symbol. It's hard to find a guide of all stitches, as some are very obscure, and people being people have made countless variations. However, I can walk you through the basic stitch symbols and more advanced stitches that you most likely will see in crochet charts. Note: I use US crochet terms throughout this article.

When we're talking about the basic stitches, I mean the group of stitches you probably learned first, such as a chain, slip stitch and single crochet. As you can see, an open oval represents a chain, while a filled-in dot represents a slip stitch. A single crochet can be depicted as a cross or plus sign, depending on the chart. Everything upward from a single crochet stitch is funny: those symbols look like a T with none, one or more crossbeams.
Tip: Find that the double crochet symbol and trebles look alike? Look at the number of crossbeams: each crossbeam represents the number of yarn overs when working the stitch.
Increasing and decreasing
You most likely have to increase or decrease at some point in your pattern. When you examine the symbols below, do you notice a pattern emerging? You're looking for the point where the symbols collide. If that's on the bottom, it's an increase, and if that's on the top, it's a decrease!

Special crochet stitches
There are also 'special' stitches that are a combination of one (or more types) of the most basic stitches. I'm talking about stitches like puff stitches, front post stitches, and popcorn stitches. These stitches are depicted in different ways and can vary from chart to chart, there is no standard symbol. However, they're quite often recognised as one of the stitches below, and are always a combination of one (or more) basic symbols!
Sometimes, when it's an obscure stitch, there's a further explanation in the full chart for some special instructions. Unfortunately, if that's in a foreign language, it won't help you very much. Just look closely at the stitches then and try to replicate them as best as possible, continuously referring to the basic stitches.

Now you know the individual letters to form the sentence. Don't worry if you don't know them by heart: you will learn over time.
How do you read a crochet chart?
The next part will focus on how you read a crochet chart. A crochet chart can look like a maze of symbols, dots and numbers. If you feel overwhelmed, it's essential to remember this one golden rule:
Find the beginning of the chart. This should always be the first step.
Find the very first stitch, and work from there; that's an easy way to get started. Once you've found the first stitch, look for the next stitch, trace the next stitches until you've found the end of the row or round. Let me give you an example of how this works for an easy pattern.

The chart here is a motif that is worked in the round. Circles are worked from the middle. So that's where we're going to look for our first stitch.
Step 1: Find the first stitch. You see a solid circle in the middle. This means that you'll make a magic loop. If you need to work from a chain space (for example, just like you could do with granny squares), then there would be a circle of chain symbols.
Step 2: Look for a way to the next round. So you've made your magic loop, but how do you get started? That's the part in the purple oval. How do I know this? Typically, you need to make one or more chains to begin making stitches in your magic loop. That part is your 'ch3' with which a pattern often begins.
Step 3: Work that round and find out how a round is closed. You work around your circle with double crochets. Count the number of stitches (it's 17, 18 if you count the ch3 as a double crochet), and then crochet them. When you reach your ch3, you slip stitch it to the top of the ch3 (depicted by that little black dot in between the last dc and the ch3).
After this, all you do is repeat Steps 2 and 3 for each round. I placed some numbers in the graph, which makes it easier to see which round you're working in. If the chart doesn't have that, print it and write them down yourself!
As a general rule of thumb, when a stitch is positioned on top of a stitch in the previous round/row, you will work that stitch IN the stitch of the previous round/row. This pattern tells you to ch3 after you joined the last stitches of Round 1, ch1, and then work 1dc into the next dc. Repeat this around and close the round again with a slip stitch.
Keep tracing the rounds stitch by stitch, until the very last stitch, and the chart tells you what to do!
Partial crochet diagrams
If a motif is large, a complete chart takes up lots of space. So that's why you'll often find partial charts with just a section of the pattern, like the one below. The one below is a modified version of the motif chart above.

While it might not look like it, it gives you the same amount of information as the chart above. You only need to know how to find it. For example, it shows you how to start (with a magic loop), and the stitch count to crochet in the first round (ch3 and 17 dc, 18 stitches in total). It shows you what to do next (ch3 to start Round 2), and how to work that round (ch1, 1dc in each stitch). It also shows you how to close Rounds 2-6. So all the information is there, just more condensed.
You'll find these types of charts in books or any other place where space might be limited.
Advanced crochet diagrams
Some more complex crochet patterns have a chart like the one below. Let's give that a try!
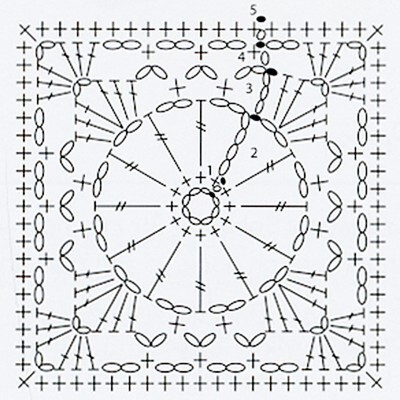
I found this chart online, but I couldn't find a source. It looks like a square motif that's worked in the round and has more stitch variation than the previous chart. But nothing you can't handle!
Are you feeling overwhelmed by all the different symbols? Remember the golden rule when looking at a new pattern: Find the beginning of the chart. Then follow the steps as specified for the circle motif.
Step 1: Find the first stitch. In this chart, you also start in the middle. This time it's with a circle of chains (8 to be precise, with one slip stitch to join the first and last ch).
Step 2: Look for a way to the next round. You make a chain (the open oval you see between the chain round and the sc round).
Step 3: Work that round and find out how the round is closed. Work 1sc in every chain. Close your round with a slip stitch. This pattern calls the chains + sc's Round 1, but that's just a matter of opinion: some designers count starting chains as a round, some do not.
Are you getting the hang of it? You're going to chain 4 (as a substitute for your first treble crochet), then two more, and then you'll crochet a treble stitch in the next single crochet. Follow the flow of the stitches. It's just one long continuous line you need to trace to get you to the end.
A little side note here, in the corner stitches, you see an elongated cross. That's also a sc (as the crossbeam is crossing the other beam instead of lying on top of it, which would be the symbol for hdc's), just a little bit stretched out so you can see where to crochet them.
Expert level crochet charts
You're now ready to play in the major league, and I have just the right stitch pattern for you. I know this doily looks both incredible and incredibly difficult. Remember the golden rule: Find the beginning of the crochet chart. Start in the middle, and work your way outwards. Just take it one round, section or stitch at a time.

I've coloured in the first couple of rounds to give you an idea of how to tackle this type of chart. Start with making a chain (yellow). Next, crochet trebles (see, two crossbeams, orange). Then start making loops. These loops consist of a sc, then 3 chains, and a sc in the next treble (green). Take it round by round. Continue making these loops in the next round, this time with a little picot in between (light blue). Then you're going to move to a new row of sc's, with chains and picots. (dark blue). Continue working steps 2 & 3 - it works every time!

Trust me: if you understand this chart, you can essentially create anything you want. No chart will hold secrets for you anymore!
Tips & Tricks for reading a stitch chart
- If possible, print out the pattern and trace the lines with a (coloured) pencil.
- If possible, look up a photo of the result. It will help you visualise how the pattern will look. Unfortunately, not all patterns come with pictures.
- If you see dc's on top of a chain, you don't necessarily need to crochet them IN the chain, but rather in the chain space. You'll find this tip convenient when the chain has four chains, and you don't have a middle stitch to work in. You might think it will slip and bend out of shape, but that doesn't happen due to all the forces that are exerted by other stitches.
- Don't be discouraged if a project doesn't look like the picture, but more like a weirdly shaped dishcloth while you're working on it. I recommend blocking your work after you're done. It really makes a huge difference! I've got a complete blocking tutorial for you if you need one.
- If you're in for a challenge, look for Japanese patterns. They're beautiful and often come with crochet charts.
- Always check the notes section in the written crochet pattern.
Good luck! Feel free to ask any questions in the comments below!


Comments
I do not have a PDF on the ready but the website printfriendly.com has the option to turn the page (without sidebar) into a pdf version for easy reference :) January 12, 2016 16:34 - Reply
Debra July 29, 2017 21:21 - Reply
that's something that I haven't covered up until now in any tutorial. I would suggest drawing out the pattern row for row. It's hard though, and I'd say you need to be an experienced crocheter to do so (at least for more intricate patterns) as you have to visualise your stitches. Good luck! August 01, 2017 12:41 - Reply
thank you for your message! That really depends on the pattern, I'm afraid. Usually charts for garments are meant to be used in conjunction with written text, because they usually don't show seams or anything like that, just the 'main' features. Of course, there are exceptions to that rule.
If there's written text with the chart, I always use google translate to see if it helps me on the way. If not, I'll just try and wing it ;). Hope this helps! March 05, 2018 16:30 - Reply
Thank you! August 06, 2018 03:47 - Reply
I'm an absolute beginner, and I may be wrong, but it's likely that you would stitch into the center of the circle, not into the individual chains. June 13, 2020 06:33 - Reply
Salene's right. When working in a circle you're often crocheting inside the circle instead of the actual chain. You're basically just bunching them up in there, even though there are less chains in the circle than stitches in round 1 that will fit.
It's different when working rows. When working your first row in a beginning chain, you'll work in the actual chain itself. Otherwise, your first row would slide right off of your beginning chains. June 13, 2020 08:00 - Reply
I'd really like to learn to read charts, your information makes it seem a lot more straightforward!! I do have one quick question.
I've made projects where I needed to crochet into the chain spaces of the previous row or round, but I've also made things where I've had to crochet into the actual chain stitches of the previous row or round. Are these two ways indicated differently on a chart or do you just assume with charts that you'll always work into the chain space rather than the stitch (obviously not including the foundation row)?
Very grateful for any advice.
Many thanks April 18, 2019 16:24 - Reply
I’m so happy you find the post useful! To answer your question, as far as I know that’s not indicated in different ways. For some patterns the acts of working in the chain vs. working in the actual space are interchangeable, but usually it’s more of an aesthetic matter (working in the actual space gives your stitches a bit more space like in a shell. Working in the actual chain gives the appearance of a regular stitch and I prefer this method when working just one stitch into the indicated ch-sp to prevent it from shifting to one or the other side of your space).
Hope this helps :) ! April 18, 2019 16:38 - Reply
Thank for your information, it is easy to understand and very helpful.
Thank again.
Xiaoyan September 03, 2021 13:48 - Reply
Thank for your information, it is easy to understand and very helpful.
Thank again.
Xiaoyan September 03, 2021 13:48 - Reply
Thank for your information, it is easy to understand and very helpful.
Thank again.
Xiaoyan September 03, 2021 13:49 - Reply
I think the '88' looking thing is something that's pattern-specific. It's not something that I've seen before, and I've seen my fair share of charts so I dare to say that it's not common :) It could be a stitch, but it's hard to tell with this particular example-chart.
The elongated ovals on top of round nine look like (dc2tog, ch3, dc2tog) to me. It's a stitch that you see used in doilies quite a lot, so that would make sense! November 08, 2023 08:06 - Reply
I'm searching for a tutorial or explanation of how to read a graph for a triangular shawl. The graph only has half of the pattern . It is a bottom to top graph meaning I start with the small bottom point of the shawl and increase to the top. I start with a magic circle but not sure how to proceed. The pattern has a chain stitch on left side and 3 DC into one stitch on the right side of row 1. Do I crochet a mirror image of row 1 or do I construct 2 separate triangles and then join them along the single crochet edge?
Thank you so much! I am knowledgeable about the different stitches but this is my first experience with a pattern only showing half the design! December 22, 2023 16:28 - Reply
I'm not completely sure how to envision this. Can you send me an email on kirsten@haakmaarraak.nl and send me the diagram so I can have a look? January 04, 2024 11:18 - Reply
I don't know if this link will work. I more or less understand the ovals being chains, and the + being single crochet into the chain. Not 100% sure how the slip stitches are worked into to chain. But the worst part is I don't understand the direction of work. When you get to an intersection of four, how do you know where to go? And I don't know how to explain with words for a Google search. Any help would be appreciated. April 21, 2024 05:47 - Reply
Basically what you do is you read it in a continuous line. So you start with the chains on the bottom right, work up, then work your first leaf branch, and when you finish the branch you slip stitch to the main 'stem' and continue working upwards. Once you reach the top leaf branch, you continue down the other side and make single crochets in the chains of the 'stem'. Once you reach a leaf branch on the other side you chain again, make the leaf branch and join it to your 'stem' and continue.
This is a picture where I tried to show the direction to crochet: https://storage.googleapis.com/hmr/leaf.jpg?mtime=20240421075700&focal=none
Hope this clears it up for you! April 21, 2024 07:50 - Reply
it doesn't change anything about the actual instructions. You can just follow the chart. Only when a pattern or chart specifies something specific about left and right (for example, 'join in the right upper corner') then you have to reverse it. so for left handed crocheters, it would be 'join in the left upper corner'.
Does that make sense? March 17, 2025 07:09 - Reply
send me an email and I will have a look at it! You can reach me at kirsten@haakmaarraak.nl :) April 06, 2025 16:27 - Reply