Hygge shawl
20.Sep.24 / Kirsten BalleringHygge is a Danish word that roughly translates to cosiness, but it’s much more! It’s about cosiness and being in a warm, welcoming environment and enjoying the good things in life. Being with friends and family is hygge. But wearing your favourite sweater with a cup of tea is hygge, too. And working on a cosy wrap, learning new things, and enjoying the process is definitely hygge.
This pattern includes written instructions, video tutorials and diagrams. It’s suitable for the adventurous beginner and is written in US terms.
Materials and preparation
There are 5 official colourways, but you can easily put together your own!
Yarn
Rainbow
Scheepjes Stonewashed (78% cotton, 22% acrylic, 50g/130m)- SW: 803 Black Onyx x 10 balls
- Colour A: 115 Hot Red x 2 balls
- Colour B: 281 Tangerine x 1 ball
- Colour C: 208 Yellow Gold x 1 ball
- Colour D: 280 Lemon x 1 ball
- Colour E: 205 Kiwi x 1 ball
- Colour F: 146 Vivid Blue x 1 ball
- Colour G: 201 Electric Blue x 1 ball
- Colour H: 282 Ultra Violet x 1 ball
- Colour I: 114 Shocking Pink x 1 ball
- Colour J: 222 Tulip x 1 ball

Jewel
Scheepjes Stonewashed (78% cotton, 22% acrylic, 50g/130m)- SW: 802 Smokey Quartz x 10 balls
- Colour A: 258 Rosewood x 2 balls
- Colour B: 130 Old Lace x 1 ball
- Colour C: 411 Sweet Orange x 1 ball
- Colour D: 401 Dark Teal x 1 ball
- Colour E: 412 Forest Green x 1 ball
- Colour F: 391 Deep Ocean x 1 ball
- Colour G: 128 Tyrian Purple x 1 ball
- Colour H: 400 Petrol Blue x 1 ball
- Colour I: 396 Rose Wine x 1 ball
- Colour J: 394 Shadow Purple x 1 ball

Pastel
Scheepjes Stonewashed (78% cotton, 22% acrylic, 50g/130m)- SW: 801 Moon Stone x 10 balls
- Colour A: 264 Light Coral x 2 balls
- Colour B: 414 Vintage Peach x 1 ball
- Colour C: 403 Lemonade x 1 ball
- Colour D: 402 Silver Green x 1 ball
- Colour E: 212 Sage Green x 1 ball
- Colour F: 406 Soft Beige x 1 ball
- Colour G: 172 Light Silver x 1 ball
- Colour H: 179 Topaz x 1 ball
- Colour I: 409 Soft Rose x 1 ball
- Colour J: 408 Old Rose x 1 ball

Danish Mermaid
Scheepjes Stonewashed (78% cotton, 22% acrylic, 50g/130m)- SW: 805 Blue Apatite x 10 balls
- Colour A: 130 Old Lace x 2 balls
- Colour B: 392 Lime Juice x 1 ball
- Colour C: 512 Lime x 1 ball
- Colour D: 205 Kiwi x 1 ball
- Colour E: 513 Apple Granny x 1 ball
- Colour F: 389 Apple Green x 1 ball
- Colour G: 241 Parrot Green x 1 ball
- Colour H: 253 Tropic x 1 ball
- Colour I: 397 Cyan x 1 ball
- Colour J: 509 Baby Blue x 1 ball

Girls' Night in
Scheepjes Stonewashed (78% cotton, 22% acrylic, 50g/130m)- SW: 820 Rose Quartz x 10 balls
- Colour A: 128 Tyrian Purple x 2 balls
- Colour B: 240 Amethyst x 1 ball
- Colour C: 394 Shadow Purple x 1 ball
- Colour D: 251 Garden Rose x 1 ball
- Colour E: 212 Sage Green x 1 ball
- Colour F: 222 Tulip x 1 ball
- Colour G: 402 Silver Green x 1 ball
- Colour H: 248 Champagne x 1 ball
- Colour I: 404 English Tea x 1 ball
- Colour J: 399 Lilac Mist x 1 ball

Shop the yarn!
Do you want to get your hands on Stonewashed and Catona? Shop them through the links below:
Crochet hook
4.5mm hook (US size G/7).
Measurements
The blocked shawl measures 185 x 36cm (73 x 14in).
Gauge/tension
To ensure your shawl has similar measurements to mine, I recommend crocheting a gauge square. This is a test to match your tension to the pattern’s tension. The 10 x 10cm (4in) gauge for this pattern is 19 sc and 19 rows when worked with a 4.5mm hook.
Pattern for gauge square
With SW, ch20.
Row 1 (RS) Starting in 2nd ch from hook, make 1sc in each ch to end, ch1, turn. [19 sc]
Rows 2-18 19sc, ch1, turn.
Row 19 19sc, place stitch marker in last stitch.
Gently flatten your gauge square with your hands and measure it. If your square measures ~10 cm in width and height, your gauge is comparable to the pattern’s gauge, and your final shawl measurements will also be similar. If your square is smaller, re-do the gauge square with a larger crochet hook. If your square is larger, consider redoing it with a smaller hook. The hook size that makes your gauge match the pattern’s gauge is the hook size you will be using during the CAL.
If you can’t match the pattern’s gauge, that’s OK too. It just means that your shawl’s measurements might be different. However, remember that this also might mean you’ll need more yarn than indicated.
Keep an eye on the looks of the crochet fabric, too. You don’t want the gauge square to have obvious holes, as that will show in your shawl, too. Don’t get too worried about gauge, though. In the end, it’s important that you feel good about this project!
Cut the yarn and weave in loose ends when your gauge square is done. You’ll use this later, so don’t throw it away!
Notes
- Colour changing is done by working the last loop of the stitch that’s worked before the colour change in the new colour.
- In between the bobble stitches, crochet over the Catona thread with the Stonewashed to minimize the number of loose ends.
- To make the bobbles pop, pull the next sc extra tight.
- The row numbers in purple indicate the row count when you count the rows continuously throughout the parts.
- The other pattern parts of the Hygge shawl can be found here:
Abbreviations (US terms)
- bobble: (yarn over, pull up loop, yarn over, pull through 2 loops on hook) 5 times,yarn over, pull through all loops on hook
- ch: chain
- RS: right side
- st(s): stitch(es)
- sc: single crochet
- ss: slip stitch
- WS: wrong side
Repeat formats
- *….; rep from * once/twice/3x Crochet the instructions after * and then repeat that section a further number of times as indicated.
- (…) once/twice/3x Crochet the instructions between brackets the total number of times indicated.
- […] Indicates the amount of stitches at the end of a row or round.
- (…) in same st/sp Indicates that all instructions between brackets are worked in the same stitch or space.
Colour layout

Techniques
Cross stitch embroidery
This pattern is all about cross stitch on crochet. Because practice makes perfect, we can practice this on the gauge square. There is a video tutorial for embroidery, so don’t be disheartened if the embroidery doesn’t work out as you imagined it right away.
Basics of cross stitch
Cross stitch consists of crosses that together form one stitch. You will be embroidering over crocheted stitches, similar to embroidering on embroidery fabric.
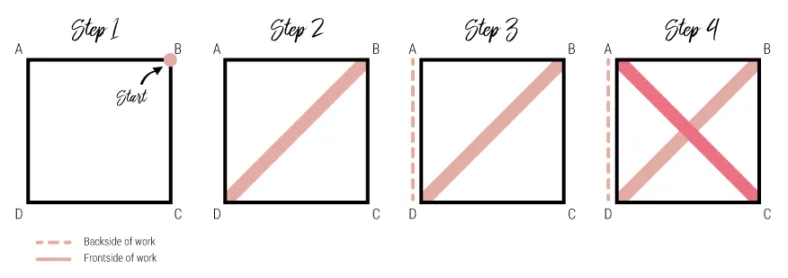
To understand the embroidery and read the accompanying diagrams, you need to visualize the embroidery grid on the crochet fabric. Take your gauge square and hold it up to the light. You will see the light shining through the 4 corners of each stitch (you might need to stretch the gauge square a bit to see this). These corners are the corners you’re going to make crosses in. The easiest way to make a cross stitch is as follows:
Imagine the four corners are called A, B, C and D, starting in the left upper corner and going clockwise.
- Step 1: Insert your threaded needle from the back to the front in B.
- Step 2: Insert your needle from the front to the back in D over the front of your work.
- Step 3: Insert your needle from the back to the front in A over the back of your work.
- Step 4: Insert your needle from the front to the back in C over the front of your work.
You repeat this for each stitch, keeping in mind that adjacent stitches share their corners (So the B and C corners of one stitch are the A and D corners of the stitch to the right). When you insert your needle in a corner, try not to split threads from previous cross stitches.
If you prefer to work your A-C line before your B-D line, that’s fine, too. It’s recommended to keep the order in which you make the ‘legs’ of your cross stitches the same throughout the project tough.

Yarn lengths
You will have to switch colours in the patterns (more on that later). Taking a long piece of colour might seem advantageous so you won’t run out when you embroider. However, long lengths are difficult to pull through and will knot. It’s better to have smaller pieces of ~50cm (20in). This means more ends to weave in, but it will benefit the look of your embroidery.
Starting, ending and changing colours
To start with a colour or switch colours while embroidering, weave your thread through a couple of stitches at the back of your work next to the stitch you want to embroider. Weave back and forth to secure your yarn. Now, you can start making cross stitches. When you finish a colour, weave your thread repeatedly and cut off the remaining yarn.
Reading embroidery diagrams
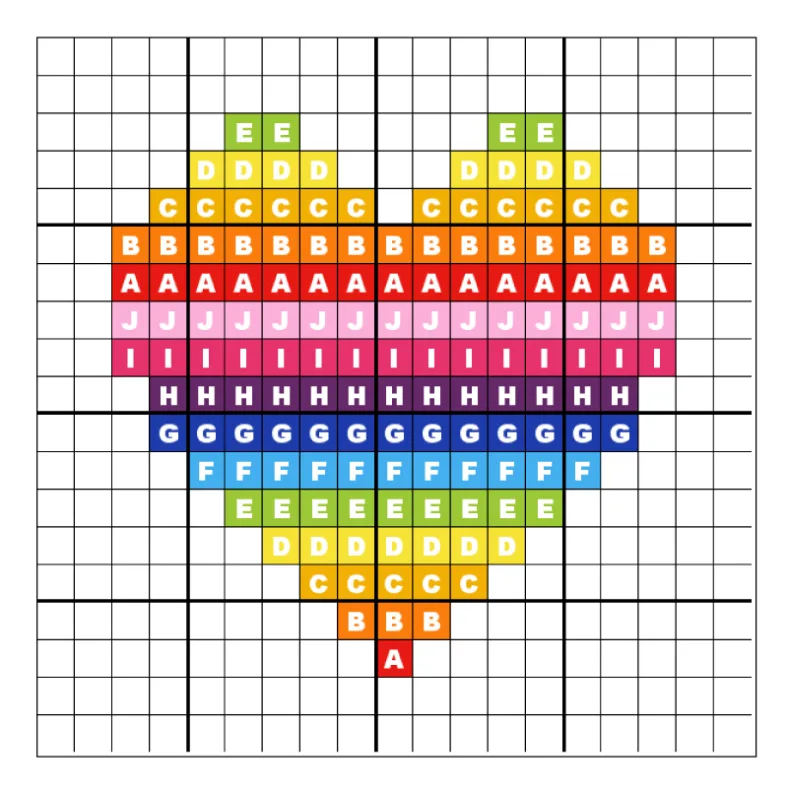
The embroidery diagrams are schematic representations of your cross-stitch pattern. Each square (pixel) in your diagram represents a stitch in your crochet fabric. Coloured squares are stitches that will be embroidered; white squares will not be embroidered.
As you can see, the embroidery diagram for the gauge square is made of 19 pixels in width and height, just as your gauge square is 19 sc in width and 19 rows in height. The letter in each coloured square represents the colour in which the cross stitch is worked. You can find the key to the letters in the colour table.
Embroidery diagrams aren’t read like crochet diagrams because there isn’t a set order in which you embroider your stitches. In the end, what counts is that all the stitches are made. Generally, it’s easiest to start reading a diagram on one side and work your way towards the other. It is essential to keep counting the stitches in the diagram and your work. To help you with the counting, thicker lines have been made in the diagram every five stitches.
To practice, look at the gauge square diagram on the next page. As you can see, each row in the pattern uses only one colour. It’s easiest to work in horizontal rows from top to bottom or bottom to top, finishing a row before you move on to the next colour.
Some patterns in this project will be straightforward, like this heart. Others will be more intricate and require you to switch colours more often. Ultimately, it doesn’t matter in which order you cross-stitch the stitches.
To practice, embroider the diagram on the next page of your gauge square. Don’t feel disheartened if it doesn’t look perfect on the first try. You will get lots of practice!


Blocking your shawl
Blocking is wetting your crochet piece to give the stitches extra definition and to work out any minor flaws in the shape. When you block your work, the tension in the stitches is more evenly divided, meaning your stitches look better after blocking.
Because this project is worked on in one piece, we will block once at the end of part 13. Because Catona is 100% cotton and Stonewashed is a cotton blend, I recommend wet blocking over any other method. I have a full tutorial on wet blocking.
Crochet pattern
Videos
Please note: the videos use UK terms, and the pattern here US. So any video dc (double crochet) is a pattern sc (single crochet).
Shawl
With SW, ch60.
Row 1 (WS) Starting in 2nd ch from hook, 59sc, ch1, turn. [59 sc]
Row 2 (RS) 59sc to end of row, ch1, turn.
Row 3 Repeat row 2.
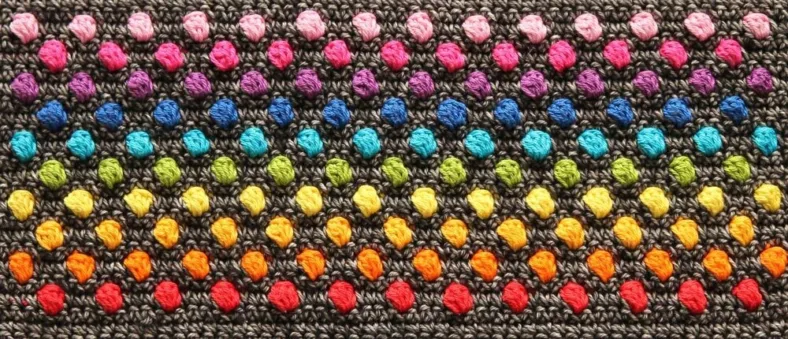
Row 4 5sc, change to Colour A, bobble, *change to SW, 3sc, change to Colour A, bobble; repeat from * another 11 times, change to SW, 5sc, ch1, turn. Cut strand of Colour A. [13 bobbles, 46 sc]
Row 5 Repeat row 2.
Row 6 3sc, change to Colour B, bobble, *change to SW, 3sc, change to Colour B, bobble; repeat from * another 12 times, change to SW, 3sc, ch1, turn. Cut strand of Colour B. [14 bobbles, 45 sc]
Row 7 Repeat row 2.
Row 8 Repeat row 4 with Colour C.
Row 9 Repeat row 2.
Row 10 Repeat row 6 with Colour D.
Row 11 Repeat row 2.
Row 12 Repeat row 4 with Colour E.
Row 13 Repeat row 2.
Row 14 Repeat row 6 with Colour F.
Row 14 Repeat row 6 with Colour F.
Row 15 Repeat row 2.
Row 16 Repeat row 4 with Colour G.
Row 17 Repeat row 2.
Row 18 Repeat row 6 with Colour H.
Row 19 Repeat row 2.
Row 20 Repeat row 4 with Colour I.
Row 21 Repeat row 2.
Row 22 Repeat row 6 with Colour J.
Row 23 Repeat row 2.
Don’t cut SW, place a stitchmarker in the last stitch. Weave in all coloured ends.

Diagram
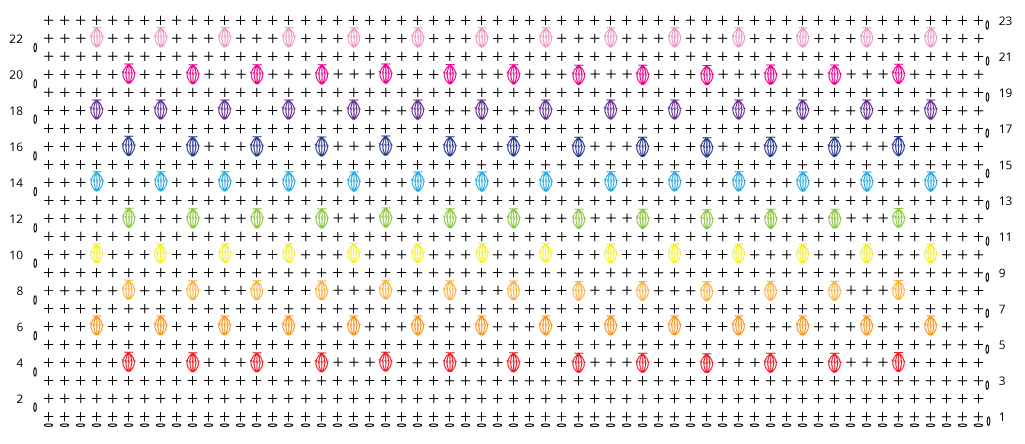
Crochet diagram part 1


Comments
I'm afraid a little from it...
But I will probe! January 30, 2025 20:09 - Reply