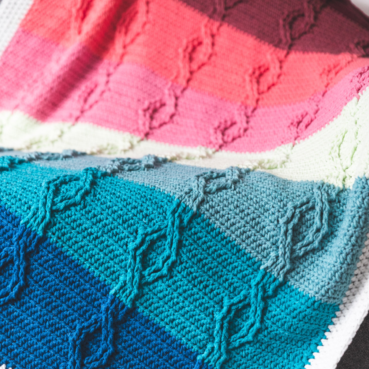
Josephine's rainbow blanket
19.Dec.22 / Kirsten BalleringJosephine’s rainbow blanket is an explosion of colour! The cheerful triangles make for a stunning palette to work with. The motifs can be made in advance, or joined as you go. It’s up to you!
Materials and preparation
Yarn
- Colour A: 510 x 1 ball
- Colour B: 639 x 1 ball
- Colour C: 714 x 1 ball
- Colour D: 551 x 1 ball
- Colour E: 642 x 1 ball
- Colour F: 663 x 1 ball
- Colour G: 665 x 1 ball
- Colour H: 712 x 1 ball
- Colour I: 519 x 1 ball
- Colour J: 529 x 1 ball
- Colour K: 726 x 1 ball
- Colour L: 653 x 1 ball
- Colour M: 720 x 1 ball
- Colour N: 650 x 1 ball
- Colour O: 502 x 8 balls

Shop the yarn!
You can find Cotton 8 at your Scheepjes retailer, or online:
Crochet hook
3.5mm (US size E/4).
Measurements
115 x 150cm (46 x 59in).
Gauge/tension
Finished, unblocked motif measures 10cm (4in) along each triangle side.
Abbreviations (US terms)
- beg-dc4tog: begin-double crochet 4 stitches together: ch2, (yarn over, insert hook in ring, yarn over, pull up loop, yarn over, pull through first two loops on hook) 3x, yarn over, pull through all loops on hook.
- ch: chain
- ch-sp: chain-space
- dc: double crochet
- dc4tog: double crochet 4 stitches together: (yarn over, insert hook in space or stitch, yarn over, pull up loop, yarn over, pull through first two loops on hook) 4x, yarn over, pull through all loops on hook
- hdc: half double crochet
- hdc2tog: half double crochet 2 stitches together: (yarn over, insert hook in st/sp, yarn over, pull up loop) in each of the two sts/sps, yarn over, pull through all loops on hook
- hdc3tog: half double crochet 3 stitches together: (yarn over, insert hook in st/sp, yarn over, pull up loop) in each of the three sts/sps, yarn over, pull through all loops on hook
- RS: Right Side
- ss: slip stitch
- sp(s): space(s)
- st(s): stitch(es)
- WS: Wrong Side
Repeat formats
- *….; rep from * once/twice/3x Crochet the instructions after * and then repeat that section a further number of times as indicated.
- (…) once/twice/3x Crochet the instructions between brackets the total number of times indicated.
- […] Indicates the amount of stitches at the end of a row or round.
- (…) in same st/sp Indicates that all instructions between brackets are worked in the same stitch or space.
Colour layout
Overview
The pattern is made in a rainbow sequence with the first and last colours ‘flowing’ into each other. This creates the illusion of random colours, but it definitely has a pattern!
The flow is as follows: Start at the bottom left, follow the first row to the right. Move up a row, and follow that one to the left. Move up a row, follow that one to the right. Etc.
Motifs per colour
You can create all the motifs in advance, and join them all at once. Or join them per row as you go - it’s up to you!
You will need the following number of motifs:
- Motifs: 12 of each for colours A-N
- Top half motifs: 1 of each, except for colour K and L (0 motifs in these colours).
- Bottom half motifs: 1 of each, except for colour M and N (0 motifs in these colours).
Create your own colour sequence
Using the information I’ve given you, you can easily create your own sequence. It doesn’t have to be a rainbow to create this effect, as long as you make sure the first and last colour ‘flow’ slightly into one another. I would recommend using a lot of colours (10+) and drawing it out beforehand.
The reason for drawing it out beforehand is that with fewer colours, you have a higher chance of motifs of the same colour ending up right above each other in separate rows. There’s nothing particularly wrong with that - I just didn’t like it. So that’s why I’m urging you to visualise your own version before you start.
If you want to make your own colour layout, you can use the empty template at the end of the pattern.


Techniques
Full motif
Make a magic loop, and ch4 (photo 1). Make a beg-dc4tog (photos 2-3), ch3 (photo 4). The ch3 spaces are the ‘midsections’ between the triangle’s corners. Make another dc4tog (photos 5-6). Ch4 to create your first corner space. Keep following the pattern and make dc4togs, ch-3 and ch-4 spaces. You will see the corners of your triangle starting to take shape in the ch-4 spaces (photo 7). Join with a ss in the top of your beg-dc4tog (photo 8). You can now pull the magic loop tight.
Start Round 2 by chaining 3 (photo 9). These 3 chains will be skipped when joining at the end of the round - they purely function to fill up empty space between the first and last stitch of the round. Make 1 dc in the same space, this is your first proper stitch of the round (photo 10). 3hdc in the ch-3 space (photo 11). Using a smaller stitch makes the sides of your triangle flatter. Work 1dc in the top of the next dc4tog (photo 12). Create a corner by crocheting 3dc, ch4, 3dc in the ch-4 space. The corner created in the previous round now becomes even more obvious!
Continue following the pattern, and finish the round with a ss in the first dc (so not the ch3!) (photo 13). The triangle shape is now quite pronounced. You can see that the sides of the triangle are straight instead of round, thanks to the hdc.
Round 3 is fairly simple. Ch3, which again purely functions to fill up empty space, and then work 1dc in each stitch of the previous round. In each corner, make (3dc, ch4, 3dc). Join with a ss in the first dc and fasten off (photo 14).


Half motif
Half motifs are very similar to the full motifs, only they are worked in rows instead of rounds. This means that you turn your work to the wrong side in Row 2. To visualise what you’re making, take one of your full motifs and fold it in half. That’s roughly the pattern we’re following.
In this example, a top half motif is crocheted. Bottom half motifs are very similar to the top ones, so I only photographed one version to display the techniques.
Start by making a magic loop. Ch4, that counts as the first dc and chain space (photo 15). Make a dc4tog (photo 16), ch3, another dc4tog, and then ch4 to create the corner space. Work another dc4tog, ch1 and make a final dc (photo 17). Pull the loop tight. As you can see, you do not crochet all the way around the loop, but rather only halfway.
Ch3 and turn your work so you’re facing the Wrong Side of your work (photo 18). The ch3 you’ve made counts as a dc. Make another dc in the ch-sp of the previous row, and another one in the top of the dc4tog (photo 19). Create the corner by making (3dc, ch4, 3dc) in the corner space (photo 20). We’ll now create a triangle side much like for the full motif, by working 1dc in the top of the dc4tog, 3hdc in the ch-3 space, 1dc in the top of the next dc4tog. Finish your row by making 3dc in the chain space, ch1, and then 1dc in the third ch of the four ch’s you started this motif with. That concludes Row 2 (photo 21).
(The reason the ch3 counts as a stitch in these rows, but not in the full motif is because of aesthetics. If it wouldn’t count, I had to make another dc in the same space and that would cause the flat edge of the half motif to ‘bulge’ outward. It simply didn’t look pretty).
Ch4 (which again counts as a first dc and chain space) Make 3dc in the chain space. Crochet 11dc over the long side, and shape the corner by crocheting (3dc, ch4, 3dc) in the corner space. Make 6dc over the short side, and cut your yarn. (photo 22).


Joining
We join our motifs with a flat ss join. This creates a beautiful flat and flexible appearance. It’s quite easy once you get the hang of it!
To start, border your first motif as per the pattern with 1hdc in each stitch, and (3hdc, ch3, 3hdc) in each corner (photo 23). Work up your second motif in a similar way to a joining side, ending with the 3hdc in one corner (photo 24). This will be your first join.
Put the motifs WS together, ch1 and make a ss in the corner space of the opposite square (photo 25). The motifs are now fastened to each other. Make 1hdc in the corner space of your current motif (photo 26). Remove the active loop from your hook, and insert your hook from back to front in the back loop of the first corner-hdc of the other motif (that’s the loop closest to you because you’re holding it WS forward). In photo 27, it’s indicated with the green arrow. Once you’ve inserted your hook through that loop, pick up the loop from your yarn again and pull it through (photos 28-30). This basically makes a ss through the back loop of the other motif.
And that’s all there is to it! Every time you create a stitch on your current motif, you remove your hook from your yarn, go through the back loop of the other motif, pick up your active loop and pull it through. It sounds cumbersome but you’ll get quite handy with it after a few tries. Photos 31-34 show you what the next couple of stitches, and the end result of your join look like. You finish a side with a ss in the chain space. If need be, you ss in the chain space of the next motif you’re joining and continue as before.
This join is used for all motifs, also the half ones. Really all you have to remember is when you join a stitch, you ‘ss’ it to the back loop of the corresponding stitch on the other motif!


Crochet pattern
Motifs
Start with a magic loop.
Round 1 (RS) Work the following in the magic loop: beg-dc4tog, ch3, dc4tog, ch4, (dc4tog, ch3, dc4tog, ch4) 2x, ss to beg-dc4tog, pull loop tight. [1 beg-dc4tog, 5 dc4tog, 3 ch-3 sps, 3 ch-4 sps]
The ch-4 spaces are the triangle’s corners in the next rounds.
Round 2 (RS) Ch3 (doesn’t count as st), *1dc in top of next dc4tog (the beg-dc4tog), 3hdc in ch-3 sp, 1dc in dc4tog, (3dc, ch4, 3dc) in ch-3 sp; repeat from * another 2 times, join with ss in first dc (so skip ch3). [8 dc, 3 hdc on each side, 3 ch-4 sps]
The triangle shape starts to form here. Skipping the ch3 at the beginning helps with filling up the space between the first and last stitch of the round.
Round 3 (RS) Ch3 (doesn’t count as st), 1dc in st at base of ch3, *1dc in each st to end of side, (3dc, ch4, 3dc) in ch-4 sp; repeat from * another 2 times, 1dc in each st to first st, ss in first dc (so skip the ch3), cut yarn, weave in ends. [17 dc on each side, 3 ch-4 sps]
Half motifs
Please note that the top and bottom half motifs are reversed on the right and left sides of the blanket. So what’s a top half motif on the left side, is a bottom half motif and vice versa. Check the colour layout to see how many you need to make of each in each colour.
Top half motifs
Make a magic loop.
Row 1 (RS) Work the following in the magic loop: Ch4 (counts as first dc and ch1), dc4tog, ch3, dc4tog, ch4, dc4tog, ch1, 1dc. Turn work, pull loop tight. [2 dc, 3 dc4tog, 2 ch-1 sps, 1 ch-3 sp, 1 ch-4 sp]
Row 2 (WS) Ch3 (counts as first dc), 1dc in ch1, 1dc in dc4tog, (3dc, ch4, 3dc) in corner-sp, 1dc in dc4tog, 3hdc in ch-sp, 1dc in dc4tog, 3dc in ch-sp, ch1, 1dc In third ch of beg-ch3. Turn work. [15 dc, 3 hdc, 1 ch-1 sp, 1 ch-4 sp]
Row 3 (RS) Ch4 (counts as first dc and ch1), 3dc in ch-sp, 11dc, (3dc, ch4, 3dc) in corner-sp, 6dc. Cut yarn, weave in ends. [27 dc, 1 ch-1 sp, 1 ch-4 sp]
Bottom half motif
Make a magic loop.
Row 1 (RS) Work the following in the magic loop: Ch4 (counts as first dc and ch1), dc4tog, ch4, dc4tog, ch3, dc4tog, ch1, 1dc. Turn work, pull loop tight. [2 dc, 3 dc4tog, 2 ch-1 sps, 1 ch-3 sp, 1 ch-4 sp]
Row 2 (WS) Ch4 (counts as first dc and ch1), 3dc in ch-1 sp, 1dc in dc4tog, 3hdc in ch-sp, 1dc in dc4tog, (3dc, ch4, 3dc) in corner-sp, 1dc in dc4tog, 1dc in ch-1 sp, 1dc in third ch of beg-ch3. Turn work. [15 dc, 3 hdc, 2 ch-1 sps, 1 ch-4 sp]
Row 3 (RS) Ch3 (counts as first dc), 5dc, (3dc, ch4, 3dc) in corner-sp, 11dc, 3dc in ch-1 sp, ch1, 1dc in third ch of beg-ch3. Cut yarn, weave in ends. [27 dc, 1 ch-1 sp, 1 ch-4 sp]
Joining
I joined the full motifs together first. After those were done, I squared off the blanket with all half motifs on the long sides. All joins are worked on the RS of the blanket.
First motif
With Colour O, join with ss in any st. Ch1, 1hdc in same st, *1hdc in each st to end of side, (3hdc, ch3, 3hdc) in corner-sp; repeat from * another 2 times, 1hdc in each st to beginning of round, join with ss. Cut yarn. [23 hdc on each side]
Other motifs in first row
With Colour O, join with ss in any st. Ch1 (doesn’t count as st), 1hdc in same st, 1hdc in each st to end, (3hdc, ch3, 3hdc) in corner-sp, 1hdc in each st to end, 3hdc, ch1, join to other motif as follows:
1ss in corner-sp of adjacent motif, ch1, 1hdc in corner-sp, remove hook from loop, pick up back loop of opposite st on other motif, pick up yarn loop again, pull through.
You’ve now joined to the other motif with what’s basically a ss in the back loop. You’ll be doing this for every st along the side to join. Continue as follows: (1hdc in corner-sp, join to back loop of opposite st) 2x, *1hdc, join to back loop of opposite st; repeat from * to end of side, (1hdc in corner-sp, join to back loop of opposite st) 3x, ch1, join with ss to ch-sp of other motif.
Repeat the instructions above for any side that’s joined.
When you reach a non-joining side, continue as follows: Ch1, 3hdc in corner-sp, 1hdc in each st to end, join with ss to first st, cut yarn. [23 hdc on each side]
Second and next rows of motifs
This join basically boils down to this: For each stitch that needs to be joined, find the opposite stitch on the other motif and pick up that back loop after you make a stitch on your current motif. Sounds easy enough, right?
When you start joining your second row and every even row from here, your first motif will be joined in one corner only as there are no other motifs to join the sides to, yet. Follow the instructions for the first motif, but join with a ss in the corner-sp of the opposite motif.
When joining sides to two motifs, make sure to ss in the corner-sps of both adjacent motifs you’re joining to.
It helps to position your triangle in the blanket to visualise which sides you are joining. You alternate joining one or two sides of each triangle. It usually takes a few motifs before you develop a feel for it.
Joining Half motifs
I filled up each gap by joining the top half motif first, and then the bottom half motif.
Joining top half motifs
With Colour O, join with ss in any st along short bottom side. Ch1 (doesn’t count as st), 1hdc in each st to end of side, ch2, evenly divide 18 hdc along the long side of the motif (I made 3 hdc in the corner-st, 6 sets of 2 hdc along the side and 3 hdc in the other corner-st), ch1, join with ss in corner-sp of adjacent motif, ch1, join to opposite motif as follows:
(1hdc in corner-sp, join to back loop of opposite st) 3x, (1hdc in next st, join to back loop of opposite st) 17x, (1hdc in corner-sp, join to back loop of opposite st) 3x, ch1, join with ss in corner-sp of adjacent motif, ch1, 3hdc in corner-sp, 1hdc in each st to beginning of round, join with ss in first hdc. Cut yarn. [12 hdc on short side, 23 hdc on diagonal side, 18 hdc on long side]
Joining bottom half motifs
With Colour O, join with ss in the side of top right corner-st, which is the ch3 that makes up the first dc of your last row . Ch1 (doesn’t count as st), 3hdc in side of row, ch1, join with ss to corner-sp of adjacent motif, ch1, join to opposite motif as follows:
(1hdc in next st, join to back loop of opposite st) 9x, (1hdc in corner-sp, join to back loop of opposite st) 3x, ch1, join with ss to corner-sp of adjacent motifs, ch1, (1hdc in corner-sp, join to back loop of opposite st) 3x, (1hdc in next st, join to back loop of opposite st) 17x, (1hdc in corner-sp, join to back loop of opposite st) 3x, ch1, join with ss to corner-sp of adjacent motifs, ch1, divide 15 sts evenly along the long side (I made 3 hdc in corner-st, and 6 sets of 2 hdc along side), join with ss to first st. [12 hdc on short side, 23 hdc on diagonal side, 18 hdc on long side]

Border
Round 1 (RS) Join Colour O in any st on the bottom left full motif on the bottom short side (the Colour C one). Ch1 (doesn’t count as st), 1hdc in same st, 1hdc in each st to next ch-sp, *1hdc3tog in ch-sp of current motif and next 2 motifs, 23hdc; repeat from * to end of side, 1hdc2tog in ch-sp on current and next half motif, (2dc, ch2, 2hdc) in corner-sp. Rotate blanket.
*18hdc, 1hdc2tog in ch-sp of current half motif and next half motif; repeat from * another 10 times, 18hdc, (2hdc, ch2, 2dc) in corner-sp. Rotate blanket.
1hdc2tog in ch-sp on current motif and next motif, 23hdc, *1hdc3tog in ch-sp of current motif and next 2 motifs, 23hdc; repeat from * another 5 times, 1hdc3tog in ch-sp of current motif and next 2 motifs, 12hdc, (2hdc, ch2, 2hdc) in corner-sp, rotate blanket.
*18hdc, 1hdc2tog in ch-sp of current half motif and next half motif; repeat from * another 10 times, 18hdc, (2hdc, ch2, 2hdc) in corner-sp. Rotate blanket.
12hdc, 1hdc3tog in ch-sp of current motif and next 2 motifs, 1hdc in each st to beginning of round, join with ss in first st. Cut yarn. [184 sts on short sides, 231 sts on long sides]
The first two corner spaces contain 2dc instead of 2hdc. This is to offset some of the (small) height-difference going on in those corners due to the positioning and joining of the motifs. If you find this difficult, simply crochet 2hdc. It won’t show up noticeably in the final border.
Round 2 Join with ss in bottom left corner-sp. Ch1 (doesn’t count as st), 1hdc, 13hdc, *1hdc3tog (so in in the st before the hdc3tog, the hdc3tog and the st after), 21hdc; repeat from * to start of final motif on side, 25hdc, (2hdc, ch2, 1hdc) in corner-sp, 1hdc in each st on long side, (2hdc, ch2, 1hdc) in corner-sp, 4hdc, *21hdc, 1hdc3tog; repeat from * until final half motif on side, 13hdc, (2hdc, ch2, 1hdc) in corner-sp, 1hdc in each st on long side, 2hdc in corner-sp, ch2, join with ss to first st. [173 sts on short sides, 234 sts on long sides]
You’re making 2hdc on one side of the corner, and 1hdc on the other side. The reason for this is that when you work in Rounds, the slanting of stitches causes the corners to look slightly crooked. By working 2hdc we’re offsetting this slant and making perfectly square corners. Trust me, it works!
Round 3 Ch1 (doesn’t count as st), 1hdc in same st, *1hdc in each st to end, (2hdc, ch2, 1hdc) in corner-sp; repeat from * another 3 times, join with ss in first st. [176 sts on short sides, 237 sts on long sides]
Rounds 4-7 Ch1 (doesn’t count as st), 1hdc in same st, *1hdc in each st to end, (2hdc, ch2, 1hdc) in corner-sp; repeat from * another 3 times, 1hdc in each st to end, join with ss in first st. [188 sts on short sides, 249 sts on long sides]
Cut yarn, weave in all ends. Block the blanket to size.

Adjusting the size
You can adjust the size of the blanket by adding more motifs. I would recommend adding (or removing) in multiples of two: adding two motifs to each row (i.e. 16 motifs per row) or adding two rows to the blanket (i.e. 14 rows). This way, you will not have to adjust any instructions for the edge other than working more or less repeats from the pattern as written.
Two motifs add ~13cm (5in) to the total width of the blanket, and two rows add ~24cm (9.5in) to the height of the blanket.
Diagram
Crochet chart 1: Full motif

Crochet chart 2: Top half motif

Crochet chart 3: Bottom half motif

Crochet chart 4: Joining

Crochet chart 5: Border

Key (US terms)

Josephine blanket (empty template)


Comments
Could you pls share the blank template because i am unable to find it on the web page.
Thank you. June 03, 2023 09:50 - Reply
It's the bottom image on the page, if you can't find it, you can contact me through the 'Contact' page ( About > Contact) and I will help you :) June 05, 2023 08:40 - Reply
I found it!
Must have been an issue with device.
Thank you for responding. June 20, 2023 19:36 - Reply
the 510 references to the colour number! Cotton 8 does not have names for its colours (like 'Snow White' or 'Pale yellow' for example). Instead, it uses numbers. So colour 510 is the colour number, and you need 1 ball of that colour. In my pattern I reference to this colour as 'Colour A' throughout. Does that make sense? January 16, 2025 09:02 - Reply