Catherine Wheel
The Catherine Wheel is a stunning piece of crochet! It has a beautiful front- and backside and consists of a repeat of only two rows. While it might look like a complicated stitch, once you get a feel for it it will simply roll off your hook (pun intended).

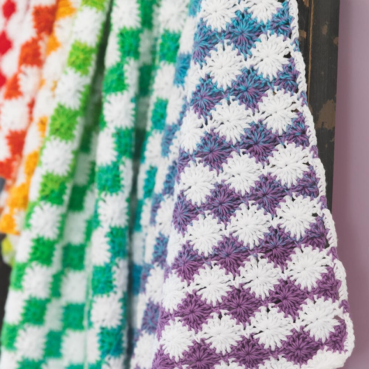
The anatomy of a Catherine Wheel
If you look closely at a Catherine Wheel, you see that each wheel consists of two parts - a top and bottom part. The wheels fall in between the wheels of the previous row. The bottom halves consist of seven dc's (spokes) crocheted together to create an 'eye'. The top half consists of a group of (three dc's, one chain, three dc's), also totalling seven stitches in total, to crochet in that eye.

Catherine Wheel Stitch Multiple
The stitch multiple for the Catherine Wheel is 6 + 1 stitch. If you want to figure out how many chains to start with, you simply take a multiple of six and add one to it. For example, 36 x 3 stitches = 216. now add the extra one, which makes 217 (like in the Rainbow Sampler 2). For smaller blankets, you could also make fewer Catherine wheels in a row. For example 24 x 6 stitches = 144, +1 = 145 stitches.
Catherine Wheel Stitch tutorial
Please note: This tutorial has been written for crocheters who are making the Rainbow Sampler Blanket 1 or 2. As such, the tutorial doesn't contain a base row to work your first Catherine Wheel row on. If you want to make the Catherine Wheel from scratch, either check one of my Catherine Wheel blanket patterns for the full instructions including a base row, or crochet a base row based on the stitch multiple given above.
First row
We must start somewhere, so we'll make a row with top halves first. This is so the full wheels can fall in between these top halves later on.
Join your yarn with a ss in the first stitch and work a sc in the same stitch (photo 1). Skip two stitches, crochet three dc, a ch and three dc in the next stitch. This is your first half-wheel. Skip two stitches and crochet a sc in the next stitch (photo 2). Repeat this until the end of the row, ending with a sc in the final stitch (photo 3). Cut yarn and turn your blanket.


Second row
We will make the bottom halves consisting of seven dc's crocheted together in between the top halves of the previous row. On both ends, we'll create a quarter wheel made of three dc's crocheted together.
Join your new colour with a ss in the first stitch (the final sc of the previous row). Crochet three chains, those count as first dc (photo 4). In this row, you will be crocheting stitches together to create that bottom half. Yarn over, insert your hook in the next stitch, yarn over, pull up a loop, yarn over again and pull through two loops. You now have an almost-finished dc on your hook. Repeat this for the next two stitches, giving you four loops on your hook (photo 5). Yarn over again and pull through all loops on the hook. You have now crocheted three dc’s together (photo 6).
Next, crochet seven ch (photo 7) to move ahead for your first full bottom half. To create the first bottom half, you will crochet seven dc’s together. Work them in the stitches between the chain spaces of the first and second clusters of the previous round (being the three dc’s on the first cluster, the sc in the middle and three dc’s on the next cluster). Crochet the seven dc’s together as you did with the three dc’s. You will have eight loops on your hook before the final yarn over (photos 8-9), then yarn over again and pull through all loops on the hook.
Repeat crocheting seven ch and seven dc’s together until you’ve completed the last full bottom half (photo 10). Crochet the final seven ch, and work three dc’s together as you did at the beginning of your row (photo 11). Work a final dc in the last stitch of the row (the sc) (photo 12). Don’t cut your yarn, turn your blanket.


Third row
Crochet three ch, those count as dc (photo 13). You will find that this row looks a lot like the very first row of the Catherine Wheels. Work three dc’s in the ‘eye’ of the three dc’s you’ve crocheted together in the previous row (photo 14). Now crochet a sc over the seven ch of the last row, into the chain space below that stitch (photo 15). This causes you to ‘catch’ the chains as another spoke in the wheel. In the next eye, crochet three dc, one ch and three dc. Crochet a sc in the chain space below the next sc.
Continue like this until you’ve reached the half-wheel at the end of the row. Work three dc in the final eye, and one dc in the last stitch (photo 17). Cut the yarn and turn your blanket.


Fourth (and final) row
Join your new colour with a ss in the first stitch. Crochet a sc in the same stitch (photo 18). In a blanket consisting of only Catherine Wheels you would now be making the bottom half of the next set of wheels (check out my blanket tutorial for continuance of the stitch pattern). But since we only make a few rows of Catherine wheels in the Rainbow Samplers, we’ll make this our last row (and make some changes accordingly).
Crochet three chains, and then crochet seven dc together as you’ve done before (photos 19-20). You usually would crochet seven ch at this point. However, we’re going to crochet three ch, then a sc in the chain space of your Catherine Wheel (photo 21) and then again three ch, so you get a total of seven stitches. We’re doing this because we want to secure our final row to the previous row in the blanket.
Continue working seven dc’s together and then working three ch, one sc and three ch, ending with three ch and one sc in the final stitch (photo 22). Cut yarn and turn your blanket. This is how you make a Catherine Wheel!


As you can see, when a Wheel is broken down into its components it really isn't that complicated!


Comments
Be the first to comment to this post!