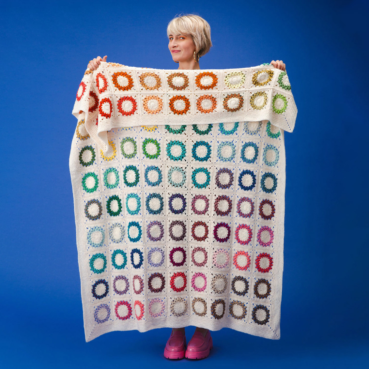
Rainbow Catherine Wheel Blanket
23.Dec.25 / Kirsten BalleringThe smooth rainbow gradient of the Catherine Wheels is enough to bring a smile to your face. New colours keep popping up and incorporating these into the blanket is an absolute delight. As a bonus, you barely have to weave in any ends!
The blanket includes written instructions, a photo tutorial and schematics. It’s suitable for the adventurous beginner and is written in US terms.
Materials and preparation

Yarn
Rainbow
Scheepjes Cotton Create (100% cotton), 50g/170m- Colour A: 502 Press x 7 balls
- Colour B: 759 Jumpin Jelly x 1 cake
Shop the yarn!
Want to get the yarn for this project? You can find both Cotton Create and Whirl at Scheepjes retailers, or online:
Crochet hook
3.5mm (US size E/5).
Measurements
Blanket measures 115 x 97cm (45¼ x 38¼in) after blocking.
Gauge/tension
Not critical for this project. You crochet until you run out of Colour B (~1.5g of Colour B per row, approx. 33 rows of wheels).
Notes
- You will not be cutting your yarn every time you switch colours. Instead, you'll leave the unused colour hanging in the back and pick it back up when needed.
Abbreviations (US terms)
- ch: chain
- ch-1 sp: chain-1 space
- dc3tog: double crochet 3 stitches together: (yarn over, insert hook in indicated stitch, yarn over, pull through first 2 loops on hook) 3 times, yarn over, pull through all loops on hook
- dc7tog: double crochet 7 stitches together: (yarn over, insert hook in indicated stitch, yarn over, pull through first 2 loops on hook) 7 times, yarn over, pull through all loops on hook
- dc: double crochet
- hdc: half double crochet
- ss: slip stitch
- RS: Right side
- sc: single crochet
- s(ts): stitch(es)
- WS: Wrong side
Repeat formats
- *….; rep from * once/twice/3x Crochet the instructions after * and then repeat that section a further number of times as indicated.
- *…; rep to end Crochet the instructions after * and then repeat that section to the end of the row or round.
- […] Indicates the amount of stitches at the end of a row or round.
Techniques
A Catherine Wheel consists of two rows; one row forms the bottom half, and one row forms the wheel's top half. Because the completed wheels are offset to the wheels in the rows above, the actual pattern repeat consists of 2 x 2 rows of Catherine Wheels. You can repeat these four rows endlessly to create a blanket.
Catherine Wheel
Top halves in Colour A (row 2)
The first row of the pattern starts with a row of top halves so the next complete wheels in Colour B snuggly fit in between.
Follow the start of the pattern to crochet your beginning chain and the first row of sc. Ch1, and then start Row 2 (photo 1). Work 1sc in the first stitch (photo 2), skip 2 stitches, and crochet (3dc, ch1, 3dc) in the third stitch. Skip another 2 stitches and make 1sc in the next stitch. This creates what looks like a wave but is actually the top half of a Catherine Wheel. (photo 3). Skip 2 stitches again, and crochet (3dc, ch1, 3dc) in the next stitch, skip 2 stitches again and make 1sc in the next stitch.
Repeat this until you reach the row's end, finish off with 1sc in the last stitch. Do not cut your yarn. Instead, place a stitch marker in the loop of Colour A (photo 4). Turn your work.

Bottom halves in Colour B (row 3)
We're now going to crochet the bottom halves of the next Catherine Wheels in Colour B, in the valleys between the top halves in Colour A. On both ends, you'll have half a wheel.
Join your Colour B with a ss in the first stitch, let the unused thread of Colour A hang in the back. Ch3 which counts as your first dc and make a dc3tog in the next 3 stitches by (yarn over, insert hook in next stitch, yarn over, pull through first 2 loops on hook) 3 times and then yarning over once more and pulling through all loops on hook (photos 5-6).
Ch7 (this helps you reach the 'centre' of the next valley between two Colour A halves (photo 7)) and crochet a dc7tog in the 3dc, 1sc and 3dc of the previous row (photos 8-9). Ch7 again and make a dc7tog in the next valley. Continue like this until the end of your row. Crochet a dc3tog in the final side of the last Colour A halve and 1dc in the last stitch (photo 10). This concludes the row of bottom halves in Colour B. Turn your work.

Top halves in Colour B (row 4)
This row looks a lot like Row 2, because we're creating top halves again. Ch3, these count as your first dc. Next, make 3dc in the eye of the dc3tog of the previous row (photos 11-12). Make 1sc in the ch-sp two rows below, created by the ch1 you made in Colour A while going over the ch7. (photo 13). This fastens your wheel and incorporates the ch7 as one of the spokes of the wheel.
Next, make (3dc, ch1, 3dc) in the eye of the previous row's dc7tog (photo 14), and then 1sc in the next ch-sp in Colour A (photo 15). Continue making (3dc, ch1, 3dc) in each eye and fastening them with 1sc in the ch-sps in between until you run out of dc7togs. Finally, crochet 3dc in the last dc3tog, and make 1dc in the final st (the ch3 with which you started Row 3, photo 16). Don't cut your yarn.

Switching yarns between Catherine Wheels (Colour B to A)
You're going to switch back to Colour A now. To get the yarn to the correct height to start your new row, you need to crochet up the sides of your half wheel. Start by taking out the marker from the loop in Colour A and placing it in the loop of Colour B (photo 17). Pick up the Colour A loop on your hook, and leave the thread of Colour B hanging in the back. With Colour A, make 3sc in the side of the first dc, and 3sc in the side of the next dc (photo 18). Ch1, and continue with the pattern.
Bottom halves in Colour A (row 5)
1sc in the first st (photo 19), ch3 (you only need to cross half the distance of a complete wheel to the centre of the next wheel), dc7tog in the 3dc, 1sc and 3dc of the previous row (photo 20). Ch7, dc7tog in the next 7 stitches. Continue like this until you've made the final bottom halve, and then ch3, 1sc in the last stitch (photo 21). Ch1, turn work.
Top halves in Colour A (row 6)
This row's easy, as you've almost entirely made it before. 1sc in the first stitch, then (3dc, ch1, 3dc) in the eye of the dc7tog of the previous row, 1sc in the ch-sp of Colour B. Repeat this until the end of your row (photo 22).

Switching yarns between Catherine Wheels (Colour A to B)
You're going to switch back to Colour B. Remove the marker from the Colour B loop and place it in the Colour A loop (photo 23). With Colour B, make 1sc in the side of the bottom half and 1sc in the side of the top half (photo 24). You only need to cover a short distance here to get to the correct height and get started with your next row (photo 25).
And that's it! You're now ready to continue the pattern repeat from Row 3 onwards. Continue with the ch3, dc3tog, ch7 and dc7togs as written in the pattern. The result of the side colour changes will look like in photo 26. As you can see too, the look of this stitch improves when you crochet the next wheels on top. Any wonkiness on the sides will be sorted out when you block your blanket.


Crochet pattern
Blanket
With Colour A, ch176.
Row 1 (RS) Starting in second ch from hook, 1sc in each ch to end, ch1, turn. [175 sc]
Row 2 (WS) 1sc in first st, *skip 2 sts, (3dc, ch1, 3dc) in next st, skip 2 sts, 1sc; repeat from * another 28 times, turn, don’t cut yarn. [29 half wheels]
Place a stitch marker in the loop of Colour A so it doesn’t come undone while you crochet with Colour B.
Row 3 Join Colour B with a ss in first st, ch3 (counts as st throughout), dc3tog in next 3 sts, ch7, *skip ch-1 sp, dc7tog, ch7; repeat from * another 27 times, dc3tog in next 3 sts, 1dc in last st, turn. [28 half wheels, 2 quarter wheels]
Row 4 Ch3, 3dc in dc3tog, 1sc in ch-1 sp of Row 2, *(3dc, ch1, 3dc) in dc7tog, 1sc in next ch-1 sp; repeat from * another 27 times, 3dc in dc3tog, 1dc in last st, turn, don’t cut yarn. [28 half wheels, 2 quarter wheels]
We’re going to work with Colour A again. Remove the stitch marker from Colour A and place it in the loop of Colour B. Let the loose strand of Colour B hang towards to back of your work.
Row 5 With Colour A, crochet 3sc around the stem of the first dc in Row 3, then work 3sc around the stem of the dc in Row 4, ch1 (You now start your regular row on top of Row 4). 1sc in first st, ch3, dc7tog, ch7, *skip ch-1 sp, dc7tog, ch7; repeat from * another 26 times, skip ch-1 sp, dc7tog, ch3, 1sc in last st, ch1, turn. [29 half wheels]
Row 6 1sc in first st, *(3dc, ch1, 3dc) in dc7tog, 1sc in ch-1 sp of Row 4; repeat from * another 27 times, (3dc, ch1, 3dc) in dc7tog, 1sc in last st. turn, don’t cut yarn. [29 half wheels]
We’re now going to work with Colour B again. Remove the stitch marker from Colour B and place it in the loop of Colour A. Let the loose strand of Colour A hang towards to back of your work.
Row 7 With Colour B, work 1sc in the side of the sc in Row 5, then work 1sc in the side of the sc in Row 6 (You now start your regular row on top of Row 6). Ch3 (counts as st throughout), dc3tog in next 3 sts, ch7, *skip ch-1 sp, dc7tog, ch7; repeat from * another 27 times, dc3tog in next 3 sts, 1dc in last st, turn. [28 half wheels, 2 quarter wheels]
Row 8 Ch3, 3dc in dc3tog, 1sc in ch-1 sp of Row 2, *(3dc, ch1, 3dc) in dc7tog, 1sc in next ch-1 sp; repeat from * another 27 times, 3dc in dc3tog, 1dc in last st, turn, don’t cut yarn. [28 half wheels, 2 quarter wheels]
Rows 5-8 form the pattern, alternating between Colour A and B. You do not cut your yarn at the end of a row, but instead change colours, crochet your way up to your current row along the side and then start your row of Catherine wheels.
Repeat Rows 5-8 until you run out of Colour B. For the size given in the pattern, this is after ~33 rows of Catherine wheel in Colour B.
Second-to-last row (RS) With Colour A, work 3sc in the side of the first dc two rows back, then work 3sc in the side of the previous row, ch1, 1sc in first st, ch3, dc7tog, ch3, 1sc in ch-sp between dc’s of previous row, ch3, *dc7tog, ch3, 1sc in ch-sp between dc’s of previous row, ch3; repeat from * another 26 times, dc7tog, ch3, 1sc in last st, ch1, turn. [29 half wheels]
Last row (WS) 1hdc in first st, *2hdc in ch-sp, 1hdc in next sc; repeat from * another 57 times, cut yarn. [175 hdc]
The final row is hdc instead of sc. This is because I want to mirror the height of the first row. That row appears taller because of the starting chain that’s made in the same colour.
Weave in all ends and block your blanket to size.

Adjusting the size of the blanket
To change the size, you need to crochet more or less Catherine wheels per row. However, because Colour B has a gradient that I assume you want to show off, you need to think about the finished size you want your blanket to be before you start.
If you crochet more or less than 29 Catherine wheels set in the pattern, you’ll end up with a different total number of rows in your blanket. For example: if you crochet 25 Catherine wheels per row instead of 29, you have enough yarn for ~8 extra rows. This, in turn, has its effect on the final size of your blanket. It becomes both shorter in length and larger in width.
To help you, I’ve calculated several (approximate) sizes after blocking with the corresponding number of starting chains.
- 130 x 85cm (51 x 33½ in): 25 wheels per row (starting chain of 152)
- 123 x 91cm (48½ x 35¾in) : 27 wheels per row (starting chain of 164)
- 120 x 92.5cm (47¼ x 36½ in): 28 wheels per row (starting chain of 170)
- 115 x 97cm (45¼ x 38¼in): 29 wheels per row (starting chain of 176)
As you can see, the more wheels you add per row, the shorter and wider your blanket will become.
You can follow the repeat instructions as indicated in the pattern. Keep in mind that the number of repeats will differ from instructions in the pattern when you change the length of the starting chain.
The stitch repeat for this pattern is 6+2. This means that for your pattern to work, you need a starting chain length consisting of a multiple of 6 chains + 2 chains (for example: to work 29 wheels in a row, you need 29 x 6 = 174 ch, + 2 = 176 ch in total).
Diagram
Blanket

Key (US terms)


Comments