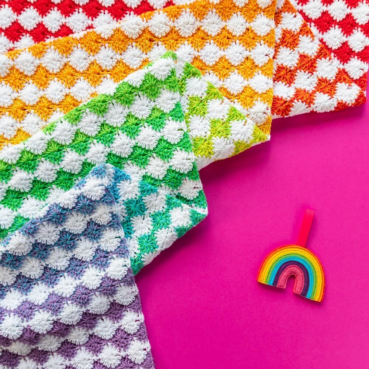
Prism Baby Lovey
21.Jun.21 / Kirsten BalleringComfort your baby in style with the Prism Baby Lovey. The rainbow accents add splashes of colour, while the wooden bite ring keeps the baby occupied and engaged.
The pattern is suitable for beginners, with easy to follow with row-by-row descriptions and charts to help you visualise your crochet.
Materials and preparation
Yarn
Rainbow
Scheepjes Organicon (100% Organic Soft Cotton), 50g/170m- Colour A: 219 Oxygen x 1 ball
- Colour B: 209 Desert Bloom x 1 scrap
- Colour C: 211 Gentle Primrose x 1 scrap
- Colour D: 213 Sapling x 1 scrap
- Colour E: 215 Glacier x 1 scrap
- Colour F: 217 Fresh Air x 1 scrap
- Colour G: 205 Lavender x 1 scrap
- Colour H: 207 Apple Blossom x 1 scrap

- 1x Wooden ring OR silicon ring 10cm in diameter
Shop the yarn!
You can find Scheepjes Organicon at Scheepjes retailers. If you can't find Organicon, Cotton Create, or Catona is also a great yarn to make loveys in!
Crochet hook
3.0mm
Measurements
Lovey measures 35cm (13.8in) on each side, blocked.
Gauge/tension
Gauge is not critical for this project. You can increase or decrease the size of the lovey as desired by continuing the pattern.
Notes
- The ch1 at the end of rows is a turning chain and does not count as st.
- If you want to wash your lovey at high temperatures, I'd recommend using a silicon bite ring instead of a wooden one.
Abbreviations (US terms)
- ch: chain
- ch-sp(s): chain space(s)
- dc: double crochet
- Join colour: When indicated, simply pick up a loop of your new colour and pull through the loop on hook.
- rep: repeat
- RS: Right side
- s(ts): stitch(es)
- sc: single crochet
- ss: slip stitch
- WS: Wrong side
Repeat formats
- *….; rep from * once/twice/3x Crochet the instructions after * and then repeat that section a further number of times as indicated.
- (…) once/twice/3x Crochet the instructions between brackets the total number of times indicated.
- […] Indicates the amount of stitches at the end of a row or round.
- (…) in same st/sp Indicates that all instructions between brackets are worked in the same stitch or space.
Crochet pattern
Handle cover
You’ll be working on a rectangular piece of crochet that will be sewn together around the handle later.
With Colour A, ch11, turn. Leave a long beginning tail to sew the cover over the handle.
Row 1 (RS) 10sc, change to Colour B, ch1, turn. Do not cut Colour A; instead, carry Colour A along in the stitches to your next colour change. [10 sc in Colour A]
Row 2 (WS) 10sc while crocheting over Colour A, change to Colour A, ch1, turn. Cut Colour B. [10 sc in Colour B]
Is the carrying-along not working for you? You can also cut Colour A after every colour change. It's just that you've got a few more ends to weave in, that's all!
Row 3 10sc, change to Colour C, ch1, turn. [10 sc in Colour A]
Rows 4-5 Rep Row 2-3.
Measure whether your crochet fits the handle snugly at this point. If it’s too loose, start over with a smaller number of beginning chains. If it’s too small, start over with a larger number of chains.
Repeat Rows 2-3 until you have 25 rows, changing colours alphabetically every other row and starting again with Colour B once you’ve worked through all colours. Weave in all ends.
Use the long beginning tail to sew the long sides of the Handle Cover together around the wooden ring with the RS facing outwards. Fasten off.

Lovey
You’ll be making a Granny Square-style Lovey. You can make this piece as large as you want. For visual help, see my Granny Square tutorial. It shows you exactly how to create a granny square, with photos.
With Colour A ch4, join with ss in first ch to close ring.
Round 1 (RS) Ch3 (counts as first dc), 2dc in ch-sp, (ch2, 3dc in ch-sp) 3 times, ch2, join with ss in third ch of begin-ch. [1 Granny cluster on each side, 4 ch-2 corner sps]
Tip: if you want the transition between your rounds to be even smoother, make an extra ss in the chain space you’re starting your next chains in. This will help keep the start of your starting chains close to the remaining dc’s of the cluster. These additional slip stitches are marked blue in the diagram.
Round 2 (RS) Ch4 (counts as first dc + ch1), *(3dc, ch2, 3dc) in corner ch-sp, ch1; repeat from * 2 more times, (3dc, ch2, 2dc) in corner ch-sp, join with ss in third ch of beginning-ch. [2 Granny clusters on each side, 4 ch-2 corner sps]
Round 3 Ch3 (counts as first dc), 2dc in ch-sp, ch1, *(3dc, ch2, 3dc) in corner ch-sp, ch1, 3dc in next ch-sp, ch1; repeat from * 2 more times, (3dc, ch2, 3dc) in corner ch-sp, ch1, join with ss. [3 Granny clusters on each side, 4 ch-2 corner sps]
Round 4 Ch4 (counts as first dc + ch1), (3dc in next ch-sp, ch1) in each ch-sp to corner, *(3dc, ch2, 3dc) in corner ch-sp, ch1, (3dc in next ch-sp, ch1) in each ch-sp to corner; repeat from * 2 more times, (3dc, ch2, 3dc) in corner ch-sp, ch1, 2dc in same ch-sp where you started your beginning chains, join with ss. [4 Granny clusters on each side, 4 ch-2 corner sps]
Round 5 Ch3 (counts as first dc), 2dc in ch-sp, ch1, (3dc in next ch-sp, ch1) in each ch-sp to corner, *(3dc, ch2, 3dc) in corner ch-sp, ch1,( 3dc in next ch-sp, ch1) in each ch-sp to corner; repeat from * 2 more times, (3dc, ch2, 3dc) in corner ch-sp, ch1, (3dc in next ch-sp, ch1) in each ch-sp to end of round, join with ss. [5 Granny clusters on each side, 4 ch-2 corner sps]
Round 6 Ch4 (counts as first dc + ch1), (3dc in next ch-sp, ch1) in each ch-sp to corner, *(3dc, ch2, 3dc) in corner ch-sp, ch1, (3dc in next ch-sp, ch1) in each ch-sp to corner; repeat from * 2 more times, (3dc, ch2, 3dc) in corner ch-sp, ch1, (3dc in next ch-sp, ch1) in each ch-sp to end of round, 2dc in same ch-sp where you started your beginning chains, join with ss. [6 Granny clusters on each side, 4 ch-2 corner sps]
Rounds 7-15 Rep Rounds 5-6. Cut yarn, weave in ends. [15 Granny clusters on each side, 4 ch-2 corner sps]
Rainbow border
Round 1 (RS) Join Colour B in any corner with a ss, *(1sc, ch2, 1sc) in corner, 1sc in every st and ch-sp to end of side; repeat from * another 3 times, join to first sc with ss, cut yarn. [64 sc on each side, 4 ch-2 corner sps]
Rounds 2-7 (RS) Rep Round 1 with Colour C, D, E, F, G and H. Cut yarn, weave in ends. [76 sc on each side, 4 ch-2 corner sps]
If your square's corners start to warp, I recommend crocheting two sc instead of one sc after the two chains in each corner.
It’s easiest to block the lovey to size before assembly. Size isn’t very important, but blocking gives you an opportunity to square the motif further. Read more about blocking in my blocking tutorial.

Green strap
With Colour D, ch11.
Round 1 (RS) Start in second ch, crochet 10sc, ch1, 10sc on other side of ch, ch1, join with ss in first sc. [10 sc on each side, 2 ch-1 sps]
Round 2 (RS) Ch1, (10sc, 3sc in ch-sp) 2 times, join with ss in first sc. Cut yarn with a long tail end. [26 sc]
Assembly
Use the tail end of the strap to sew the short sides of the strap together through the wooden ring and the centre of your lovey. I sewed through two diagonally opposite corners of Round 1 of the lovey for extra security.
Care advice
To protect the wooden ring (and your laundry machine), I recommend washing the lovey in a washing bag or pillowcase. Wash it by hand or on a gentle cycle (30 degrees) and let it dry flat and in shape.

Diagram
Handle cover

Lovey

Green strap

Key (US terms)


Comments