Haak Maar Raak home

Hygge CAL: Week 1

KirstenKirsten15 April 20203 min read
Bobbles week 1

I’m so excited, today the Scheepjes 2017 Hygge CAL will start! If you haven’t heard about the Hygge CAL yet, please check out this page which contains all information regarding the CAL. Really, I couldn’t be happier because the CAL has been so well received already, it’s very exciting and humbling at the same time! Thank you for all your enthusiasm and I hope you’ll enjoy the CAL just as much as I do!

Week 1

So week 1, the very first part of the Hygge CAL! As you might figured out already, the shawl is made in one piece. This means that, in contrary to most CALs, you will not be working on motifs that you will join afterwards. Rather, you crochet, embroider and decorate a piece of the shawl each week, and instead of cutting your base yarn you’ll leave it for next week. In the end, we’ll crochet an edging around the piece and line it (if you want).

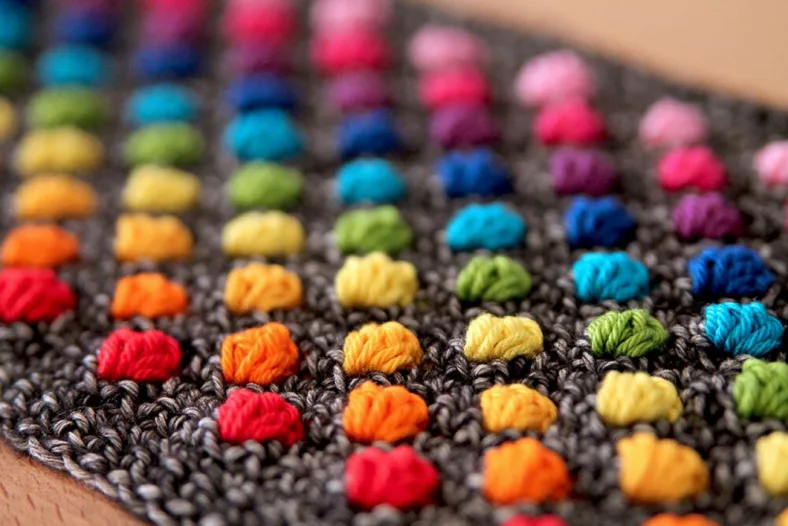
This means that the shawl will be worked from one end to the other. As you might have seen on the photo’s, the ends of the shawl are made out of bobble stitches! They are one of my favourite stitches, as they provide texture and pops of colour, depending on how you use them. I’ve chosen to make rows of bobble stitches, just to bring those pops of colour into the base colour of the shawl (and because I’m a sucker for geometry). This also means that you don’t have to embroider this week. But no worries, that will come soon!

Tips

I’ve included some tips in the pattern to help you on your way. One of the most important things to remember is that if you want your bobble to pop you want to make the stitch next to the bobble stitch, which is a double crochet (UK, or single crochet in US terms), tight. Pull that stitch tight means that your bobble will stick out more. Esther explains this very well in her video’s (see below).

Another useful tip is one I learned throughout the years. People make bobble stitches in all shapes and sizes and inevitably, some will sag or don’t puff up as nicely as you’d want to. Besides following the tip above, another tip is to add volume in the bobble stitch. My bobble stitches have 5 ‘spokes’ (/repeats of unfinished stitches), but you could also do 6 to make it stand out more. This does mean that you use up a bit more yarn though (so don’t go wild and make 10 spokes just to be sure).

Details

The kits are for sale through various Scheepjes retailers, such as Wool Warehouse (UK based, worldwide).. The pattern will be released from February 15th 2017 in 14 weekly instalments in the Facebook groups, and on Scheepjes.com. To help you understand the patterns, the fabulous Esther from It’s all in a Nutshell has made videos for the techniques used in this CAL. You can find her video’s on her Youtube channel, It’s all in a Nutshell Crochet.

Comments

Linn

February 15, 2017 14:43

Oh wat ben ik blij dat we nu echt gaan beginnen, het ziet er al veelbelovend uit! Dank je alvast voor deze mooie patroon week 1 , ik ga snel aan de slag! Hoe blij kun je zijn he? :)) Liefs van Linn Xox

kirsten

February 15, 2017 16:24

Graag gedaan!! Ben blij dat jij er ook erg blij mee bent :)

Els Riemens

February 15, 2017 16:01

Hallo Kirsten, Ook ik ben lekker enthousiast aan de haak - prachtig patroon! Nu heb ik alleen een vraag over de bobbelstitch - ik zie dat je hier een foto van de achterkant geplaatst heb, maar zo ziet mijn achterkant er helemaal niet uit... Jij hebt een soort grijs V-tje aan de achterkant van de bobbel lopen, maar bij mij ziet hij er net zo uit als aan de voorkant. En heeft hij ook erg de neiging om weer ' naar achteren' te schieten, ondanks dat ik hem toch redelijk strak aantrek... Heb je een tip voor me? Doe ik iets fout? Alvast heel erg bedankt!

kirsten

February 15, 2017 16:24

Hi Els, leuk! De achterkant is maar net wat je ervan maakt :) Je haakt een oneven aantal rijen voordat je met de bobbels begint, dus als je je 1e rij als 'voorkant' noemt, haak je je bobbels inderdaad aan de achterkant. Maar omdat voor- en achter van de Stonewashed rijen gelijk is, heb ik rij 1 de 'achterkant' genoemd en is de 'goede' kant van de bobbels gewoon de voorkant van je shawl in andere weken. Snap je? Wat betreft de neiging om naar achteren te schieten, probeer anders eens een extra steekje in de bobbelsteek te maken (5 ipv 6). Dat vult hem nog wat meer op. Als het echt niet wil lukken, kan je ook overwegen om een popcornsteek te maken in plaats van een bobbel!

Els Riemens

February 15, 2017 16:33

Wat ik dan nog niet helemaal begrijp is dit,; jij hebt aan 'jouw' voorkant een mooie bobbel, en aan de achterkant dat v-tje in het grijs. Maar ik heb dus aan 2 kanten een 'nette' bobbel ... En het lijkt me dat als je dat grijze v-tje aan de achterkant hebt, dat hij dan sowieso minder makkelijk 'terug'-plopt. Snap je me nog? Maar ik ga gewoon eens met een extra 'pootje' proberen, dus 6 ipv 5. Super leuk dat je de moeite en tijd neemt om vragen te beantwoorden, trouwens! Ik ben zo benieuwd hoeveel Hygge-sjaals we dit voorjaar in het straatbeeld tegenkomen Het lijkt er haast op dat half NL aan de haak is

Els Riemens

February 15, 2017 19:43

Inmiddels is het gelukt hoor - prachtige dikke bobbel met 6 pootjes en u po weet nu ook hoe ik dat 'v-tje' aan de achterkant krijg. Happy me

Esther Leek

February 15, 2017 20:43

Hello Kristen! Thank you for the beautiful pattern! A quick question! The backs of your bobbles look adorable. How are you doing yours to get that little v? I am carrying my stonewash under the catona as I do mine.

kirsten

February 27, 2017 11:59

Hi Esther :) I get this by switching to the Catona colour in the last loop of the last sc before the bobble, and then switching back to the Stone Washed in the last loop to finish the bobble stitch and then continue with the Stone Washed for the next 3 sc, while I work over my Catona yarn there. Hope this makes sense!

Eileen Landa

March 23, 2017 21:41

I did the same switch as you described but I don't get the V. What do you do with the stonewash while stitching the bobble?

kirsten

March 26, 2017 09:01

Hi Eileen, nothing, I just leave it on the back and pick it up to finish the final 'pull through'!

Carin

February 15, 2017 21:37

Zucht, zo mooi ! Zelfs de achterkant is een plaatje. Ik maak hem in de jewel kleuren, maar ik wacht nog even met beginnen totdat mijn petekind haar pakket in het bezit krijgt (rainbowkleuren). Dan kunnen we samen starten. Maar hoe meer ik deze kleuren zie, hoe meer zin ik krijg om hem nogmaals in de rainbowkleuren te maken. Beter 2 dan geen, zeg ik maar LOL

Margaret Evans

February 16, 2017 03:45

Such a fabulous start to the CAL. So many positive messages and already so many gorgeous week 1 shawls have been finished. I am really looking forward to working my way through the next 14 weeks. Congratulations on the success so far - this CAL is absolutely HUGE. xx

Margaret

February 20, 2017 16:56

I have the same question as Esther Leek above. Being new to crochet I have found the video tutorials a real help and confidence boost. In the video the bobble stitches are worked over the scheepjes but you appear to have stranded yours at the back. Do you get a better result with stranding?

kirsten

February 27, 2017 11:58

Hi Margaret, Both methods are fine :) they don't really give a better 'bobble' performance, but I find it easier to carry my Stone washed in the back of the bobble because I'm afraid it will show in the front if I do otherwise. I'd suggest to try both and see what works for you, I've heard different people swearing by both methods!

Lydia

February 26, 2017 21:19

Hoi kirsten, Als eerste wat een geweldig patroon, voor het eerst van mijn leven doe ik een cal. Is het mogelijk de maten te vermelden? Ik zou graag weten hoelang hij ongeveer wordt en daarnaast zou ik graag weten hoeveel sw er in de rand gaat mocht ik dan willen verlengen dan zou ik wat losse sw met een ander kleurbaden voor de de rand kunnen gebruiken. Ik ben nu na 2 weken 35 cm breed en 25 hoog. Mvg

Kirsten

February 27, 2017 11:52

Hi Lydia, De sjaal wordt als hij af is ongeveer 36 cm breed en 180-190 cm lang. die 36 cm is inclusief rand, die van jou zal dus ietsje breder uitkomen! Die 25 cm hoog klinkt goed, maar de hoogte verschilt per week dus dat is wat lastig te zeggen. Ik zou halverwege de sjaal even kijken, dan weet je dat hij nog ongeveer 1x zo lang wordt!
Stay in the loop

New posts & patterns,
straight to your inbox.

Join the Haak Maar Raak community and get new blog posts, free patterns, and the occasional yarn find delivered to your inbox.

  • New patterns before they go public
  • Free PDF guide to blocking
  • Honest yarn reviews & inspiration

Join the newsletter

Free, friendly, and easy to unsubscribe.

No spam. Unsubscribe any time!

Kirsten
KirstenCrochet designer at Haak Maar Raak