

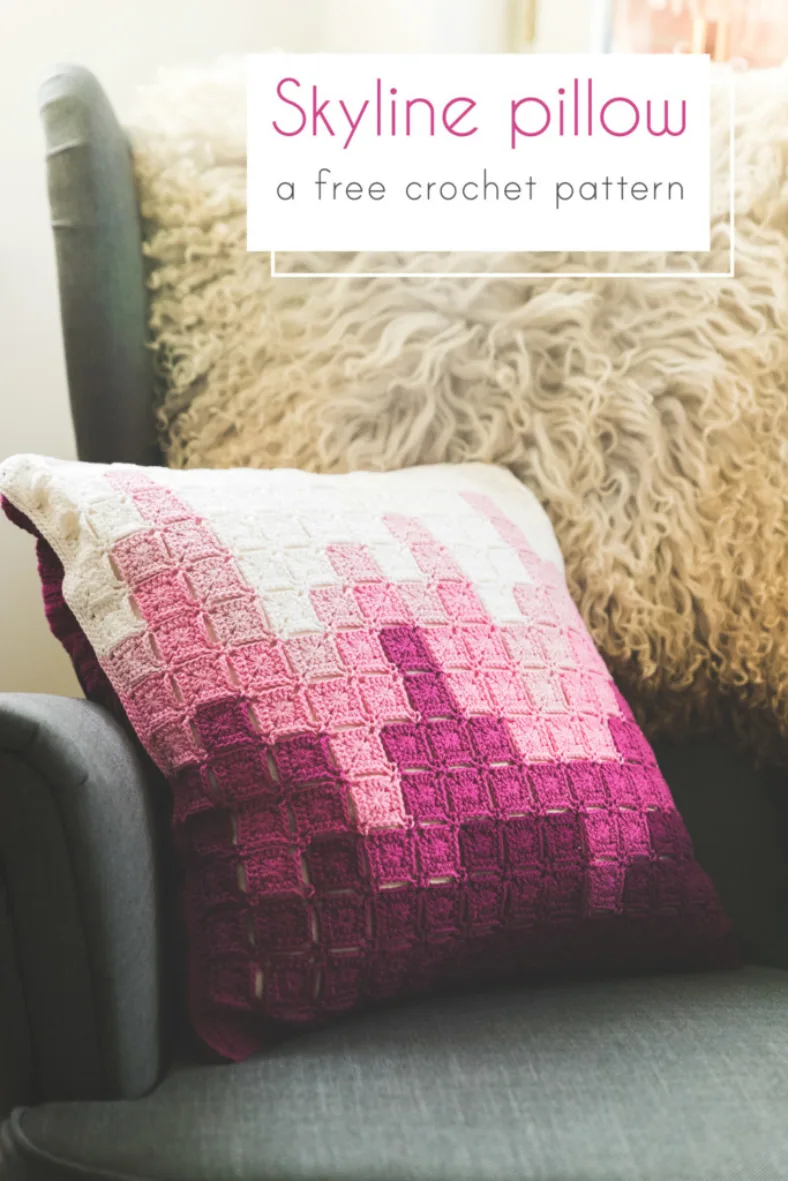
The Skyline pillow is a great excuse to use your favourite colours. The ombre colours look great in any decor, and the join-as-you-go panels are easy to change in size. The pattern comes with a crochet diagram and is written in US English terms.
Materials and preparation
Yarn
| Label | Colour name | Code | Amount |
|---|---|---|---|
| Colour A | White snow | 106 | 1 ball |
| Colour B | Ice Pink | 246 | 1 ball |
| Colour C | Tulip | 222 | 1 ball |
| Colour D | Carnelian Rose | 251 | 1 ball |
| Colour E | Tyrian Purple | 128 | 5 balls |
| Label | Colour name | Code | Amount |
|---|---|---|---|
| Colour A | White snow | 106 | 1 ball |
Other
- 5 buttons
- 50 x 50 cm inner pillow (20 x 20 in)
- 4 stitch markers
Shop the yarn
Are you looking for these yarns? You can buy them from a local Scheepjes retailer, or online at webshops such as:
Crochet hook
3.0mm
Measurements
Fits 50 x 50 cm inner pillow (20 x 20 in)
Gauge/tension
One square measures 3 cm on each side (1.2in)
Abbreviations (US terms)
- BL
- back loop
- ch
- chain
- ch-sp(s)
- chain-space(s)
- hdc
- half double crochet
- RS
- right side
- sc
- single crochet
- ss
- slip stitch
- st(s)
- stitch(es)
- WS
- wrong side
Notes
- You’ll be making a 14 x 14 square grid that is joined-as-you-go. For the colour distribution, check the colour layout below. Next, you’ll work an edge around the front. The back is worked in two separate parts, to ensure that you can change the pillow inner. Finally, you work an edge around the back and work a final row through both the edges of the Front and Back to join the cover parts.
- You can start with any square. I prefer to work the grid in columns, starting with the darker colours.
- Want to swap yarns to Colour Crafter? Check out the Catona-to-Colour Crafter conversion table.
Colour layout

Crochet pattern
Front
First Motif
Make a magic ring.
Fasten off, weave in ends.
Subsequent motifs
Work the subsequent motifs as the first motif, but join to adjacent motifs in the second round by working (1hdc, ch1, 1ss, ch1, 1hdc) in corner spaces.
Fasten off, weave in ends.
Front border (around front panel)
Note: You’ll work the edging with colours of the underlying squares, so it will look like it’s part of the square grid.
Colour changes are done in the stitch before the indicated colour change. Pull up your final loop of the stitch in the new colour.
Join Yarn A with a ss in the ss join of the third square down from the right top corner (see colour layout), 1sc in ch-sp, 5sc, 1sc in corner-sp; repeat from * once more, 1sc in ch-sp, 5sc. Rotate work 90 degrees.
(1sc, ch2, 1sc) in corner ch-sp, 5sc, 1sc in ch-sp, *1sc in next ch-sp, 5sc, 1sc in ch-sp; repeat from * another 11 times, 1sc in ch-sp, 5sc, rotate work 90 degrees.
(1sc, ch2, 1sc) in corner ch-sp, 5sc, 1sc in ch-sp, *1sc in next ch-sp, 5sc, 1sc in ch-sp; repeat from * another 3 times. Change to Yarn B, repeat from * another time, 1sc in next ch-sp, 5sc, 1sc in ch-sp, change to Yarn C, *1sc in next ch-sp, 5sc, 1sc in ch-sp; repeat from * another time, change to Yarn D, 1sc in next ch-sp, 5sc, 1sc in ch-sp, change to Yarn E, *1sc in next ch-sp, 5sc, 1sc in ch-sp; repeat from * another 3 times, 1sc in next ch-sp, 5sc, rotate work 90 degrees.
(1sc, ch2, 1sc) in corner-sp, 5sc, 1sc in ch-sp, *1sc in next ch-sp, 5sc, 1sc in ch-sp; repeat from * another 11 times, 5sc, rotate work 90 degrees.
(1sc, ch2, 1sc) in corner ch-sp, 5sc, 1sc in ch-sp, *1sc in next ch-sp, 5sc, 1sc in ch-sp; repeat from * another 2 times, change to Yarn D, *1sc in next ch-sp, 5sc, 1sc in ch-sp; repeat from * another time, change to Yarn C, *1sc in next ch-sp, 5sc, 1sc in ch-sp; repeat from * another 2 times, change to Yarn B, *1sc in next ch-sp, 5sc, 1sc in ch-sp; repeat from * another time, Join with ss in first sc. Fasten off and weave in all ends.
If your Front isn’t measuring 48 x 48cm, this is the moment to block it to size.
Back
Note: both sides are reversible and thus have no real right or wrong side.
Part 1 (big part)
With Yarn E, ch92.
Repeat Row 1-2 another 23 times until you have 48 rows. Make sure to mark the first and last stitch of Row 41. Cut yarn.
Part 2 (small part)
With Yarn E, repeat Row 1-3 as for Part 1.
Repeat Row 5 another 25 times until you have 31 rows. Make sure to mark the first and last stitch of Row 8. Don’t cut yarn.
Back border (around back panels)
Note: We’ll be increasing the stitch count on each side to 98 stitches to match the Front’s stitch count. We’ll also be joining the big and small parts to form the back panel.
If your back isn’t measuring 48 x 48cm, this is the moment to block it to size. Once it’s the right size, sew the buttons on the big part, aligning with their buttonholes on the small part. Weave in ends.
Joining Front and Back
Because you can see this join on the front side, we’ll be working on the final joining with the colours of the underlying squares, just as we did previously for the front panel.
Weave in any remaining ends.
Diagrams
This crochet diagram is an illustration of how you can connect the corners of the squares. Note: this is not a representation of the actual colours used.

You might also like

Comments
Bec
December 25, 2022 23:21
Kirsten
December 28, 2022 08:31
Bec
January 12, 2023 00:06