

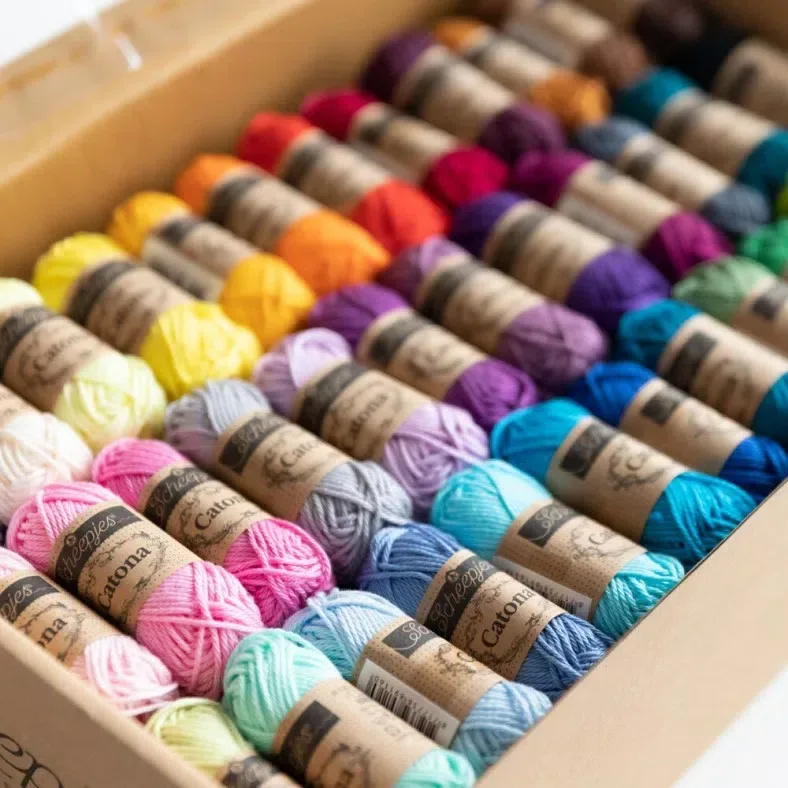
Elegant flowers, a comfortable size and rainbow colours make the Noëlle blanket a must-have crochet pattern. This stunning project is designed to work with a Scheepjes Catona Colour pack, helping you create this fluid rainbow-gradient blanket.
The pattern is suitable for advanced crocheters. The written instructions guide you through the pattern, while clear diagrams and photo tutorials show how to assemble the flower motifs.

Materials and preparation
Yarn
| Label | Colour name | Code | Amount |
|---|---|---|---|
| Colour A | Snow White | 106 | 8 balls |
| Label | Colour name | Code | Amount |
|---|---|---|---|
| All colours | 109 balls |
Shop the yarn!
You can find the Scheepjes Catona and Colour packs at Scheepjes retailers, or online at:
Crochet hook
3.5mm (US Size E/4)
Measurements
120 x 150 cm (47 x 59 in)
Gauge/tension
Motif up to Round 5 measures 7 cm (2¾ in) across flat to flat side, 8 cm (3.15 in) across point to point
Abbreviations (US terms)
- BPhdc
- Back Post half double crochet: yarn over, insert hook from back to front and back to back around stem of st, yarn over, pull up loop, yarn over, pull through all loops
- ch
- chain
- ch-sp
- chain space(s)
- dc
- double crochet
- dc2tog
- double crochet 2 stitches together: (yarn over, insert hook in st/sp, yarn over, pull up loop, yarn over, pull through first 2 loops on hook) in each of the two sts/sps, yarn over, pull through all loops on hook
- dc3tog
- double crochet 3 stitches together: (yarn over, insert hook in st/sp, yarn over, pull up loop, yarn over, pull through first 2 loops on hook) in each of the three sts/sps, yarn over, pull through all loops on hook
- dropped hdc
- dropped half double crochet: yarn over, insert hook in the indicated sp/st, yarn over, pull up a loop to height of current st, yarn over, pull through all loops on hook
- hdc
- half double crochet
- hdc2tog
- half double crochet 2 stitches together: (yarn over, insert hook in st/sp), yarn over, pull up loop) in each of the two sts/sps, yarn over, pull through all loops on hook
- picot
- ch2, insert hook in second ch from hook, yarn over, pull up loop and immediately pull through loops on hook
- RS
- Right side
- sc
- single crochet
- sp(s)
- space(s)
- ss
- slip sstitch
- st(s)
- stitch(es)
- tr
- treble crochet
- WS
- wrong side
Repeat formats
- *….; rep from * once/twice/3x — Crochet the instructions after * and then repeat that section a further number of times as indicated.
- (…) once/twice/3x — Crochet the instructions between brackets the total number of times indicated.
- […] — Indicates the amount of stitches at the end of a row or round.
- (…) in same st/sp — Indicates that all instructions between brackets are worked in the same stitch or space.
Notes
- You’ll use different colours for each motif. These are indicated in the pattern as ‘Colour 1’ and ‘Colour 2’. Check out the colour layout and table for the actual colour combinations. Please note that full motifs with combination 52 and 88 are only made once, all the other twice.
- The motifs are joined together by working a joining round in Colour A around each motif and joining to adjacent motifs where necessary. So you can work all motifs up to Round 5 before joining.
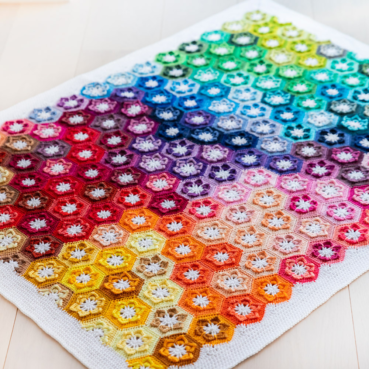
Colour layout
Full motif colour combinations
You will create 182 full motifs, and 13 half motifs with the colours from your colour pack. You’ll need to make two full motifs out of each colour combination, with the exception of combination 88 and 52 where you’ll only make one full motif.
Note that the colour combinations are paired: Combination 1 and 2 are both combining the same colours, only for two motifs Colour 1 is used on the inside, and for the other combination Colour 2. So while the table lists 92 combinations, you only have 46 pairs of colours. The numbers in the table below correspond with the numbers in the colour overview.
You will not use colour 74, 105, 106, 110, 130, 157, 162, 248, 254, 257, 387, 393, 395, 404, 501, 505 and 507.
Tip: Sort out your combinations at the start of the blanket and keep the balls together with a rubber band or something similar.
Combination |
Colour 1 (inside) |
Colour 2 (outside) |
1 |
524 |
263 |
2 |
263 |
524 |
3 |
264 |
256 |
4 |
256 |
264 |
5 |
396 |
517 |
6 |
517 |
396 |
7 |
516 |
115 |
8 |
115 |
516 |
9 |
281 |
386 |
10 |
386 |
281 |
11 |
258 |
192 |
12 |
192 |
258 |
13 |
255 |
414 |
14 |
414 |
255 |
15 |
410 |
189 |
16 |
189 |
410 |
17 |
252 |
390 |
18 |
390 |
252 |
19 |
388 |
504 |
20 |
504 |
388 |
21 |
522 |
249 |
22 |
249 |
522 |
23 |
101 |
179 |
24 |
179 |
101 |
25 |
403 |
100 |
26 |
100 |
403 |
27 |
208 |
280 |
28 |
280 |
208 |
29 |
411 |
383 |
30 |
383 |
411 |
31 |
528 |
244 |
32 |
244 |
528 |
33 |
212 |
525 |
34 |
525 |
212 |
35 |
261 |
124 |
36 |
124 |
261 |
37 |
245 |
205 |
38 |
205 |
245 |
39 |
513 |
515 |
40 |
515 |
513 |
41 |
253 |
241 |
42 |
241 |
253 |
43 |
512 |
392 |
44 |
392 |
512 |
45 |
389 |
412 |
46 |
412 |
389 |
47 |
385 |
514 |
48 |
514 |
385 |
49 |
402 |
391 |
50 |
391 |
402 |
51 |
172 |
242 |
52 ★ (only 1) |
242 |
172 |
53 |
400 |
146 |
54 |
146 |
400 |
55 |
509 |
510 |
56 |
510 |
509 |
57 |
397 |
401 |
58 |
401 |
397 |
59 |
247 |
399 |
60 |
399 |
247 |
61 |
511 |
201 |
62 |
201 |
511 |
63 |
384 |
173 |
64 |
173 |
384 |
65 |
527 |
164 |
66 |
164 |
527 |
67 |
113 |
508 |
68 |
508 |
113 |
69 |
520 |
521 |
70 |
521 |
520 |
71 |
240 |
526 |
72 |
526 |
240 |
73 |
398 |
128 |
74 |
128 |
398 |
75 |
251 |
394 |
76 |
394 |
251 |
77 |
226 |
282 |
78 |
282 |
226 |
79 |
246 |
519 |
80 |
519 |
246 |
81 |
409 |
413 |
82 |
413 |
409 |
83 |
518 |
114 |
84 |
114 |
518 |
85 |
238 |
222 |
86 |
222 |
238 |
87 |
408 |
523 |
88 ★ (only 1) |
523 |
408 |
89 |
502 |
503 |
90 |
503 |
502 |
91 |
406 |
506 |
92 |
506 |
406 |
Half motif colour combinations
Make 1 half motif each with combination 19, 21, 23, 26, 28, 30, 34, 37, 41, 44, 50, 52 and 90. If you don’t have enough yarn leftovers for these combinations, pick similar colours that are not used in adjacent motifs.
Colour Layout

Techniques
Trebles in picots
Please note: a different colour is used for contrast in the photos to show the joining.
When you’re working the joining around your first motif and joining rounds of subsequent motifs, you’ll be making tr’s in the picots below. When you make a tr (photo 1), yarn over twice and insert your hook into both chains of the picot. Yarn over again, pull up a loop, and (yarn over, pull through two loops) three times until you’ve made the tr (photo 2). Next, work a dc in the stitch behind the tr (photo 3). Ch2, work a dc in the first st on the other side of the chain. Next, make a tr as you did before in the same picot (photo 4). This is how you create a ‘V’ of trebles in each corner. Work your way around the motif as instructed. Once fastened off, your motifs look like in photo 5.


Video tutorial: Motifs
Joining
The joining rounds for other motifs are very similar to the first round, with one significant difference: to achieve a flexible join, we’ll be taking up loops from the other motif before we work a stitch. You do this with the WS’s of both motifs together.
Note: To show the join, I’ve worked with two different colours of yarn. This might look slightly messy in the tutorial, but remember that in the blanket you’ll be working with one colour
When you reach a side you will join to other motifs (photo 6), crochet up to the first chain space of that side. Ch1, 1ss in the chain space of the other motif (photo 7). 1dc in the first st (photo 8), remove your hook from the (red) loop. Now insert your hook from back to front through the back loop of the first dc on the other motif (photo 9, this is the loop on the side closest to you). Pick up the (red) loop and pull it through the back loop of the other motif (photo 10).


Now work your second stitch on the original motif: 1tr in the picot (photo 11). Take your hook out of the loop again, insert from back to front through
the back loop of the next st on the other motif, pick up your (red) loop again and pull through. Continue with your next dc, and join to the BL of the next st on the other motif. Continue like this until you’ve joined all dc’s and tr’s on that side. Ch 1, then finish with a ss in the next chain space (photo 12).
You can now continue with a ss to another motif or work a side that’s not joined to another motif. See the pattern for pattern instructions.
Video tutorial: Joining
Crochet pattern
Full Motif
Make 182 motifs.
The motifs are worked in rounds on the RS, no turning involved.
With Colour A, make a magic ring.
Weave in all ends. You can crochet over the ends of Round 1, 3 and 5 as you go if you don’t want to weave in all the ends separately.
Half Motif
Make 13 half motifs. The half motif will be worked in rows. Turn in the first row. All other rows are worked from the RS without turning. See Diagram 2: Half Motif for extra clarification.
With Colour A, make a magic ring.
Weave in all ends.
Joining
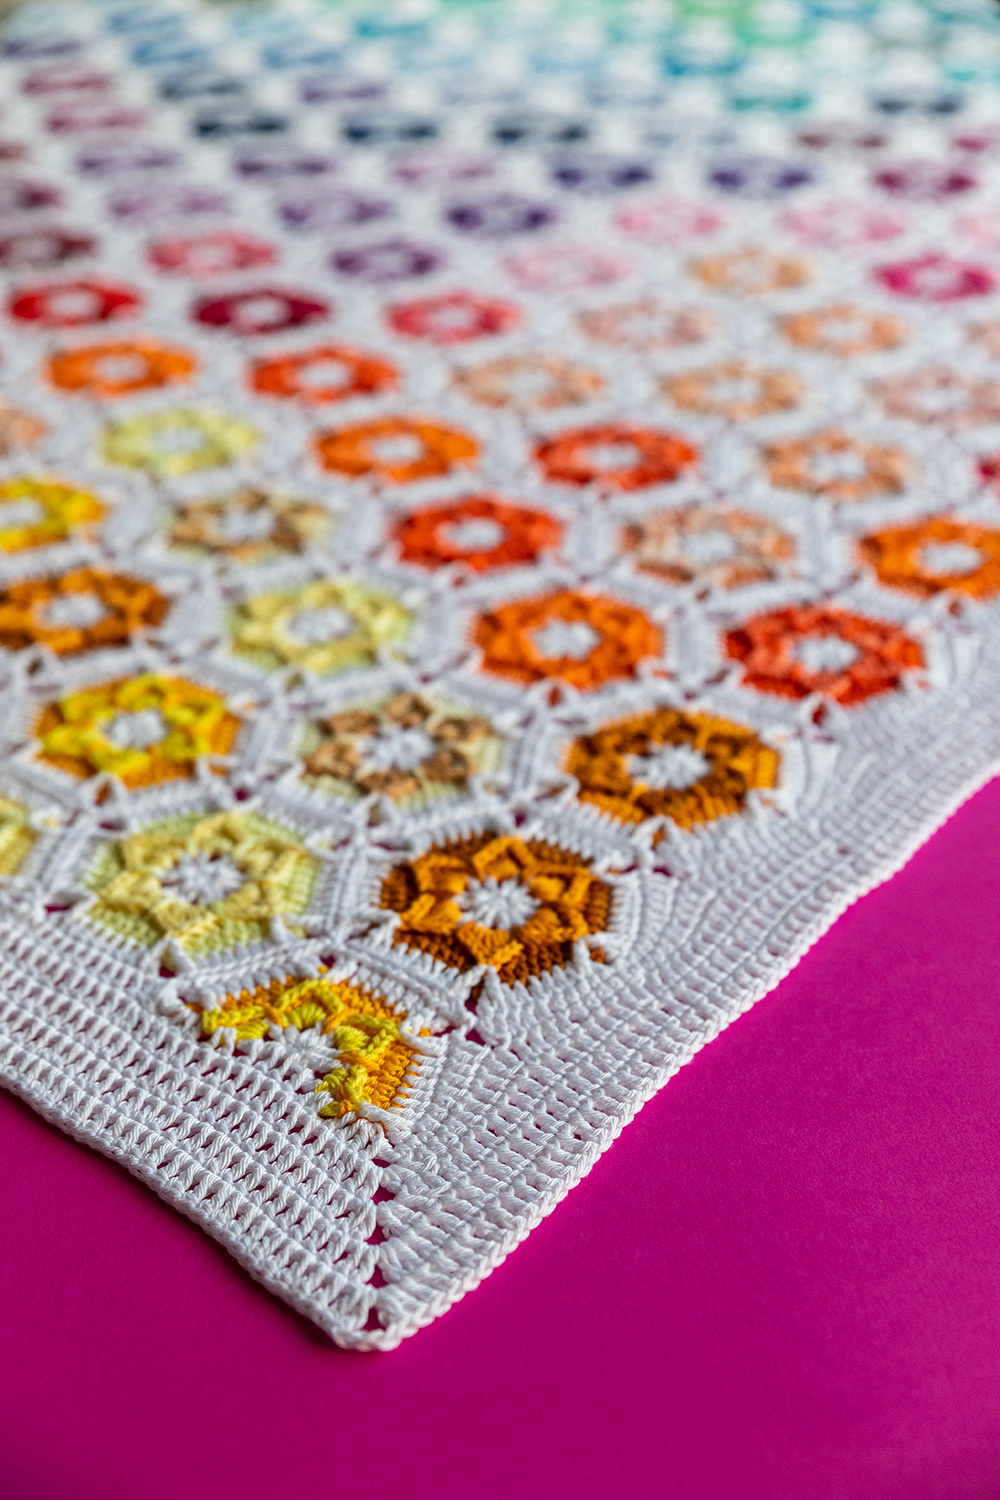
You can make all motifs in advance, up to and including Round 5. With Colour A (the white), you’ll be joining them piece by piece in Round 6, the Border round.
We’ll join with a flat join. This method gives you a flat and delicate finish, but it is a little time consuming. If you’d rather make a quick join, simply crochet the motifs together with ss’s in each motif corner.
Order of joining
First, join all complete motifs. Once the blanket is assembled, you’ll add the half motifs to straighten out the sides.
It doesn’t matter in which order you join your complete motifs. You join the motifs piece by piece, and whether you start in a corner and work your way out diagonally or join them row by row doesn’t matter. Personally, I prefer row by row over the long side because it keeps everything organised, and I can see how big the blanket will be quite early on.

First motif
You’ll make a border around the first motif without joining. See Diagram 3: Joining first motif.
Note: you’ll be making two tr’s in each picot on the motif, one on each side of a corner space. If you work these tr’s in the picot, don't skip a st on the motif; instead, crochet your next st in the st behind the tr. This is how we increase sts in the Border Round without crocheting in the corner spaces themselves.
Joining other motifs
Read the instructions below carefully. It looks complicated, but once you get the rhythm of the join it will become easier. See the photo tutorial for visual instructions.
Joining troubleshooting
- The tr’s don’t line up. Chances are that you either forgot to pick up a stitch by removing your hook from the loop, or you’ve accidentally skipped a st. The only thing to do here is to rip that side out and redo it.
- One side of the motif has more stitches than the other. This happens occasionally and usually means you’ve crocheted sts in the corner space on Round 3 or 4 of the motif. You can either redo the motif, or smuggle a little bit in Round 5 by crocheting sts together on the short side and working multiple sts in one st on the long side.
Joining the half motifs
The half motifs are joined over their short sides to other motifs. Please note that the instructions for the left upper corner and left bottom corner half motifs differ from the general instructions. They’re specified below.
Left upper corner half motif (colour combo 30)
Note: The final side of this motif has no adjacent motif.
Left bottom corner half motif (colour combo 28)
Note: The first side of this motif has no adjacent motif.

Border
The first couple of rounds are a mix of stitches of varying heights. This is so we can fill up the gaps on the long sides of the blanket. It might look complicated, but once you get into the rhythm of the stitches, it will make sense. Have a look at Diagram 4: border R1-R3 for some visual help.
There’s a difference of 4 sts between the two short sides because there’s a half motif more on one side. This will remain throughout the border, and you won’t see this in the end result.
The border should almost lay completely flat at this point. If it instead waves, it means that you have more sts in the border than ‘space’ available. To counter this, check where your blanket waves (this is often on the long sides, above the ch-sps of motifs), and mark with stitch markers if necessary on Round 2. Next, rip out Round 3 and decrease by crocheting either a hdc2tog or dc2tog on the indicated spaces. If need be, work extra decreases in Round 4 and 5.
Weave in all ends and block the blanket to size.
Adjusting the size of the blanket
You can adjust the size of the blanket by adding more motifs. I recommend adding (or removing) in multiples of two: adding two motifs to each row (i.e., 16 motifs per row) or adding two rows to the blanket (i.e., 15 rows). This way, you will not have to adjust any border instructions other than working more or fewer repeats from the pattern as written.
Two motifs add 19 cm (7.5 in) to the length of the blanket, and two rows add 20 cm (8 in) to the height of the blanket.

Diagrams


You might also like


Comments
kas gcb
November 15, 2020 13:03
kas gcb
November 15, 2020 13:23
Michelle
November 16, 2020 07:01
Michelle
November 16, 2020 07:01
Michelle
November 16, 2020 07:02
Kathy
November 27, 2020 12:41
Dell
January 13, 2021 00:48
Judy
September 20, 2022 14:30
Dana
October 01, 2022 14:16
Sarah
December 17, 2022 17:14
Kirsten
December 18, 2022 09:16
Kerstin
September 16, 2023 16:26
Annarita
December 18, 2023 23:33
Kirsten
December 19, 2023 08:34