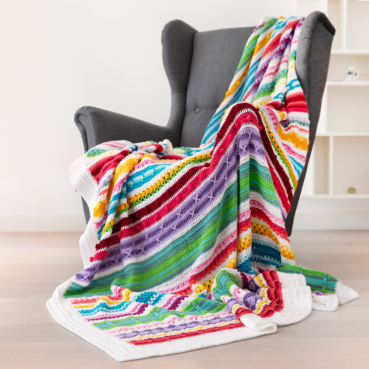
Rainbow Sampler Blanket (Part 11)
15.Jul.20 / Kirsten BalleringMaterials and preparation
You can find all information about yarns and hook sizes in the pattern of week 1.
Yarn
Shop the yarn!
You can find Scheepjes Colour Crafter via your local Scheepjes retailer or order online in these webshops:
Notes
- You can find general information and the patterns for the previous parts for this CAL here.
- Yarn amounts used in part 11 are below. please note: these are my yarn amounts. I'm a loose crocheter. If you need less, that's perfectly fine as long as the blanket looks and feels good.
- Colour A: 49g
- Colour C: 22g
- Colour P: 52g
- Colour Q: 52g
- Colour U: 31g
Abbreviations (US terms)
- ch: chain
- crab st: crab stitch: crochet a sc, then work a sc in the stitch to the right of the previous stitch. This causes the stitch to roll up on itself
- hdc: half double crochet
- RS: Right side
- sc: single crochet
- ss: slip stitch
- WS: Wrong side
Repeat formats
- *….; rep from * once/twice/3x Crochet the instructions after * and then repeat that section a further number of times as indicated.
- (…) once/twice/3x Crochet the instructions between brackets the total number of times indicated.
- […] Indicates the amount of stitches at the end of a row or round.
- (…) in same st/sp Indicates that all instructions between brackets are worked in the same stitch or space.
Crochet pattern
Edging foundation round (Round 180)
Although I am quite enamoured by intricate edgings, I do feel there always needs to be some balance between the edging and body of a blanket. If one’s very intricate, the other should be relatively simple and vice versa. Since the body of our blanket is filled with different stitches, I’m going for a rather straightforward edging.
The original blanket had a couple of rows of hdc all around. I’ve tweaked the original edging a little bit, and added one new final stitch: the crab stitch. It’s a fun stitch to learn and a great way to finish off this blanket. Before we get to the crab stitch, we will need a couple of rows of hdc though to get some ‘body’ to the edging. Follow me!
Where to place those stitches?
In the next round you will crochet in the side of rows. Some rows are higher than others, consisting of hdc, or dc for example. You will find that if you crochet 1 hdc in the side of each row, your stitches will start to lean. So you will need to compensate with extra stitches. The exact placement of where you place these extra stitches is not very important. That’s why I will give you the number of stitches per section, rather than the exact placement. It would make for a very complex and long pattern, and the point of this edging is rather to keep it practical.
Crocheting in or around a stitch
When crocheting in the side of a row, you can choose between crocheting IN the post of the stitch (inserting your hook in the post), or around the post of the stitch (inserting your hook in the space between the post of the first and second stitch of a row). Both methods are fine and depend on what you think looks best. It will not matter for the sizing or integrity of this blanket.
Note: You will be working this round on the RS, NOT the WS. So make sure the blanket is facing with the RS towards you, and start in the upper left corner of the blanket. You will be working along the left long side of the blanket towards the bottom left corner at first.
Note 2: For this edging it does not matter how many stitches you have in your border, as the moss stitch is a repeat of a single stitch. So if you end up with a few stitches more or less in Round 180, that’s perfectly fine. The most important thing is that your blanket lies flat and is not ruffling or pulling on the edge.
What to do when your blanket edge is not straight?
Chances are that the sides of some stitches pull inwards more than others (Larksfoot stitch, looking at you). This is expected and will often be smoothed out in the edging. One of the more reliable ways to see if it will smooth out is to stretch the blanket in width slightly, with your hands. If the previously inwards-pulling sections stay flush with the side and very slowly pull back inwards, then it will probably be okay. If it immediately snaps back, chances are it won't.
There's a solution for this though: you can substitute some stitches in the edging with taller stitches. The principle behind this is very much like the wave rows with the 'anti-waves'. If the body of your blanket is smaller in several sections, simply replace the hdc that are worked in that section with dc. These stitches are taller, and fill up the space to make the blanket edge flush. Since we're not working with pattern repeats in the edging, you can replace any stitch with a dc. Likewise, if a certain part of your blanket sticks out more, you can replace the hdc with a sc. This stitch is shorter and allows for the protruding blanket part to fill up the space that a hdc normally would.
You can substitute the stitches in all edging rounds, except for the final round (the crab stitch) round. So if your edging is not flush yet after the first round, keep on substituting for smaller and larger stitches in the next rounds too.
Round 180 (RS) Join Colour A with a ss in the left side of Row 179. Ch1, and work in this order:
- 12 hdc in Star stitch Section, (over 9 rows)
- 18 hdc in Striped section (over 14 rows)
- 6 hdc in Wave section (over 4 rows)
- 5 hdc in Puff stitch section (over 4 rows)
- 7 hdc in Granny section (over 4 rows)
- 9 hdc in Catherine wheel section (over 6 rows)
- 11 hdc in Herringbone stitch section (over 8 rows)
- 8 hdc in Shell section (over 6 rows)
- 7 hdc in Popcorn section (over 5 rows)
- 4 hdc in Granny section (over 2 rows)
- 11 hdc in Surface crochet section (over 7 rows)
- 8 hdc in Puff stitch section (over 5 rows)
- 13 hdc in Granny section (over 7 rows)
- 15 hdc in Popcorn section (over 12 rows)
- 18 hdc in Striped section (over 14 rows)
- 9 hdc in Catherine wheel section (over 6 rows)
- 9 hdc in Shell section (over 7 rows)
- 9 hdc in Puff stitch section (over 6 rows)
- 9 hdc in Granny section (over 5 rows)
- 6 hdc in Puff stitch section (over 4 rows)
- 17 hdc in Larksfoot section (over 10 rows)
- 11 hdc in Striped section (over 9 rows)
- 11 hdc in Bobble section (over 6 rows)
- 8 hdc in Wave Section (over 6 rows)
- 7 hdc in Granny section (over 4 rows)
- 11 hdc In Popcorn section (over 9 rows)
Ch2, 241hdc across the beginning-chain, ch2,
- 11 hdc in Popcorn section (over 9 rows)
- 7 hdc in Granny section (over 4 rows)
- 8 hdc in Wave Section (over 6 rows)
- 11 hdc in Bobble section (over 5 rows)
- 11 hdc in Striped section (over 9 rows)
- 17 hdc in Larksfoot section (over 10 rows)
- 6 hdc in Puff stitch section (over 4 rows)
- 9 hdc in Granny section (over 5 rows)
- 9 hdc in Puff stitch section (over 6 rows)
- 9 hdc in Shell section (over 7 rows)
- 9 hdc in Catherine wheel section (over 6 rows)
- 18 hdc in Striped section (over 14 rows)
- 15 hdc in Popcorn section (over 12 rows)
- 13 hdc in Granny section over (7 rows)
- 8 hdc in Puff Stitch section (over 6 rows)
- 11 hdc in Surface crochet section (over 7 rows)
- 4 hdc in Granny section (over 2 rows)
- 7 hdc in Popcorn section (over 5 rows)
- 8 hdc in Shell section (over 6 rows)
- 11 hdc in Herringbone stitch section (over 8 rows)
- 9 hdc in Catherine wheel section (over 6 rows)
- 7 hdc in Granny section (over 4 rows)
- 5 hdc in Puff Stitch section (over 4 rows)
- 6 hdc in Wave section (over 4 rows)
- 18 hdc in Striped section (over 14 rows)
- 12 hdc in Star stitch section, (over 9 rows)
Ch2, 241hdc across Row 179, ch2, join with ss in first st of round, cut yarn. [241 hdc on both short sides, 259 hdc on both long sides]
Edging rounds (Rounds 181-187)
From here on, you’ll only work on the RS rows. This means that the blanket will face you with the front side throughout the edging.
Round 181 (RS) Join Colour A with a ss in top left corner, ch1, (1hdc, ch2, 1hdc) in same corner space, 259hdc, (1hdc, ch2, 1hdc) in next corner space, 241hdc, (1hdc, ch2, 1hdc) in next corner space, 259hdc, (1hdc, ch2, 1hdc) in next corner space, 241hdc, join with ss to first hdc. Cut yarn. [243 hdc on both short sides, 261 hdc on both long sides]
Round 182 (RS) Join Colour Q with a ss in top left corner, ch1, (1hdc, ch2, 1hdc) in same corner space, 261hdc, (1hdc, ch2, 1hdc) in next corner space, 243hdc, (1hdc, ch2, 1hdc) in next corner space, 261hdc, (1hdc, ch2, 1hdc) in next corner space, 243hdc, join with ss to first hdc. Cut yarn. [245 hdc on both short sides, 263 hdc on both long sides]
Round 183 (RS) Join Colour Q with a ss in top left corner, ch1, (1hdc, ch2, 1hdc) in same corner space, 263hdc, (1hdc, ch2, 1hdc) in next corner space, 245hdc, (1hdc, ch2, 1hdc) in next corner space, 263hdc, (1hdc, ch2, 1hdc) in next corner space, 245hdc, join with ss to first hdc. Cut yarn. [247 hdc on both short sides, 265 hdc on both long sides]
Round 184 (RS) Join Colour P with a ss in top left corner, ch1, (1hdc, ch2, 1hdc) in same corner space, 265hdc, (1hdc, ch2, 1hdc) in next corner space, 247hdc, (1hdc, ch2, 1hdc) in next corner space, 265hdc, (1hdc, ch2, 1hdc) in next corner space, 247hdc, join with ss to first hdc. Cut yarn. [249 hdc on both short sides, 267 hdc on both long sides]
Round 185 (RS) Join Colour P with a ss in top left corner, ch1, (1hdc, ch2, 1hdc) in same corner space, 267hdc, (1hdc, ch2, 1hdc) in next corner space, 249hdc, (1hdc, ch2, 1hdc) in next corner space, 267hdc, (1hdc, ch2, 1hdc) in next corner space, 249hdc, join with ss to first hdc. Cut yarn. [251 hdc on both short sides, 269 hdc on both long sides]
Round 186 (RS) Join Colour U with a ss in top left corner, ch1, (1hdc, ch2, 1hdc) in same corner space, 269hdc, (1hdc, ch2, 1hdc) in next corner space, 251hdc, (1hdc, ch2, 1hdc) in next corner space, 269hdc, (1hdc, ch2, 1hdc) in next corner space, 251hdc, join with ss to first hdc. Cut yarn. [253 hdc on both short sides, 271 hdc on both long sides]
Your last round of stitches will consist of the crab stitch. The crab stitch is a special stitch. Instead of being worked from right to left, it’s worked from left to right. This means that the stitch will fold and turn over itself, creating a unique little ‘roll’. I find it to be the perfect stitch to finish a blanket.
Round 187 (RS) Join Colour C with a ss in top left corner, ch1, 1sc to the right of your ss in top left corner space (first crab st made), 253crab st, (1crab st, ch2, 1crab st) in top-right corner space, 271crab st, (1crab st, ch2, 1crab st) in bottom-right corner space, 253crab st, (1crab st, ch2, 1crab st) in bottom-left corner space, 271crab st, 1crab st, ch2, join with ss in first crab st. Cut yarn. [255 crab sts on both short sides, 273 crab sts on both long sides]
Fasten off, weave in all ends.
Diagram
Crochet diagram week 11

Key week 11

Yarn colours


Comments
I recommend wet-blocking for this blanket (or spray blocking as second best, as acrylics don't tend to bleed colour). I've got a complete tutorial of all blocking methods on haakmaarraak.nl/blocking :) July 23, 2020 09:44 - Reply