Rainbow Sampler Blanket (Part 4)
27.May.20 / Kirsten BalleringMaterials and preparation
You can find all information about yarns and hook sizes in the pattern of week 1.
Yarn
Shop the yarn!
You can find Scheepjes Colour Crafter via your local Scheepjes retailer or order online in these webshops:
Notes
- You can find general information and the patterns for the previous weeks for this CAL here.
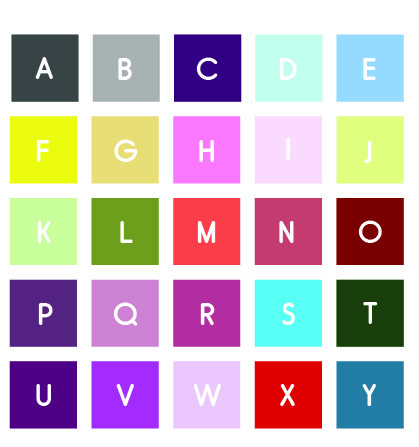
- Yarn amounts used in Part 4:
- Colour A: 39g
- Colour E: 10g
- Colour F: 18g
- Colour J: 19g
- Colour Q: 17g
- Colour R: 19g
- Colour S: 21g
Abbreviations (US terms)
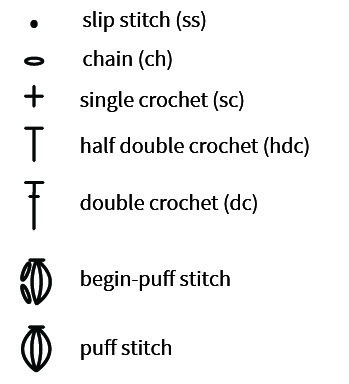
- begin-puff stitch: ch2, (yarn over, insert hook in stitch, yarn over, pull up loop) 3x in the same stitch, yarn over, pull through all loops on hook
- dc: double crochet
- ch: chain
- hdc: half double crochet
- puff stitch: (yarn over, insert hook in stitch, yarn over, pull up loop) 4x in the same stitch, yarn over, pull through all loops on hook
- RS: Right side
- sc: single crochet
- ss: slip stitch
- st(s): stitch(es)
- WS: Wrong side
Repeat formats
- *….; rep from * once/twice/3x Crochet the instructions after * and then repeat that section a further number of times as indicated.
- *…; rep to end Crochet the instructions after * and then repeat that section to the end of the row or round.
- […] Indicates the amount of stitches at the end of a row or round.
- (…) in same st/sp Indicates that all instructions between brackets are worked in the same stitch or space.
Techniques
Granny Clusters
Click here for the tutorial about granny clusters.
Puff Stitches
Click here for the tutorial about the puff stitch.
Shell Stitch
Click here for the tutorial about the shell stitch.Crochet pattern
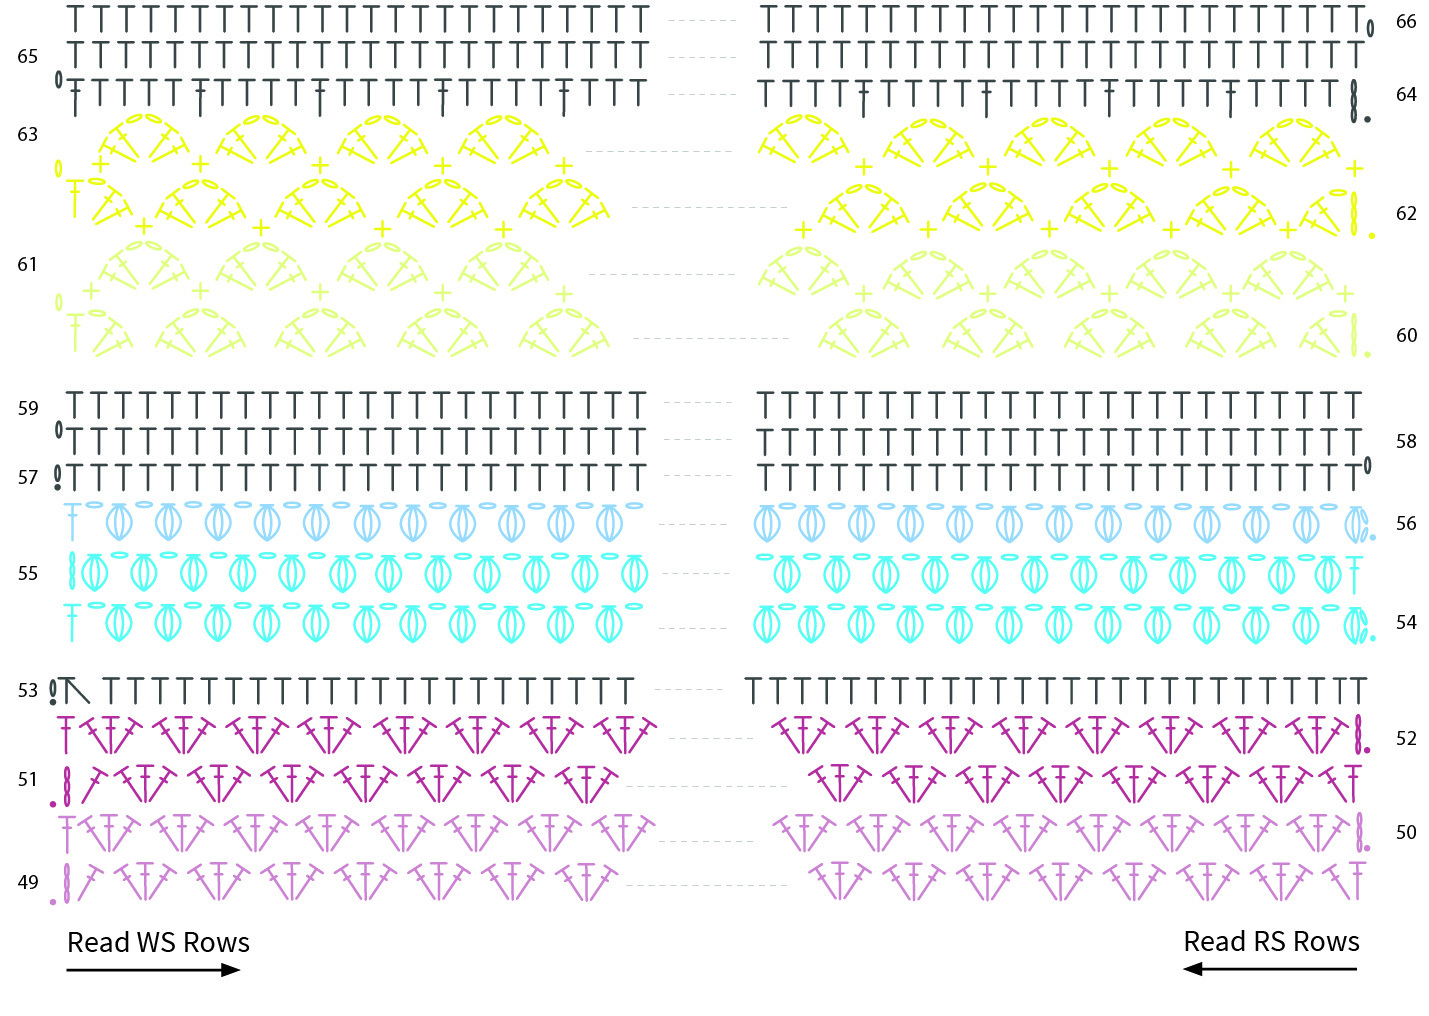
Granny Cluster Section 2 (Rows 49-53)
We will be repeating the instructions for the previous Granny Clusters here, only we’re starting from the WS instead of the RS and will not change colours as often. I’ve written the complete instructions below. But rest assured, if you’ve done section 1 this will be a breeze!
Row 49 (WS) Join Colour Q with a ss in first st, ch3 (counts as first dc), 1dc in same st, *skip 2 sts, 3dc in next st; repeat from * another 78 times, skip 2 sts, 2dc in last stitch, turn. [79 Granny clusters with 3 dc, 2 clusters with 2 dc, 241 dc in total]
Row 50 (RS) Ch3 (counts as first dc), *3dc in space between clusters of previous row; repeat from * another 79 times, 1dc in third ch of begin-ch3 of previous row. Cut yarn, turn. [80 Granny clusters with 3 dc, 2 dc, 242 dc in total]
Row 51 (WS) Join Colour R with a ss in first st, ch3 (counts as first dc), 1dc in first space between clusters, *3dc in next space between clusters; repeat from * another 78 times, 1dc in final space, 1dc in third ch of begin-ch3 of previous row, turn. [79 Granny clusters with 3 dc, 2 clusters with 2 dc, 241 dc in total]
Row 52 (RS) Repeat Row 50. [80 Granny clusters with 3 dc, 2 dc, 242 dc in total]
Row 53 (WS) Join Colour A with a ss in first st, ch1, 1hdc in same st, 239hdc, 1hdc2tog in final 2 sts, cut yarn, turn. [241 hdc]
That last hdc2tog is necessary to reduce our stitch count from 242 back to 241 again!
Puff Stitch section 2 (Rows 54-59)
Puff stitches create are just divine. I like using them as a contrast row, or as an edging. They’re not too big and add just little more visual flair than a regular edging.
For full measure, I’ve written down the instructions for the puff stitch rows below again.
Row 54 (RS) Join Colour S with a ss in first st, begin-puff stitch in same st, *ch1, skip 1 st, puff stitch; repeat from * another 118 times, ch1, skip 1 st, 1dc in last stitch, turn. [1 begin-puff stitch, 119 puff stitches, 120 ch, 1 dc]
If you look closely to your stitches, you can see that the chains you’re crocheting look like they’re laying on top of the puff stitches!
Row 55 (WS) Ch3 (counts as first dc), puff stitch in first ch-1 space, *ch1, skip 1 st, puff stitch in next ch-1 space; repeat from * another 118 times, 1dc in last puff stitch, cut yarn, turn. [120 puff stitches, 119 ch, 2 dc]
Row 56 (RS) Join Colour E with ss in first st, repeat Row 54, cut yarn, turn. [1 begin-puff stitch, 119 puff stitches, 120 ch, 1 dc]
Row 57 (WS) Join Colour A with a ss in first st, ch1, 1hdc in same st, *1hdc in ch, 1hdc in puff stitch; repeat from * another 118 times, 1hdc in last ch, 1hdc in final puff stitch, ch1, turn. [241 hdc]
Row 58 (RS) 241hdc, ch1, turn. [241 hdc]
Row 59 (WS) 241hdc, cut yarn, turn. [241 hdc]
Shell section 1 (Rows 60-66)
We’re going to be crocheting shells in this section. There are many different types of shells. What they all have in common is that they’re worked from one stitch, fanning out (hence the name ‘shell’). They’re a classic stitch. My great-grandma made several shawls in shell stitches, and those shawls are from ~ 1950!
I found that tension makes a difference for the next few rows. If your tension is very loose, your shell row might start to wiggle and fan out a little bit. You can tell because if you put your blanket on a flat surface and smooth it out with your hands, the shell row will not lay flat. That’s because there’s simply too much yarn to occupy the space for these rows. If your tension is tight, you will find that the method below will cause your blanket to pull inwards. That’s because there’s too little yarn for your rows to stretch comfortably. So make sure that you keep an eye on your tension and get your shells to lie flat after Row 61. Trust me; you’d rather only pull out two rows and do them over, instead of regretting not fixing it for the remainder of the CAL. Part of the learning process is getting to know your tension and make adaptations based on that.
Row 60 (RS) Join Colour J with a ss in first st, (ch4 (counts as first dc + 1 ch), 2dc) in same st, skip 4 sts, *(2dc, ch2, 2dc) in same st, skip 4 sts; repeat from * another 45 times, (2dc, ch2, 2dc) in same st, skip 4 sts, (2dc, ch1, 1dc) in final st, ch1, turn. [47 shells, 2 half shells (one on each end), 48 spaces where you skipped 4 sts]
Row 61 (WS) Skip first dc, 1sc in ch-1 space of first half shell, *(2dc, ch2, 2dc) in space between shells from previous row, 1sc in ch-2 space of next shell; repeat from * another 46 times, (2dc, ch2, 2dc) in space between shells from previous row, 1sc in ch-1 space of half shell, cut yarn, turn. [48 shells, 49 sc]
Row 62 (RS) Join Colour F with a ss in the ch-1 space of Row 60 (so not in the sc that you’ve ended Row 61 with, but the space below), ch4 (counts as first dc + ch 1), 2dc in same ch-1 space, 1sc in ch-2 space of next shell of Row 61, *(2dc, ch2, 2dc) in next space between shells (this is also the ch-2 space in the first complete shell of Row 60), 1sc in ch-2 space of next shell in Row 61; repeat from * another 46 times, (2dc, ch1, 1dc) in ch-1 space of half shell in Row 60, ch1, turn. [47 shells, 2 half shells (one on each end), 48 sc]
Row 63 (WS) Repeat Row 61. [48 shells, 49 sc]
The next row is a compensation row. You will need to compensate for the difference in height in the shells before we can resume our regular 241 hdc-rows. We'll do that by working double crochets in the pieces of the shell that are lower than the fans.
Row 64 (RS) Join Colour A with a ss in first st, ch3 (counts as first dc), mark the third ch with a stitch marker or contrasting piece of. yarn, *1hdc in each of the next 2 sts, skip ch-2 space, 1hdc in each of the next 2 sts, 1dc in sc; repeat from * another 46 times, 1hdc in each of next 2 sts, skip ch-2 space, 1hdc in each of the next 2 sts, 1dc in sc, ch1, turn. [192 hdc, 49 dc]
Row 65 (WS) 241hdc, ch1, turn. [241 hdc]
The stitch markers placed in the last row of the Shells will help you identify the right chain to crochet in. Remove marker.
Row 66 (RS) 241hdc, cut yarn, turn. [241 hdc]
Continue with part 5 of the Rainbow Sampler Blanket.
Diagram
Crochet diagram Week 4

Key Week 4

Yarn colours


Comments