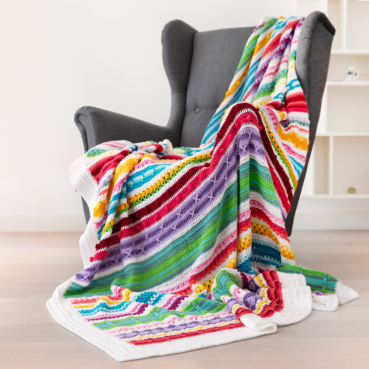
Rainbow Sampler Blanket (Part 8)
24.Jun.20 / Kirsten BalleringMaterials and preparation
You can find all information about yarns and hook sizes in the pattern of week 1.
Yarn
Shop the yarn!
You can find Scheepjes Colour Crafter via your local Scheepjes retailer or order online in these webshops:
Notes
- You can find general information and the patterns for the previous parts for this CAL here.
- Yarn amounts used in Week 8 are below. please note: these are my yarn amounts. I'm a loose crocheter. If you need less, that's perfectly fine as long as the blanket looks and feels good.
- Colour A: 40g
- Colour C: 18g
- Colour E: 20g
- Colour H: 13g
- Colour P: 29g
- Colour R: 10g
- Colour X: 12g
- Colour Y: 18g
Abbreviations (US terms)
- ch: chain
- ch-space: chain space: the space below the chain of the previous row. The same goes for ch-2 space, ch-3 space etc.
- dc: double crochet
- dc3tog: double crochet 3 stitches together to decrease the stitch count by 2: (yarn over, insert hook in stitch, yarn over, pull up loop, yarn over, pull through first two loops on hook) once in each of three stitches, yarn over, pull through all loops on hook
- dc7tog: double crochet 7 stitches together to decrease the stitch count by 6: (yarn over, insert hook in stitch, yarn over, pull up loop, yarn over, pull through first two loops on hook) once in each of seven stitches, yarn over, pull through all loops on hook
- hdc: half double crochet
- hhdc: herringbone half double crochet: yarn over, insert hook in stitch, yarn over, pull up loop and pull directly through first loop on hook, yarn over, pull through all loops on hook
- RS: right side
- st(s): stitch(es)
- ss: slip stitch
- WS: wrong side
Repeat formats
- *….; rep from * once/twice/3x Crochet the instructions after * and then repeat that section a further number of times as indicated.
- (…) once/twice/3x Crochet the instructions between brackets the total number of times indicated.
- […] Indicates the amount of stitches at the end of a row or round.
- (…) in same st/sp Indicates that all instructions between brackets are worked in the same stitch or space.
Techniques
Shell Stitch
Click here for the tutorial about the shell stitch.
Herringbone Stitch
Click here for the tutorial about the herringbone stitch.
Catherine Wheel
Click here for the tutorial about the catherine wheel.
Crochet pattern
Shell Section 2 (Rows 125-130)
This shell pattern is the same as the previous shell section, however, due to the use of colour it looks completely different. It’s amazing to see what a difference colour placement can make!
In a ‘standard’ shell pattern you work the shells in the single crochets (or similar stitches, this depends on the pattern) that you crochet between shells of the previous row. Doing so creates a flat and lacy pattern. If you crochet in the spaces between shells instead of in single crochets like we do, you create a denser, thicker fabric. Perfect for a blanket, not so perfect for a shawl. As you see, there are many ways to vary on a standard shell pattern.
Row 125 (WS) Join Colour P with a ss in first st, (ch4 (counts as first dc + ch 1), 2dc) in same st, skip 4 sts, *(2dc, ch2, 2dc) in same st, skip 4 sts; repeat from * another 45 times, (2dc, ch2, 2dc) in same st, skip 4 sts, (2dc, ch1, 1dc) in final st, cut yarn, turn. [47 shells, 2 half shells (one on each end), 48 spaces where you skipped 4 sts]
Row 126 (RS) Join Colour C with a ss in first dc, ch1, 1sc in ch-1 space of first half shell, *(2dc, ch2, 2dc) in space between shells from previous row, 1sc in ch-2 space of next shell; repeat from * another 46 times, (2dc, ch2, 2dc) in space between shells from previous row, 1sc in ch-1 space of half shell, cut yarn, turn. [48 shells, 49 sc]
Row 127 (WS) Join Colour P with a ss in the ch-1 space of Row 125 (so not in the sc that you’ve ended Row 126 with, but the space below), ch4 (counts as first dc + ch1), 2dc in same ch-1 space, 1sc in ch-2 space of next shell of Row 126, *(2dc, ch2, 2dc) in next space between shells (this is also the ch-2 space in the first complete shell of Row 125), 1sc in ch-2 space of next shell in Row 126; repeat from * another 46 times, (2dc, ch1, 1dc) in ch-1 space of half shell in Row 125, cut yarn, turn. [47 shells, 2 half shells (one on each end), 48 sc]
Row 128 (RS) Repeat Row 126. [48 shells, 49 sc]
The next row is a compensation row. You will need to compensate for the difference in height in the shells, before we can resume our regular 241 hdc-rows.
Row 129 (WS) Join Colour A with a ss in first st, ch3 (counts as first dc), mark the third ch with a stitch marker, *1hdc in each of the next 2 sts, skip ch-2 space, 1hdc in each of the next 2 sts, 1dc in sc; repeat from * another 46 times, 1hdc in each of next 2 sts, skip ch-2 space, 1hdc in each of the next 2 sts, 1dc in sc, ch1, turn. [192 hdc, 49 dc]
Row 130 (RS) 241hdc, ch1, cut yarn. [241 hdc]
The stitch markers help you find the chains in which to crochet your hdc’s in. Remove them after this row.
Herringbone Section (Rows 131-138)
The Herringbone stitch is a stitch I found quite early in my crochet journey. It’s an adaptation of the regular hdc. By changing the way you work your loops you create a diagonal loop that resembles the traditional (knit) herringbone stitch. One of the ‘downsides’ of this stitch is that it doesn’t work in rows, so we’ll have to start at the RS for each row in this section.
The herringbone stitch feels quite rough for a crocheted stitch. It’s a great stitch for protective cases, bathmats, anything that needs to be able to withstand a bit of wear and tear.
Remember, you are starting on the RS again!
Row 131 (RS) Join Colour H with a ss in first st, ch1, 1hhdc in same st, 240hhdc, ch1, cut yarn, don’t turn. [241 hhdc]
Don’t forget to double-check that your herringbone stitch is showing on the right side of your blanket. It’s the side with the rougher (and prettier) texture.
Also, please make sure that you’re actually joining your new row into the first hhdc. These stitches, by nature, lean to the left, so be careful that you’re not accidentally joining in the ch1 you started your Row with (and subsequently, end up with 242 hhdc).
Row 132 (RS) Start on RS again. Join Colour H with a ss in first st, ch1, 1hhdc in same st, 240hhdc, cut yarn, don’t turn. [241 hhdc]
Row 133 (RS) Start on RS again. Join Colour R with a ss in first st, ch1, 1hhdc in same st, 240hhdc, cut yarn, don’t turn. [241 hhdc]
Row 134 (RS) Start on RS again. Join Colour R with a ss in first st, ch1, 1hhdc in same st, 240hhdc, cut yarn, don’t turn. [241 hhdc]
Row 135 (RS) Start on RS again. Join Colour X with a ss in first st, ch1, 1hhdc in same st, 240hhdc, cut yarn, don’t turn. [241 hhdc]
Row 136 (RS) Start on RS again. Join Colour X with a ss in first st, ch1, 1hhdc in same st, 240hhdc, cut yarn, don’t turn. [241 hhdc]
Row 137 (RS) Start on RS again. Join Colour A with a ss in first st, ch1, 1hdc in same st, 1hdc in each of the next 240 sts, ch1, turn. [241 hdc]
Row 138 (WS) 241hdc, cut yarn, turn. [241 hdc]
Catherine Wheel Section 2 (Rows 139-144)
Let’s get crazy, and make another section of Catherine wheels!
Row 139 (RS) Join Colour E with a ss in first st, 1sc in same st, *skip 2 sts, (3dc, ch1, 3dc) in same st, skip 2 sts, 1sc in next st; repeat from * another 37 times, skip 2 sts, (3dc, ch1, 3dc) in same st, skip 2sts, 1sc in last stitch, cut yarn, turn. [41 sc, 40 3dc-ch1-3dc clusters, 80 spaces where you skipped 2 stitches]
Row 140 (WS) Join Colour Y with a ss in first st, ch3 (counts as first dc), dc3tog, ch7, skip ch-1 space, *dc7tog, ch7, skip ch-1 space; repeat from * another 38 times, dc3tog, 1dc in final st, turn. [39 half Catherine wheels, 2 quarter wheels (one on each end), 2 dc]
Row 141 (RS) Ch3 (counts as first dc), 3dc in dc3tog (there’s an ‘eye’ in the centre of the wheel, that’s where you’ll be working your stitches), 1sc over the ch7 of your previous row into the ch-1 space of Row 139, *(3dc, ch1, 3dc) in next dc7tog, 1sc over the ch7 of your previous row into the next ch-1 space of Row 139; repeat from * another 38 times, 3dc in final dc3tog, 1dc in last dc (the ch3 with which you started Row 140), cut yarn, turn. [39 half Catherine wheels, 2 quarter Catherine wheels (one on each end), 2 dc]
Since we’re only going to work one row of Catherine wheels the next row will look like Row 140, but will not be exactly the same. If you would crochet 7 chains as the ‘top’ row of the Catherine wheel, you can imagine that all your next rows would have quite the gap. Instead, we’ll be securing the chain to the Catherine wheels. This way, you can continue with the rest of your blanket without big gaps. Basically, we’re mirroring Row 139.
Row 142 (WS) Join Colour E with a ss in first st, 1sc in same st, *ch3, dc7tog, ch3, 1sc in ch-1 space of Row 141; repeat from * another 38 times, ch3, dc7tog, ch3, 1sc in last dc (the ch3 with which you started Row 141), cut yarn, turn. [41 sc, 40 dc7tog, 80 ch-3]
We’ll need to make sure we’re going back to 241 hdc in the next row. This means counting! Luckily, we can look to Row 139 for that. Each Catherine wheel took up 6 stitches (1sc, 2 skipped stitches, a Catherine wheel and then 2 skipped stitches again) for every repeat. So we’ll just need to make sure we’re working 6 stitches per Catherine wheel to get back to 240 plus the final stitch that we’ve used to fasten the last wheel.
Row 143 (RS) Join Colour A with a ss in first st, ch1, 1hdc in same st, *2hdc in ch-3 space, 1hdc in dc7tog, 2hdc in next ch-3 space, 1hdc in sc; repeat from * another 38 times, 2hdc in ch-3 space, 1hdc in dc7tog, 2hdc in ch-3 space, 1hdc last sc, ch1, turn. [241 hdc]
Row 144 (WS) 241hdc, cut yarn, turn. [241 hdc]
Continue with part 9 of the Sampler Blanket.
Diagram
Crochet diagram week 8

Key Week 8

Yarn colours


Comments
Be the first to comment to this post!