Rainbow Sampler Blanket 2 (Part 11)
07.Dec.23 / Kirsten BalleringAre you ready to continue your Sampler adventure? The Rainbow Sampler Blanket 2 features more stitches, vibrant colours, and a sprinkle of yarn magic.
Designed for adventurous beginners who want to take their crochet skills to the next level, this blanket teaches you everything you need to know about more advanced stitch patterns.
Other pattern parts can be found here:
Materials and preparation
Yarn
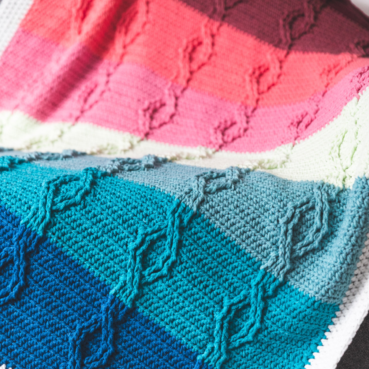
Original Colours
Scheepjes Colour Crafter (100% Premium Acrylic, 100g/300m)- Colour A: 1001 Weert x 6 balls
- Colour B: 1132 Leek x 1 ball
- Colour C: 1083 Tilburg x 1 ball
- Colour D: 1123 Roermond x 1 ball
- Colour E: 2004 Brussel x 1 ball
- Colour F: 1277 Amstelveen x 1 ball
- Colour G: 1432 Heerlen x 1 ball
- Colour H: 1130 Sittard x 1 ball
- Colour I: 1241 Den Bosch x 1 ball
- Colour J: 1821 Terneuzen x 1 ball
- Colour K: 1725 Ameland x 1 ball
- Colour L: 1422 Eelde x 1 ball
- Colour M: 2009 Kortrijk x 1 ball
- Colour N: 2006 Luik x 1 ball
- Colour O: 1068 Den Helder x 1 ball
- Colour P: 1034 Urk x 1 ball
- Colour Q: 2015 Bastogne x 1 ball
- Colour R: 1114 Eindhoven x 1 ball
- Colour S: 1263 Leerdam x 1 ball

Shop the yarn!
If you're looking for Colour Crafter, you can find it at your local retailer or online through one of these links:
Crochet hook
5.0mm (US size H/8).
Measurements
The blanket measures 170 x 210cm (67 x 82 ½in) after blocking.
Gauge/tension
See pattern of part 1 for gauge information.
Notes
- Colours used this week are:
- Colour A: 42g
- Colour I: 12g
- Colour J: 18g
- Colour K: 17g
- Colour L: 12g
- In most rows, you’ll make a ch1 before turning your blanket. This is a turning chain and does not count as a stitch. If you find a ch1 is too small, you can also make a ch2. This depends on how tight you crochet.
Abbreviations (US terms)
- begin-bobble: ch2, (yarn over, insert hook in stitch, yarn over, pull up loop, yarn over, pull through two loops on hook) 5x in the same stitch or space, yarn over, pull through all loops on hook
- begin-puff stitch: ch1, (yarn over, insert hook in stitch, yarn over, pull up loop) 3x in the same stitch, yarn over, pull through all loops on hook
- BLO: back loop only
- bobble: (yarn over, insert hook in stitch, yarn over, pull up loop, yarn over, pull through two loops on hook) 6x in the same stitch, yarn over, pull through all loops on hook
- ch: chain(s)
- dc: double crochet
- dc2tog: double crochet 2 stitches together to decrease the stitch count by 1: (yarn over, insert hook in stitch, yarn over, pull up loop, yarn over, pull through first two loops on hook) once in each of two stitches, yarn over, pull through all loops on hook
- dc3tog: double crochet 3 stitches together to decrease the stitch count by 2: (yarn over, insert hook in stitch, yarn over, pull up loop, yarn over, pull through first two loops on hook) once in each of three stitches, yarn over, pull through all loops on hook
- dc7tog: double crochet 7 stitches together to decrease the stitch count by 6: (yarn over, insert hook in stitch, yarn over, pull up loop, yarn over, pull through first two loops on hook) once in each of seven stitches, yarn over, pull through all loops on hook
- FL: front loop
- FPdc: front post double crochet: Yarn over, insert your hook around the post of the stitch indicated in the pattern, yarn over, pull up a loop, yarn over, pull through first two loops on hook, yarn over, pull through all loops on hook
- hdc: half double crochet
- hdc2tog: half double crochet 2 stitches together to decrease the stitch count by 1: (yarn over, insert hook in stitch, yarn over, pull up loop) in each of two stitches, yarn over, pull through all loops on hook
- popcorn: 6dc in same stitch, remove hook from loop, insert hook from front to back through first dc, pick up loop, pull through dc to close popcorn
- puff stitch: (yarn over, insert hook in stitch, yarn over, pull up loop) 4x in the same stitch, yarn over, pull through all loops on hook
- RS: right side
- sc: single crochet
- ss: slip stitch
- s(ts): stitch(es)
- tr: treble crochet
- wrapped st: wrapped stitch: (yarn over, insert hook in stitch, yarn over, pull up loop to working height) 2x in same space, yarn over, pull through all loops on hook
- WS: wrong side
Repeat formats
- *….; rep from * once/twice/3x Crochet the instructions after * and then repeat that section a further number of times as indicated.
- *…; rep to end Crochet the instructions after * and then repeat that section to the end of the row or round.
- (…) once/twice/3x Crochet the instructions between brackets the total number of times indicated.
- […] Indicates the amount of stitches at the end of a row or round.
- (…) in same st/sp Indicates that all instructions between brackets are worked in the same stitch or space.
Colour layout

Crochet pattern
Popcorn section 3
The final section with popcorns. Enjoy!
Row 189 (WS) Join Colour R with a ss in first stitch, ch1, 1hdc in same st, 216hdc, ch1, turn. [217 hdc]
Row 190 (RS) 8hdc, *popcorn, 7hdc; repeat from * another 23 times, popcorn, 8hdc, ch1, turn. [25 popcorn, 192 hdc]
Row 191 (WS) 217hdc, cut yarn, turn. [217 hdc]
Row 192 (RS) Join Colour A with a ss in first st, ch1, 1hdc in same st, 216hdc, ch1, turn. [217 hdc]
Row 193 (WS) 217hdc, cut yarn, turn. [217 hdc]
Jacob's Ladder section 2
this blanket. We’re adding in one extra section, to add a little bit of symmetry to this blanket. I know it was one of the more difficult stitches in this blanket. So if you did not enjoy the first part, you can leave it out. The blanket will end up about 10cm shorter if you do, but that’s all.
Row 194 (RS) Join Colour K with a ss in the first stitch, ch1, 1hdc in the same st, 5hdc, (1hdc, ch5, 1ss in last hdc), *11hdc, (1hdc, ch5, 1ss in last hdc); repeat from * another 16 times, 6hdc, ch1, turn. [18 ch-5 loops in hdc, 199 hdc]
The hdc in which you slip-stitched the five chains is now called ch5-hdc.
Row 195 (WS) 6hdc (you end up on the right side of the ch5-hdc), ch5, *skip the ch-5 loop of the previous row, 12hdc, ch5; repeat from * another 16 times, skip the ch-5 loop of the previous row, 7hdc, cut yarn, turn. [18 ch-5 spaces, 217 hdc]
Row 196 (RS) Join Colour J with a ss in the first stitch, ch1, 1hdc in the same stitch, 6hdc (the last hdc looks like it’s going in the chain, but it actually is the loop of the hdc), ch5, *skip ch-5 space, 12hdc, ch5; repeat from * another 16 times, 6hdc, ch1, turn. [18 ch-5 spaces, 217 hdc]
Row 197 (WS) 6hdc, ch5, *12hdc, ch5; repeat from * another 16 times, 7hdc, cut yarn, turn. [18 ch-5 spaces, 217 hdc]
Row 198 (RS) With Colour L, repeat Row 196. [18 ch-5 spaces, 217 hdc]
Row 199 (WS) Repeat Row 197. [18 ch-5 spaces, 217 hdc]
Row 200 (RS) With Colour J, repeat Row 196. [18 ch-5 spaces, 217 hdc]
Now, ladder up all Jacob’s ladders. If they get undone, secure them with a stitch marker. Make sure to ladder them up on the RS!
Row 201 (WS) 6hdc, 1ss in top of first ladder, skip st after ladder, *11hdc, 1ss in top of ladder, skip st after ladder; repeat from * another 16 times, 6hdc, cut yarn, turn. [18 ss, 199 hdc]
If skipping the stitch after the ladder leaves too big of a gap, you can decide to make a hdc2tog in the first and second stitch after the ladder. It leads to the same result (i.e. 11 stitches in between slip stitches).
Row 202 (RS) Join Colour A with a ss in the first stitch, ch1, 1hdc in same st, 216hdc, ch1, turn. [217 hdc]
Row 203 (WS) 217hdc, cut yarn, turn. [217 hdc]
Tulip section 3
We’ll be finishing the body of this blanket with a final row of Tulip stitches. Maybe you have ideas on how to make this row truly your own? For example, with your favourite colours, or maybe with different colours in the same row, or maybe something different altogether?
Row 204 (RS) Join Colour K with a ss in the first stitch, ch4, 1dc in same st as the first ch (so the first stitch), skip next 2 stitches, *(1dc, ch2, 1dc) in same stitch, skip next 2 stitches; repeat from * another 70 times, (1dc, ch1, 1dc) in last stitch, cut yarn, turn. [71 full V’s and 2 smaller V’s on both ends]
As you can see, this first row of the Tulip stitch is very much alike to the V stitch. You can see the leaves of each tulip forming in green. Next, we will make bobble stitches to form the tulip’s flower.
Row 205 (WS) Join Colour I with a ss in the first V-space. Ch2, begin-bobble, *ch2, skip the dc’s, bobble in next V-space; repeat from * another 71 times, cut yarn, turn. [73 bobbles]
Row 206 (RS) Join Colour A with a ss in the top of the first bobble. Ch1, 1hdc in same stitch, 2hdc in the next ch-2 space, *1hdc in top of bobble, 2hdc in the next ch-2 space; repeat from * another 70 times, 1hdc in the final bobble, ch1, turn. [217 hdc]
The white row will most likely pull a bit inward here, especially on top of the first and last puff stitch. But that’s okay - we’ll sort it out with the edging.
Row 207 (WS) 217hdc, ch1, turn. [217 hdc]
Row 208 (RS) 217hdc, cut yarn. [217 hdc]
Weave in all your ends, if you haven’t done that already.
Blocking
Checking the shape
If you have the space and opportunity, I would recommend wet- or sprayblocking your blanket at this point. It helps to see where your blanket pulls inwards and possibly flares so you can counter this in your first couple of edging rows. If you don’t have the space, simply lay your blanket flat and have a look at it, and where it flares or pulls - write the section(s) down so you can refer to them when making the edging.
Blocking
After finishing Row 208, my blanket measured approximately 145 x 180cm (57 x 71in). I blocked the blanket to around 160 x 220cm (63 x 87in), but it’s more important for you to make sure that you make it as rectangular as possible, than to approximate my measurements (those might differ for everybody).
You can find an extensive blocking tutorial on my website, but the short version is as follows: simply stretch the blanket to the point where you can pin it in a rectangular shape, and where there are no ‘peaks’ forming where your pins are. If so, pin again and stretch the blanket a little less. Next, use a spray bottle with lukewarm water (and optionally some Eucalan) to make your blanket wet. Let it air dry, and then take out the pins.
The ideal scenario is that after you block your blanket, you remove the pins and leave it on the ground for another day so you can see the final shape once all external tension (from the pins) is removed. This gives you the best approximation of the final shape of your blanket. After blocking, my blanket stretched back to approximately 150 x 200cm (59 x 79in).

Diagram
Chart Part 11

Key (US terms)


Comments
Be the first to comment to this post!