

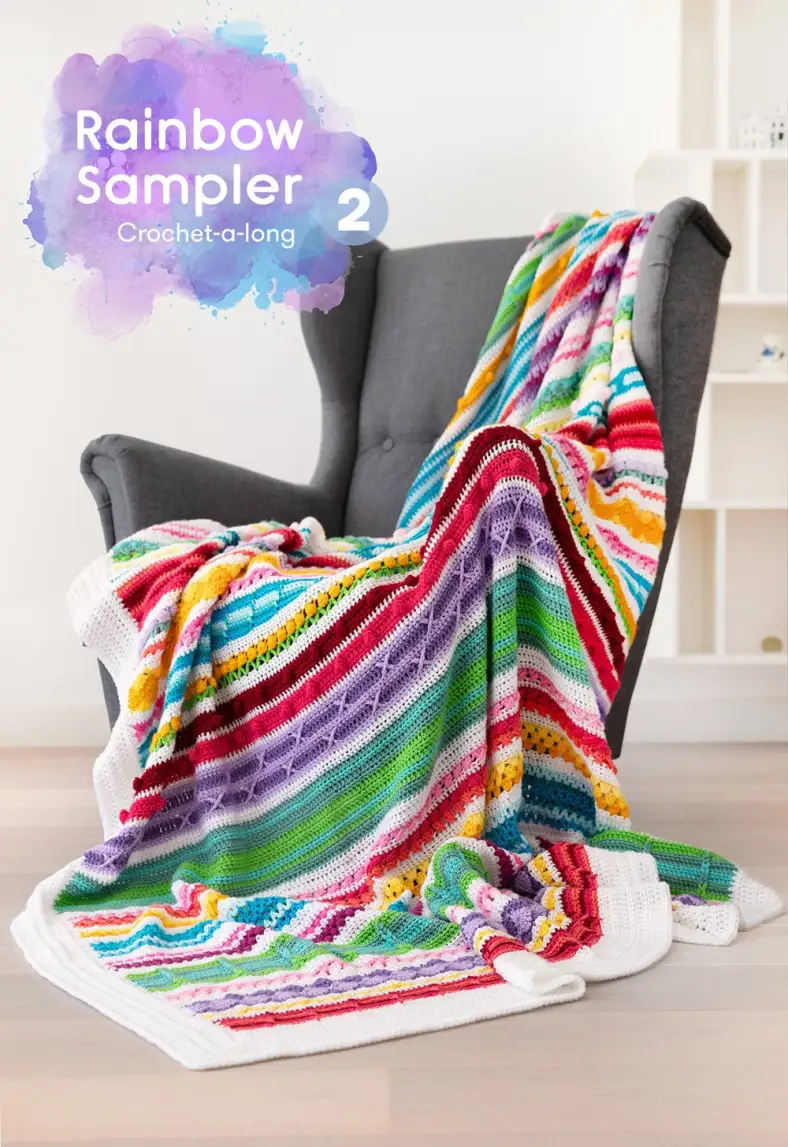
Are you ready to continue your Sampler adventure? The Rainbow Sampler Blanket 2 features more stitches, vibrant colours, and a sprinkle of yarn magic.
Designed for adventurous beginners who want to take their crochet skills to the next level, this blanket teaches you everything you need to know about more advanced stitch patterns.
Other pattern parts can be found here:
Materials and preparation
Yarn
| Label | Colour name | Code | Amount |
|---|---|---|---|
| Colour A | Weert | 1001 | 6 balls |
| Colour B | Leek | 1132 | 1 ball |
| Colour C | Tilburg | 1083 | 1 ball |
| Colour D | Roermond | 1123 | 1 ball |
| Colour E | Brussel | 2004 | 1 ball |
| Colour F | Amstelveen | 1277 | 1 ball |
| Colour G | Heerlen | 1432 | 1 ball |
| Colour H | Sittard | 1130 | 1 ball |
| Colour I | Den Bosch | 1241 | 1 ball |
| Colour J | Terneuzen | 1821 | 1 ball |
| Colour K | Ameland | 1725 | 1 ball |
| Colour L | Eelde | 1422 | 1 ball |
| Colour M | Kortrijk | 2009 | 1 ball |
| Colour N | Luik | 2006 | 1 ball |
| Colour O | Den Helder | 1068 | 1 ball |
| Colour P | Urk | 1034 | 1 ball |
| Colour Q | Bastogne | 2015 | 1 ball |
| Colour R | Eindhoven | 1114 | 1 ball |
| Colour S | Leerdam | 1263 | 1 ball |
Shop the yarn!
If you're looking for Colour Crafter, you can find it at your local retailer or online through one of these links:
Crochet hook
5.0mm (US size H/8)
Measurements
170 x 210 cm (67 x 82 ½ in)
Gauge/tension
See pattern of part 1 for gauge information
Abbreviations (US terms)
- begin-bobble
- ch2, (yarn over, insert hook in stitch, yarn over, pull up loop, yarn over, pull through two loops on hook) 5x in the same stitch or space, yarn over, pull through all loops on hook
- begin-puff stitch
- ch1, (yarn over, insert hook in stitch, yarn over, pull up loop) 3x in the same stitch, yarn over, pull through all loops on hook
- BLO
- back loop only
- bobble
- (yarn over, insert hook in stitch, yarn over, pull up loop, yarn over, pull through two loops on hook) 6x in the same stitch, yarn over, pull through all loops on hook
- ch
- chain(s)
- dc
- double crochet
- dc2tog
- double crochet 2 stitches together to decrease the stitch count by 1: (yarn over, insert hook in stitch, yarn over, pull up loop, yarn over, pull through first two loops on hook) once in each of two stitches, yarn over, pull through all loops on hook
- dc3tog
- double crochet 3 stitches together to decrease the stitch count by 2: (yarn over, insert hook in stitch, yarn over, pull up loop, yarn over, pull through first two loops on hook) once in each of three stitches, yarn over, pull through all loops on hook
- dc7tog
- double crochet 7 stitches together to decrease the stitch count by 6: (yarn over, insert hook in stitch, yarn over, pull up loop, yarn over, pull through first two loops on hook) once in each of seven stitches, yarn over, pull through all loops on hook
- FL
- front loop
- FPdc
- front post double crochet: Yarn over, insert your hook around the post of the stitch indicated in the pattern, yarn over, pull up a loop, yarn over, pull through first two loops on hook, yarn over, pull through all loops on hook
- hdc
- half double crochet
- hdc2tog
- half double crochet 2 stitches together to decrease the stitch count by 1: (yarn over, insert hook in stitch, yarn over, pull up loop) in each of two stitches, yarn over, pull through all loops on hook
- popcorn
- 6dc in same stitch, remove hook from loop, insert hook from front to back through first dc, pick up loop, pull through dc to close popcorn
- puff stitch
- (yarn over, insert hook in stitch, yarn over, pull up loop) 4x in the same stitch, yarn over, pull through all loops on hook
- RS
- right side
- sc
- single crochet
- ss
- slip stitch
- s(ts)
- stitch(es)
- tr
- treble crochet
- wrapped st
- wrapped stitch: (yarn over, insert hook in stitch, yarn over, pull up loop to working height) 2x in same space, yarn over, pull through all loops on hook
- WS
- wrong side
Repeat formats
- *….; rep from * once/twice/3x — Crochet the instructions after * and then repeat that section a further number of times as indicated.
- *…; rep to end — Crochet the instructions after * and then repeat that section to the end of the row or round.
- (…) once/twice/3x — Crochet the instructions between brackets the total number of times indicated.
- […] — Indicates the amount of stitches at the end of a row or round.
- (…) in same st/sp — Indicates that all instructions between brackets are worked in the same stitch or space.
Notes
- This week we use the following colours:
- Colour A: 26g
- Colour I: 8g
- Colour J: 5g
- Colour L: 5g
- Colour N: 8g
- Colour O: 10g
- Colour P: 5g
- Colour Q: 10g
- Colour R: 12g
- In most rows, you’ll make a ch1 before turning your blanket. This is a turning chain and does not count as a stitch. If you find a ch1 is too small, you can also make a ch2. This depends on how tight you crochet.
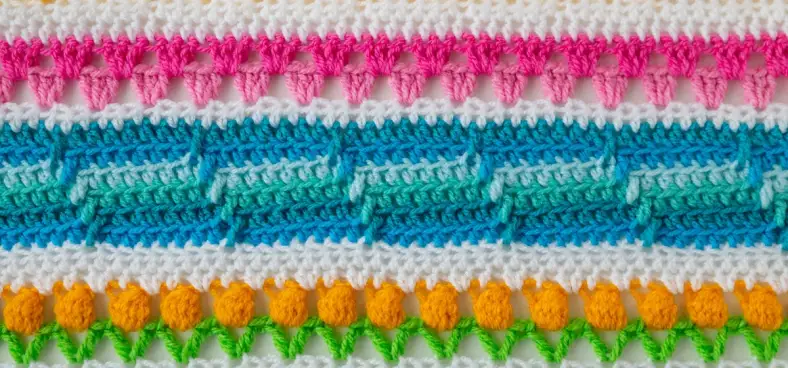
Colour layout
Techniques
To keep the pattern organised, I placed the stitch tutorials on separate pages:
Crochet pattern
Tulip stitch section 1
This floral addition is a combination of two separate stitches. You are combining a variant of the V-stitch with a bobble stitch to form a tulip shape. We’re working it in rows, but I can definitely see this stitch work in square motifs as well.
As you can see, this first row of the Tulip stitch is very much alike to the V stitch. You can see the leaves of each tulip forming. Next, we will make bobble stitches to form the tulip’s flower. Bobbles are yet another way of creating volume.
The white row will most likely pull a bit inward here, especially on top of the first and last bobble stitch. But that’s okay - we’ll sort it out with the edging.
Apache tear section 2
We’re making a second Apache Tear in this blanket. Don’t forget: if the sides flare out, you can crochet sc and slip stitches instead of hdc at the beginning and end of the row!
If you feel grabbing the FL only is too loose, you can choose to grab both loops of the stitch as well, or even the loop below the FL.
Granny Stripe section 4
For good measure, another Granny Stripe section!
You might have noticed that we have 218 stitches in this row. We’ll fix that in the next row.
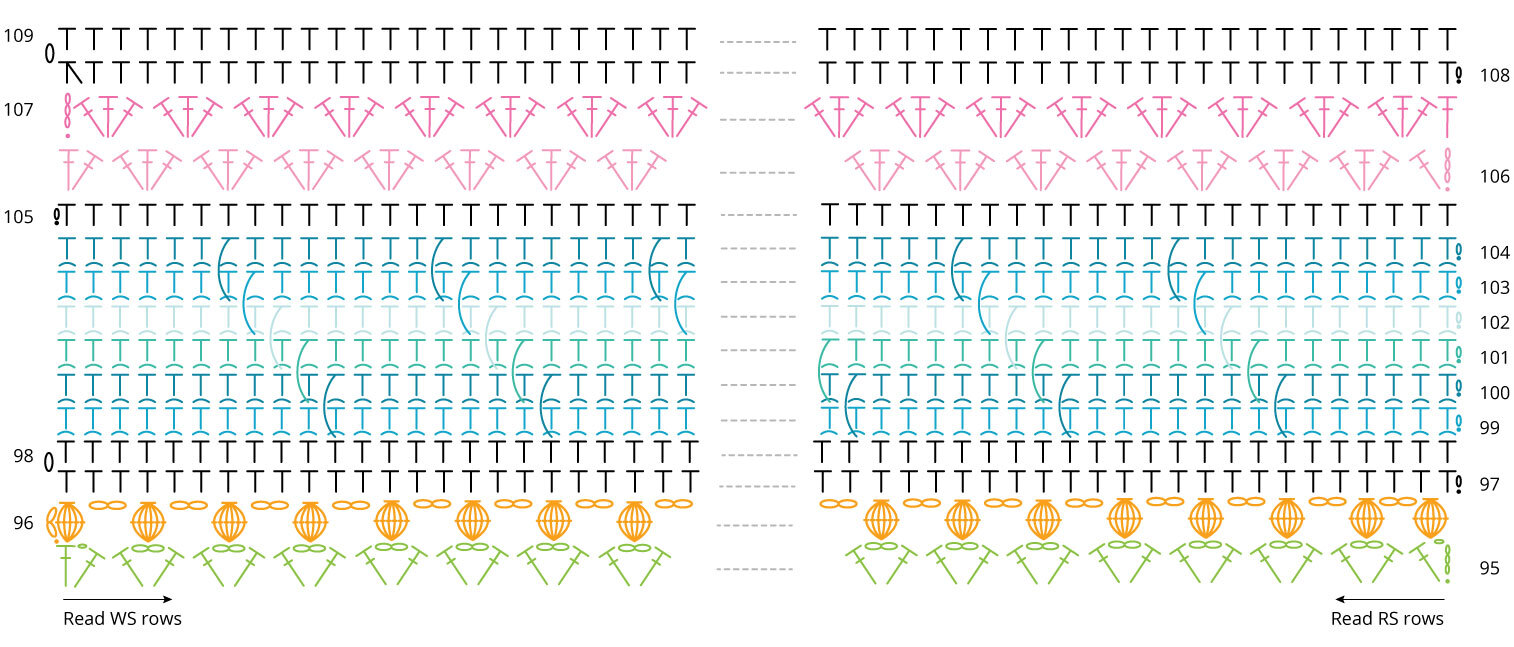
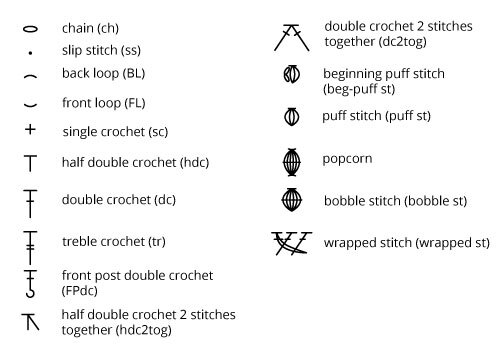
Diagrams
You might also like
Comments
Kelly Stamper
November 02, 2023 16:46
Kirsten
November 03, 2023 08:34
Kelly Stamper
November 04, 2023 16:59