Rainbow Sampler Blanket 2 (Part 9)
23.Nov.23 / Kirsten BalleringAre you ready to continue your Sampler adventure? The Rainbow Sampler Blanket 2 features more stitches, vibrant colours, and a sprinkle of yarn magic.
Designed for adventurous beginners who want to take their crochet skills to the next level, this blanket teaches you everything you need to know about more advanced stitch patterns.
Other pattern parts can be found here:
Materials and preparation
Yarn
Original Colours
Scheepjes Colour Crafter (100% Premium Acrylic, 100g/300m)- Colour A: 1001 Weert x 6 balls
- Colour B: 1132 Leek x 1 ball
- Colour C: 1083 Tilburg x 1 ball
- Colour D: 1123 Roermond x 1 ball
- Colour E: 2004 Brussel x 1 ball
- Colour F: 1277 Amstelveen x 1 ball
- Colour G: 1432 Heerlen x 1 ball
- Colour H: 1130 Sittard x 1 ball
- Colour I: 1241 Den Bosch x 1 ball
- Colour J: 1821 Terneuzen x 1 ball
- Colour K: 1725 Ameland x 1 ball
- Colour L: 1422 Eelde x 1 ball
- Colour M: 2009 Kortrijk x 1 ball
- Colour N: 2006 Luik x 1 ball
- Colour O: 1068 Den Helder x 1 ball
- Colour P: 1034 Urk x 1 ball
- Colour Q: 2015 Bastogne x 1 ball
- Colour R: 1114 Eindhoven x 1 ball
- Colour S: 1263 Leerdam x 1 ball

Shop the yarn!
If you're looking for Colour Crafter, you can find it at your local retailer or online through one of these links:
Crochet hook
5.0mm (US size H/8).
Measurements
The blanket measures 170 x 210cm (67 x 82 ½in) after blocking.
Gauge/tension
See pattern of part 1 for gauge information.
Notes
- The used colours this week are:
- Colour A: 47g
- Colour F: 22g
- Colour G: 33g
- Colour I: 10g
- Colour J: 11g
- Colour K: 11g
- Colour L: 11g
- Colour M: 22g
- Colour N: 10g
- In most rows, you’ll make a ch1 before turning your blanket. This is a turning chain and does not count as a stitch. If you find a ch1 is too small, you can also make a ch2. This depends on how tight you crochet.
Abbreviations (US terms)
- begin-bobble: ch2, (yarn over, insert hook in stitch, yarn over, pull up loop, yarn over, pull through two loops on hook) 5x in the same stitch or space, yarn over, pull through all loops on hook
- begin-puff stitch: ch1, (yarn over, insert hook in stitch, yarn over, pull up loop) 3x in the same stitch, yarn over, pull through all loops on hook
- BLO: back loop only
- bobble: (yarn over, insert hook in stitch, yarn over, pull up loop, yarn over, pull through two loops on hook) 6x in the same stitch, yarn over, pull through all loops on hook
- ch: chain(s)
- dc: double crochet
- dc2tog: double crochet 2 stitches together to decrease the stitch count by 1: (yarn over, insert hook in stitch, yarn over, pull up loop, yarn over, pull through first two loops on hook) once in each of two stitches, yarn over, pull through all loops on hook
- dc3tog: double crochet 3 stitches together to decrease the stitch count by 2: (yarn over, insert hook in stitch, yarn over, pull up loop, yarn over, pull through first two loops on hook) once in each of three stitches, yarn over, pull through all loops on hook
- dc7tog: double crochet 7 stitches together to decrease the stitch count by 6: (yarn over, insert hook in stitch, yarn over, pull up loop, yarn over, pull through first two loops on hook) once in each of seven stitches, yarn over, pull through all loops on hook
- FL: front loop
- FPdc: front post double crochet: Yarn over, insert your hook around the post of the stitch indicated in the pattern, yarn over, pull up a loop, yarn over, pull through first two loops on hook, yarn over, pull through all loops on hook
- hdc: half double crochet
- hdc2tog: half double crochet 2 stitches together to decrease the stitch count by 1: (yarn over, insert hook in stitch, yarn over, pull up loop) in each of two stitches, yarn over, pull through all loops on hook
- popcorn: 6dc in same stitch, remove hook from loop, insert hook from front to back through first dc, pick up loop, pull through dc to close popcorn
- puff stitch: (yarn over, insert hook in stitch, yarn over, pull up loop) 4x in the same stitch, yarn over, pull through all loops on hook
- RS: right side
- sc: single crochet
- ss: slip stitch
- s(ts): stitch(es)
- tr: treble crochet
- wrapped st: wrapped stitch: (yarn over, insert hook in stitch, yarn over, pull up loop to working height) 2x in same space, yarn over, pull through all loops on hook
- WS: wrong side
Repeat formats
- *….; rep from * once/twice/3x Crochet the instructions after * and then repeat that section a further number of times as indicated.
- *…; rep to end Crochet the instructions after * and then repeat that section to the end of the row or round.
- (…) once/twice/3x Crochet the instructions between brackets the total number of times indicated.
- […] Indicates the amount of stitches at the end of a row or round.
- (…) in same st/sp Indicates that all instructions between brackets are worked in the same stitch or space.
Colour layout

Crochet pattern
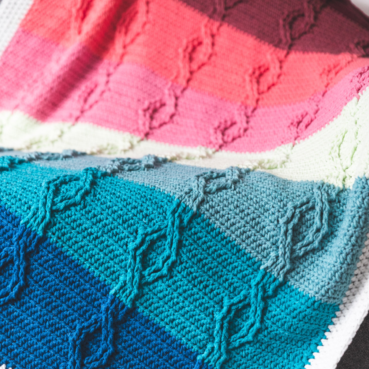
Wrapped stitch section 2
I’ve thrown in another wrapped section. I hope you enjoyed them last time!
Row 146 (RS) Join Colour J with a ss in first stitch, ch3 (counts as first dc), 1dc, *skip next stitch, 2dc, wrapped st in skipped stitch before 2dc; repeat from * another 70 times, 2dc, cut yarn, turn. [71 wrapped clusters, 4 dc]
You’ll find that the double wrap gives the stitch a bit more body.
For the next wrapped rows, I like to modify the stitch slightly so the wraps align better.
Right before I make the first wrap of the row (so after making the two regular dc’s) I do not skip a stitch. Instead, I just make two more dc (the first two of the wrapped stitch) and then insert my hook into the second of the regular dc’s space. After that, I continue as the pattern says by skipping the next stitch, making two dc, and making a wrapped stitch in the skipped stitch.
After my last block of the row, I added that missed skipped stitch again and crocheted 2 dc in the last 2 dc’s, just as the pattern says. It totals 217 stitches, but we have moved all the blocks one stitch to the beginning of the row. This makes your wraps align better, but it is a bit complicated to explain. I added a few photos about this in the Wrapped Stitch tutorial to explain better.
Not your cup of tea? Simply repeat the instructions for the next wrapped rows as written down in the pattern.
Row 147 (WS) Join Colour K with a ss in first stitch, repeat Row 146. [71 wrapped clusters, 4 dc]
Row 148 (RS) Join Colour L with a ss in first stitch, repeat Row 146. [71 wrapped clusters, 4 dc]
Row 149 (WS) Join Colour A with a ss in first st, ch1, 1hdc in same st, 216hdc, ch1, turn. [217 hdc]
Row 150 (RS) 217hdc, ch1, turn. [217 hdc]
Row 151 (WS) 217hdc, cut yarn, turn. [217 hdc]
Puff stitch section 3
Compare this row to the wrapped section - which type of volume do you like better? The compact puffiness of the puff stitch, or the soft supple puff of the wrapped stitch?
Row 152 (RS) Join Colour N with a ss in the first stitch, begin-puff st in same st, *ch1, skip 1 st, puff st; repeat from * another 106 times, ch1, skip 1 st, 1dc in last stitch, cut yarn, turn. [1 begin-puff st, 107 puff sts, 108 ch, 1 dc]
If you look closely at your stitches, you can see that the chains you’re crocheting look like they’re laying on top of the puff stitches!
Row 153 (WS) Join Colour A with a ss in the first dc, ch1, *1hdc in same st, 1hdc in next puff st; repeat from * another 107 times, 1hdc in last dc, cut yarn, turn. [217 hdc]
Row 154 (RS) With Colour I, repeat Row 152. [1 begin-puff st, 107 puff sts, 108 ch, 1 dc]
Row 155 (WS) With Colour A, repeat Row 153. [217 hdc]
Row 156 (RS) 217hdc, ch1, turn. [217 hdc]
Row 157 (WS) 217hdc, cut yarn, turn. [217 hdc]
Alpine stitch section 1
The Alpine stitch is a wonderful stitch that works well in a gradient. It’s a repeating combination of Front Post dc’s and regular dc’s with a mesmerising effect.
Row 158 (RS) Join Colour G with a ss in the first stitch, ch3 (counts as first dc), 216dc, ch1, turn. [217 dc]
Row 159 (WS) 217sc, cut yarn, turn. [217 sc]
Row 160 (RS) Join Colour F with a ss in the first stitch, ch2 (counts as first dc), *1FPdc around dc 2 rows below, skip next stitch on current row, 1dc in next stitch; repeat from * another 106 times, 1FPdc around dc 2 rows below, 1hdc in last stitch, ch1, turn. [108 FPdc, 108 dc, 1 hdc, 217 stitches in total]
The final stitch in a FPdc row is a hdc. This keeps the row ends from puckering!
Row 161 (WS) Repeat Row 159. [217 sc]
Row 162 (RS) Join Colour M with a ss in the first stitch, ch2 (counts as first dc), *1dc, 1FPdc around dc 2 rows below, skip next stitch on current row; repeat from * another 106 times, 1dc, 1hdc in last st, ch1, turn. [107 FPdc, 109 dc, 1 hdc]
Row 163 (WS) Repeat Row 159. [217 sc]
Row 164 (RS) With Colour G, repeat Row 160. [108 FPdc, 108 dc, 1 hdc]
Row 165 (WS) Repeat Row 159. [217 sc]
Row 166 (RS) With Colour F, repeat Row 162. [107 FPdc, 109 dc, 1 hdc]
Row 167 (WS) Repeat Row 159. [217 sc]
Row 168 (RS) With Colour M, repeat Row 160. [108 FPdc, 108 dc, 1 hdc]
Row 169 (WS) Repeat Row 159. [217 sc]
Row 170 (RS) With Colour G, repeat Row 162. [107 FPdc, 109 dc, 1 hdc]
Row 171 (WS) Repeat Row 159. [217 sc]
Row 172 (RS) Join Colour A with a ss in first st, ch1, 1hdc in same st, 216hdc, ch1, turn. [217 hdc]
Row 173 (WS) 217hdc, cut yarn, turn. [217 hdc]
Diagram
Diagram Part 9

Key (US terms)


Comments
Be the first to comment to this post!